In 2019, Jean-Claude Deguara had explained the work of Milk VFX on the series Good Omens. He’s back today to tell us about his work on Sky‘s sci-fi series, Intergalactic.
How did you and Milk get involved on this series?
We were approached by Moonage Pictures to discuss a scenario where Milk might take responsibility for creating all the VFX for Intergalactic directly. We felt we could put all the money on the screen and add a huge amount of value and streamlined communication collaborating in this manner, as we have on several similar productions.
With Kieron Hawkes directing many episodes as well as taking a role as exec producer we quickly built up a trusting relationship which was key to the success of the project and we were on the same page visually from the very beginning.
How was the collaboration with the showrunners and the directors?
As well as working closely with Kieron, I collaborated with showrunner Julie Gearey (Prisoner’s Wives), production designer Mark Geraghty and executive producer Iona Vrolyk as well as China Moo-Young who directed episodes 6, 7 and 8.
Kieron and Mark’s overall vision for the series was really distinctive and we began work on our first recce for ‘London’ in Spain in 2019. That was my jumping off point for the complex London sequence and set the tone for the entire series.
We had just finished shooting (at Space Studios and nearby in Manchester and also on location in Spain) as lockdown began in 2020 and we all began working and collaborating remotely as we continued on shot production. I led the VFX teams at Milk and Egg in Dublin to deliver the entire project remotely on a tight schedule in December 2020.
What was their approach and expectations about the visual effects?
As soon as I saw Mark and Kieron’s early concepts for dystopian future London, I could see how we were going to tackle it creatively.
Likewise, they understood immediately how visual effects could enhance and support their vision and the distinctive look they wanted for the series. Intergalactic moves quickly – it’s a constant journey from planet to planet and rarely goes back – with the exception of New and Old London. So we needed to have maximum impact and be very clear where our focus would be.
The brief required us to create an exceptionally broad range of work – 850 shots across across eight episodes; spanning stunning planet and complex city environments featuring well known landmarks; an FX focused desert storm, a spaceship crash in the desert; a submerged planet; a space walk including complex water and bubble elements and hyperspace travel, in addition to creatures (space chicks) and character enhancements. Every episode threw up a different technique that got another department busy. Modeling in episode one with London was huge while episode 2 was massive for effects for example.

How did you organize the work with your VFX Producer?
I worked very closely with Kat Mann, our in-house VFX Producer throughout. We went into lockdown just as the last episode had been shot and she and our production team did an absolutely stellar job throughout lockdown keeping things moving at pace in the tricky circumstances we all found ourselves in.
What are the main challenges with a sci-fi TV show?
Making sure the focus is firmly on the most impactful story points and the client’s budget is used as effectively as possible. And ensuring ‘alien’ environments and creatures are as ‘fantastical ’as the director envisages them yet remaining just grounded enough to feel credible to audiences.
A great example of this would be the frequent hyperspace travel in the series…to ensure its visual integrity, myself and executive producer Iona Vrolyk consulted BBC Sky At Night space scientist Dr Maggie Aderin-Pocock MBE about the science of space, hyperspace travel and the folding of space time known as the ‘Alcubierre drive’ – named after theoretical physicist Miguel Alcubierre.
We spent an absolutely fascinating two or so hours chatting to Dr Maggie about how hyperspace travel would look. She kept it simple so that it was clear for me! This allowed our artists to develop concepts representing how these elements would actually behave, to ensure the VFX supported the storytelling as ‘realistically’ as possible. We created a bubble-like effect around the Hemlock to represent the folding of space time and we then expanded it to feel like an ocean. To visualise a giant bubble on screen might look a bit boring but just from talking to Maggie we went down that route and then made the scale of it massive, so in our conception time and space travel basically resembles a huge ocean rippling when anything interacts with it.

How did you work with the art department to design the various ships and environments?
Kieron and Mark’s team supplied concepts for the key planet environments, spaceships and props. They were already building the main spaceship – a prisoner transport ship named the Hemlock – when we came on board and they had all the key art for each episode. We jumped in and collaborated with them. In particular our team developed the concepts for the space chicks in episode 4 and the Jupiter Cruisers – the smaller transport spaceships. These needed to be in keeping with the style of the Commonworld, the sleek modern ‘new’ upper part of London.
In addition, the hero vehicle – Ash’s Police Pod – which we see swooping through both parts of London – went through a lot of changes as we matched it to the practical prop and then developed it in subtle ways to enhance the look and feel of it.
Can you explain in detail about the creation of the ship?
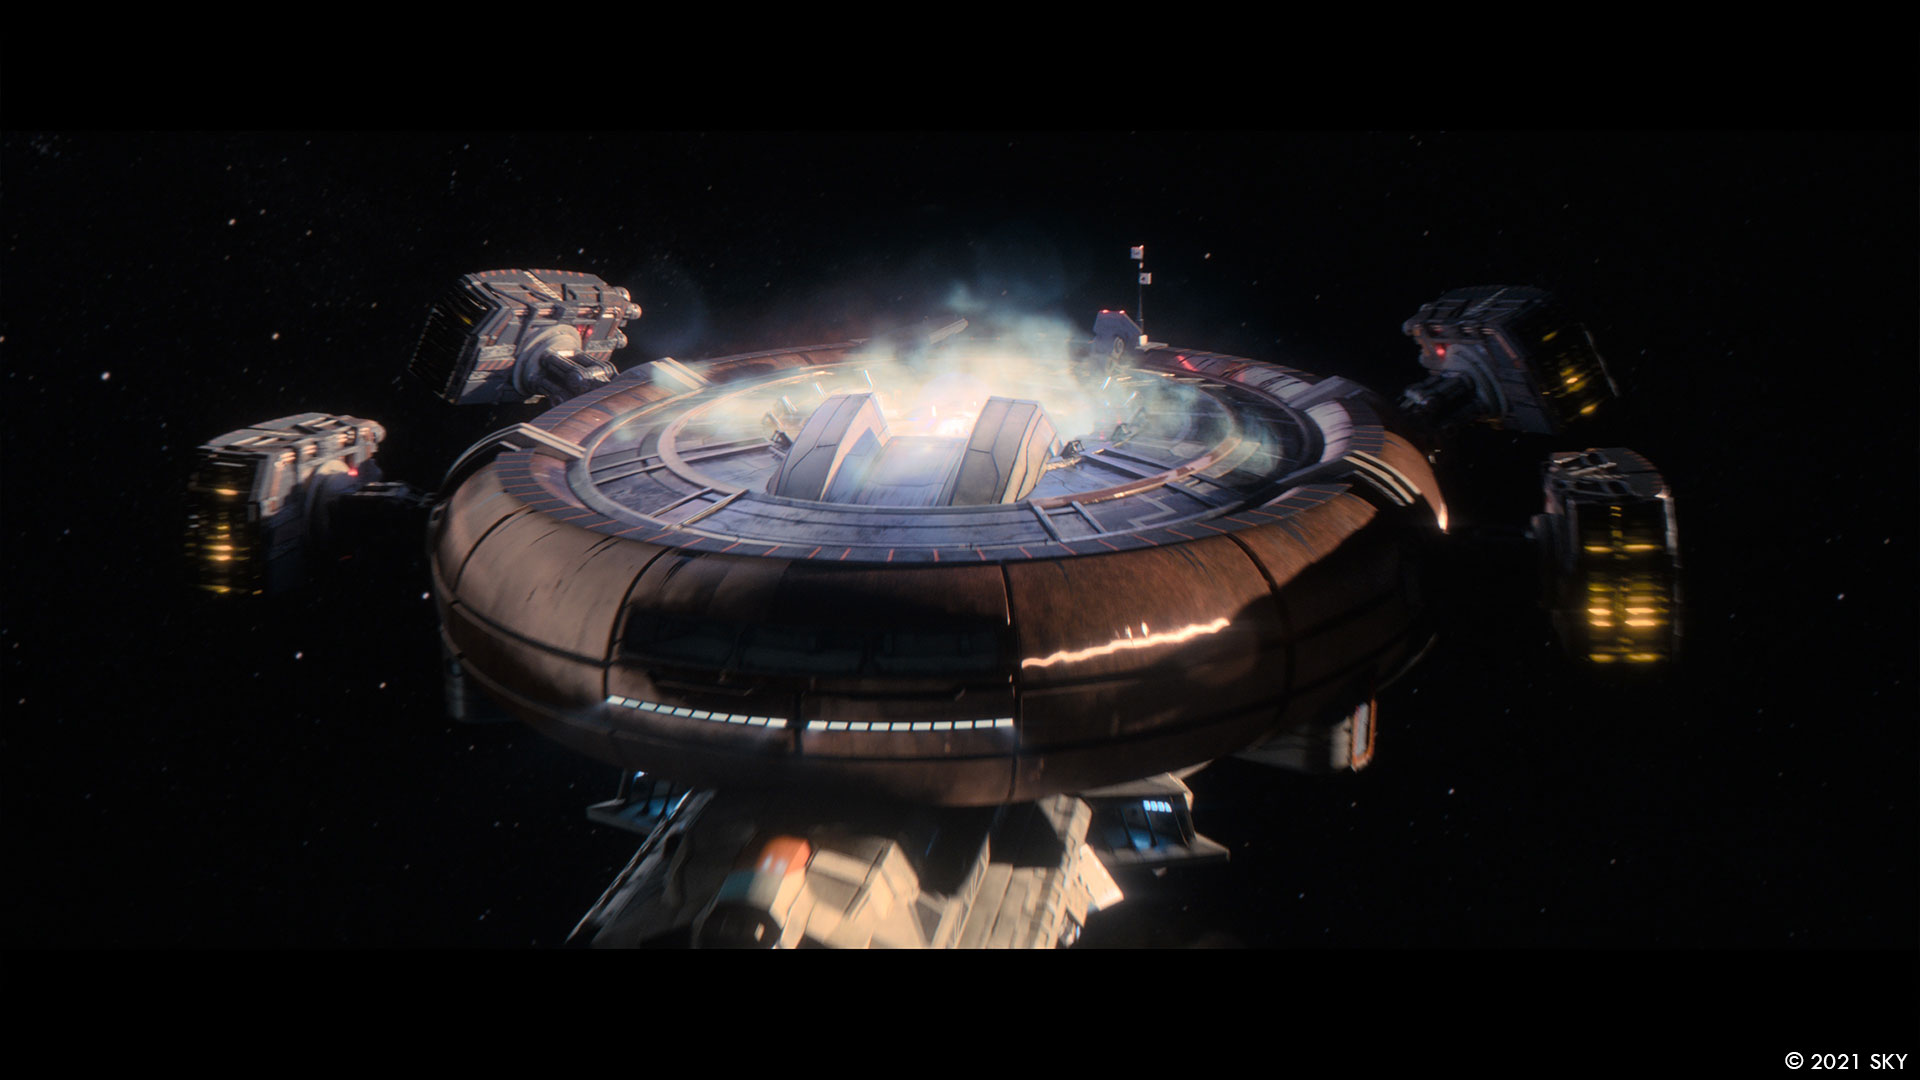
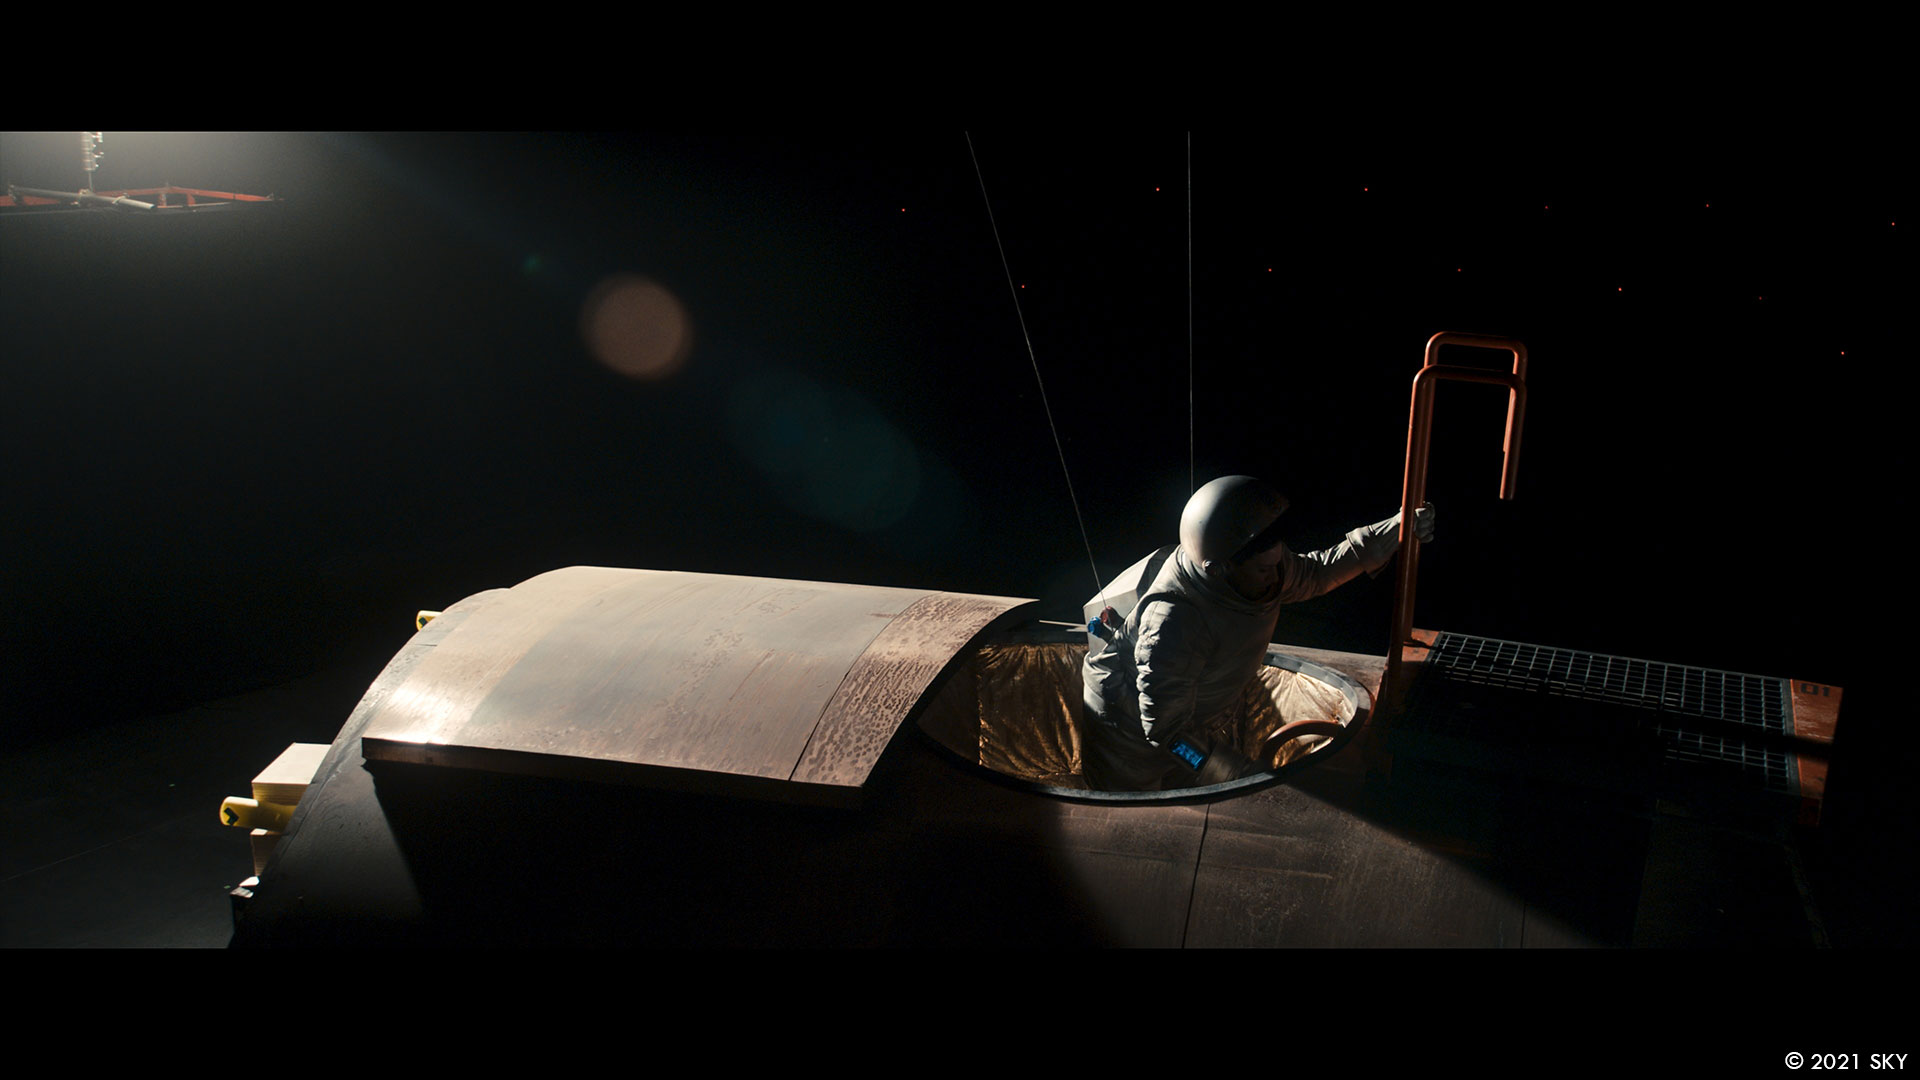
The Hemlock is a nuts and bolts ship that transports prisoners so it needed to have a rugged feel to it. We already had the initial concepts and several sections of the ship were built on set. From these built sections we received lidar scans of the top of the cockpit (built on set in Manchester), and the bottom of the cockpit (from the set in Spain). The rear hangar and the ring of corridors going around the top of the ship were also built as a set, so we had all the main proportions and measurements of the overall ship. The main purpose of the Hemlock was to look functional and worn. It was built to be more industrial and heavy duty with its large engines on the side and chunky landing gear. For the space walk sequence in episode 8 we gave all the dimensions of our model for the top of the ship to be recreated on set. We then used our 3d model as an extension, adding more detail to create a large hero patch.
How did you create the various shaders and textures for the ship?
The Hemlock had to look used and worn so we added layers of dirt, oil drips and scratches in the textures. The biggest challenge was to balance the shiny copper ring with the dirtier duller, more angular lower half. After the Hemlock crashes on the planet Pau Rosa in episode 2, we needed a crashed version, adding many more scratches from the impact with the trees across the copper and more dirt and scratches across the lower half.
London has changed a lot in this show. Can you elaborate about the creation of this new version?
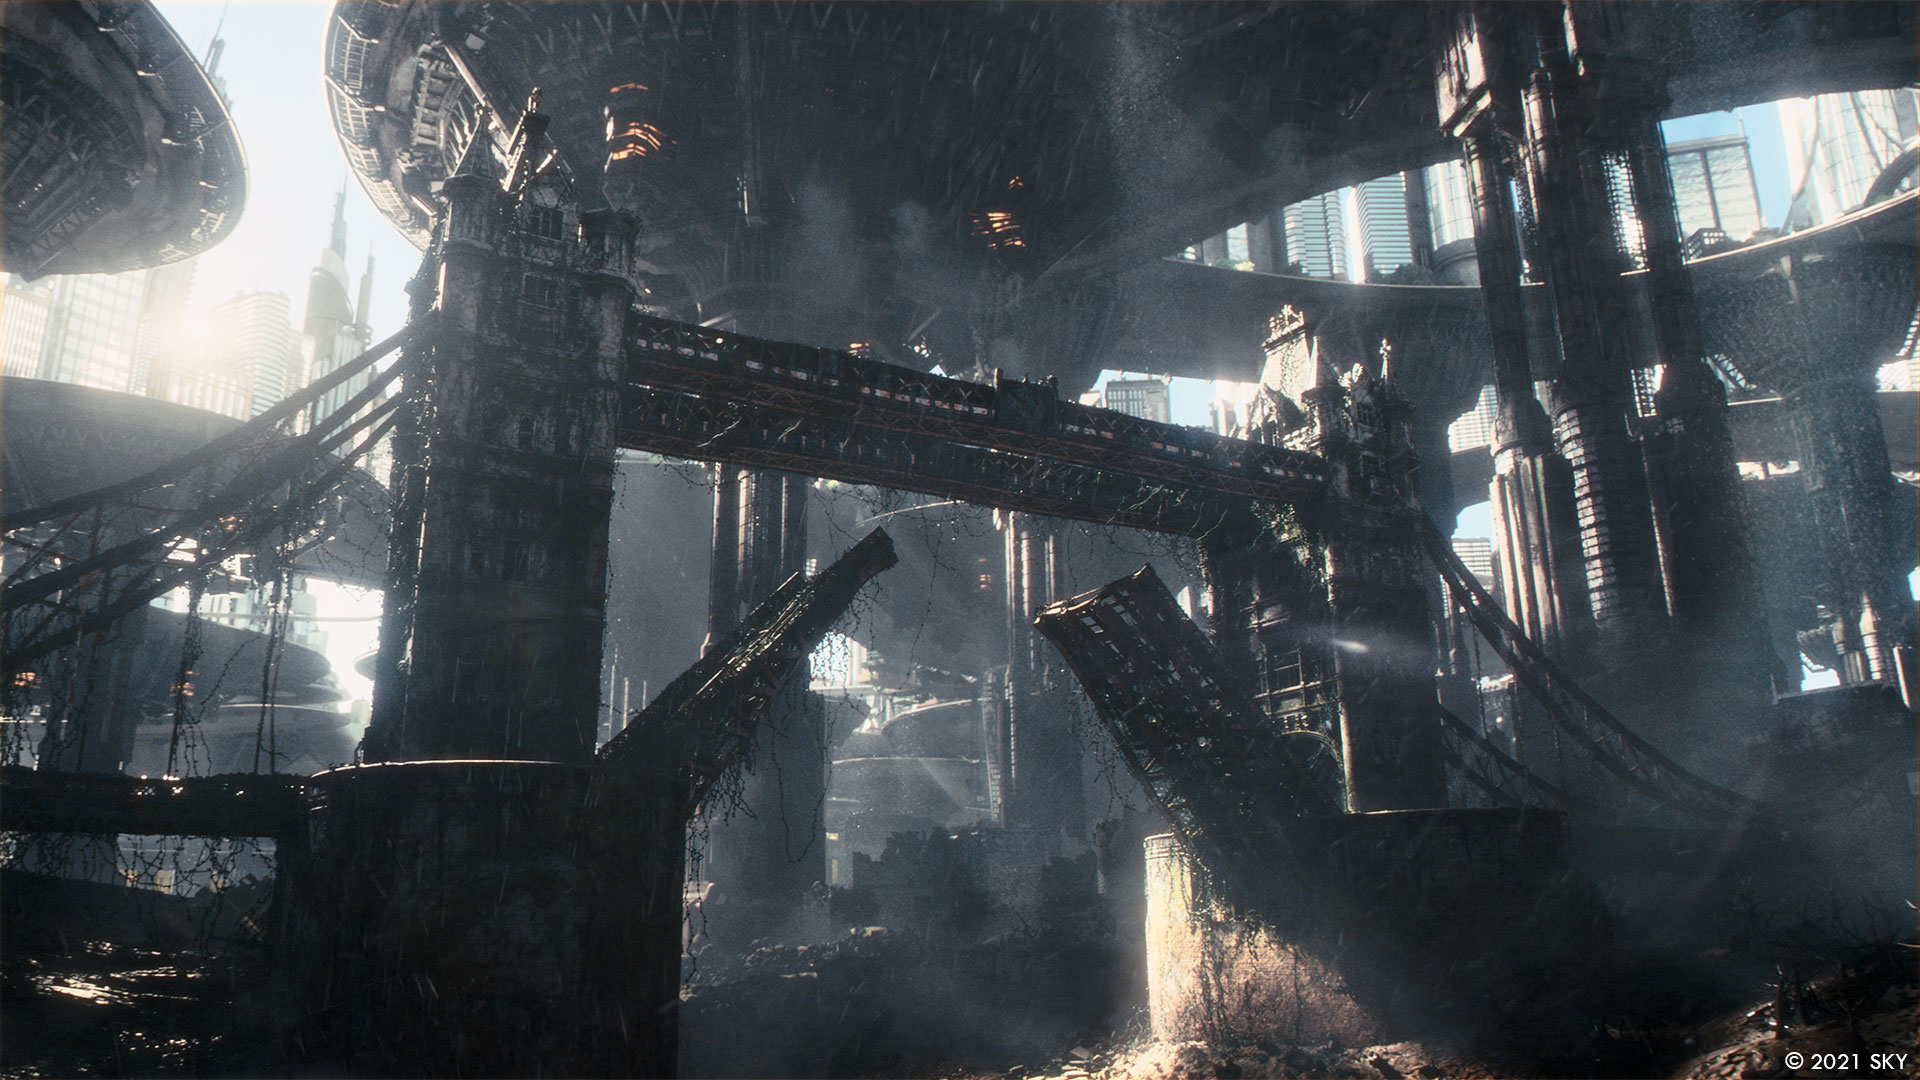
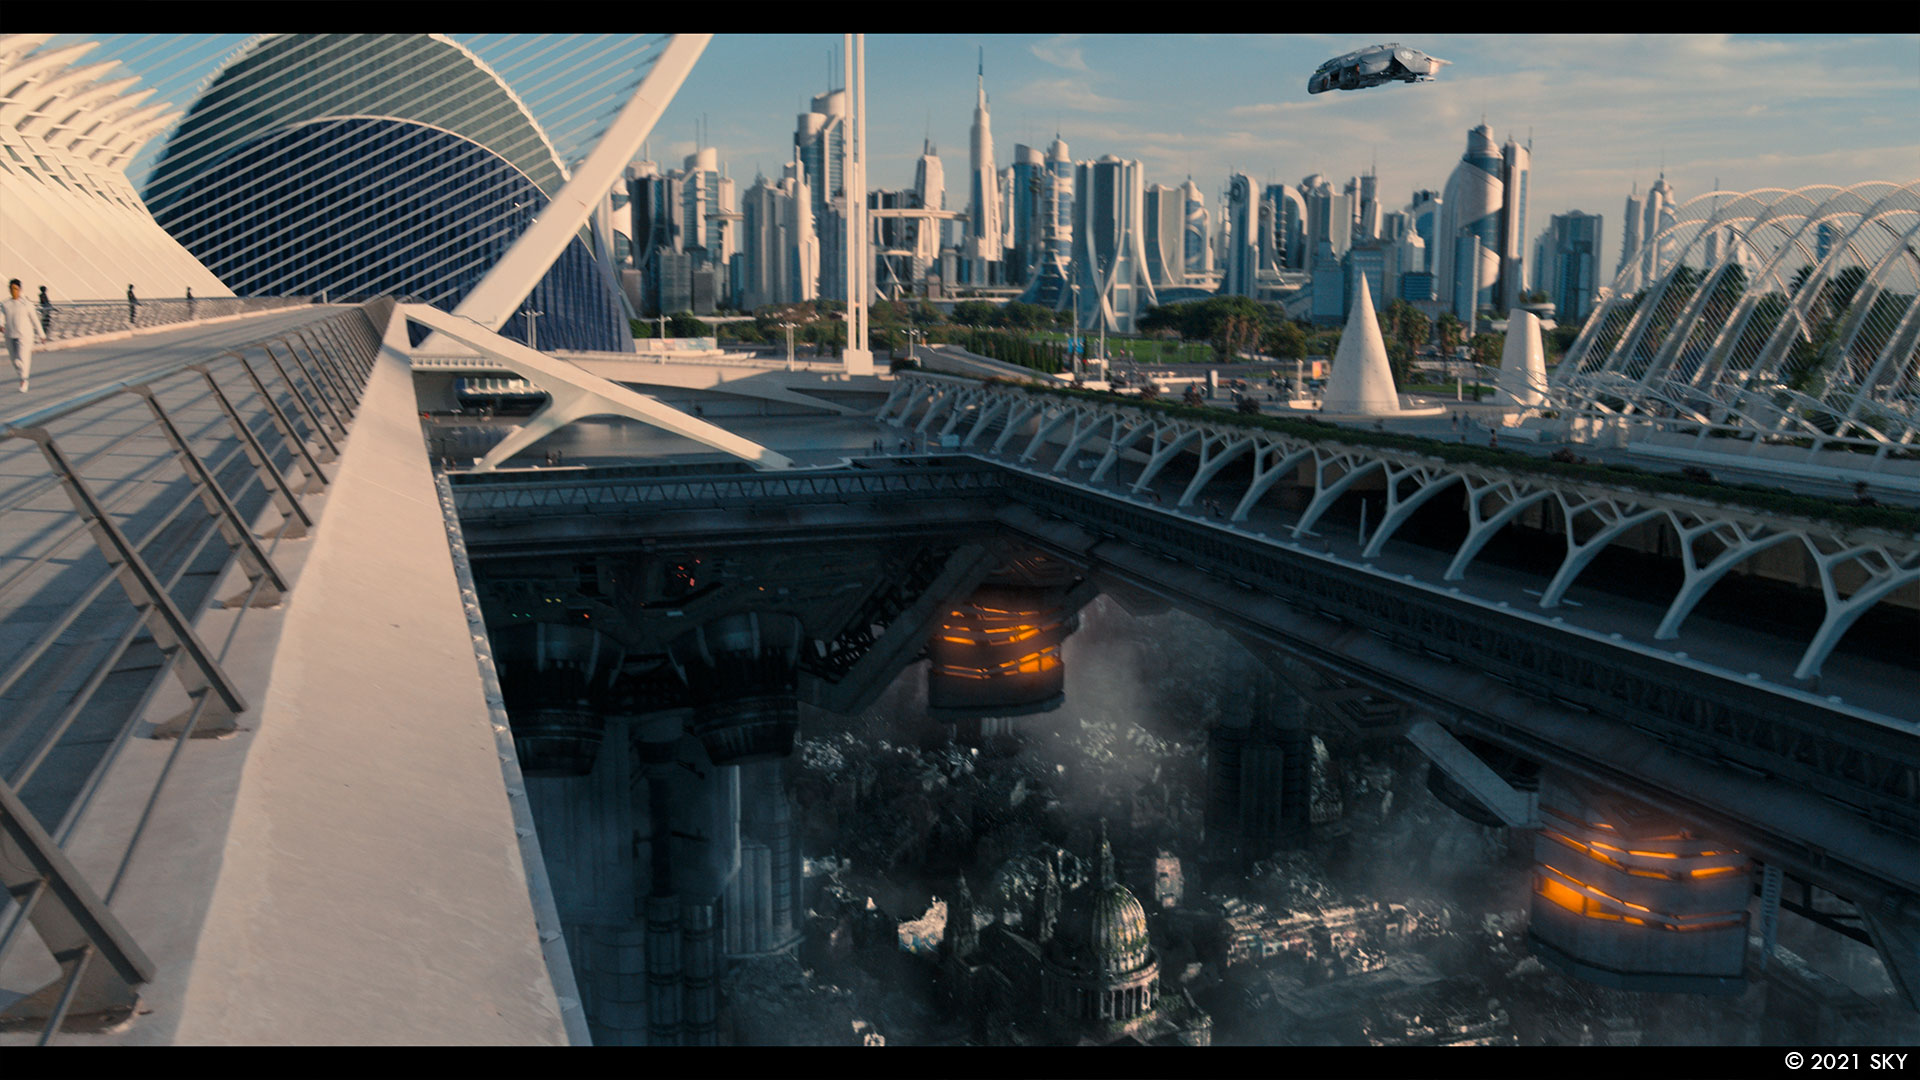
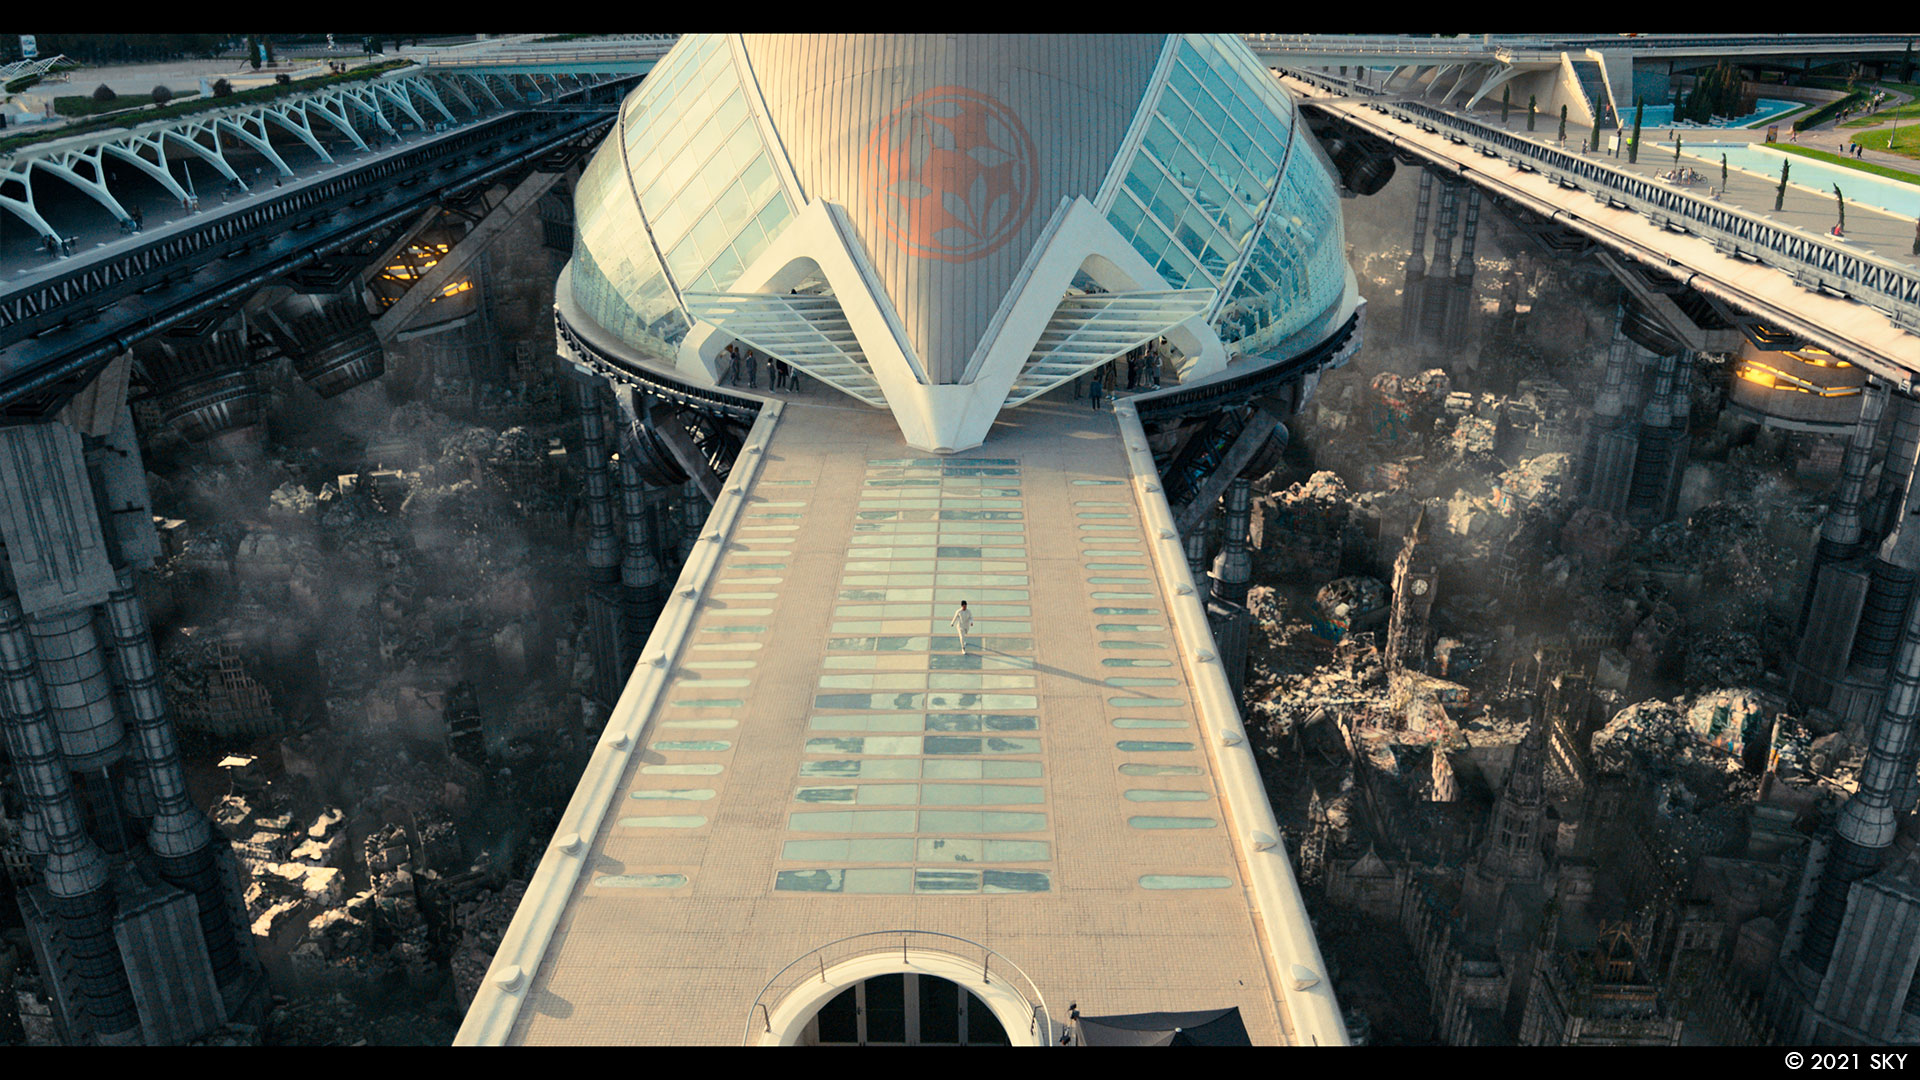
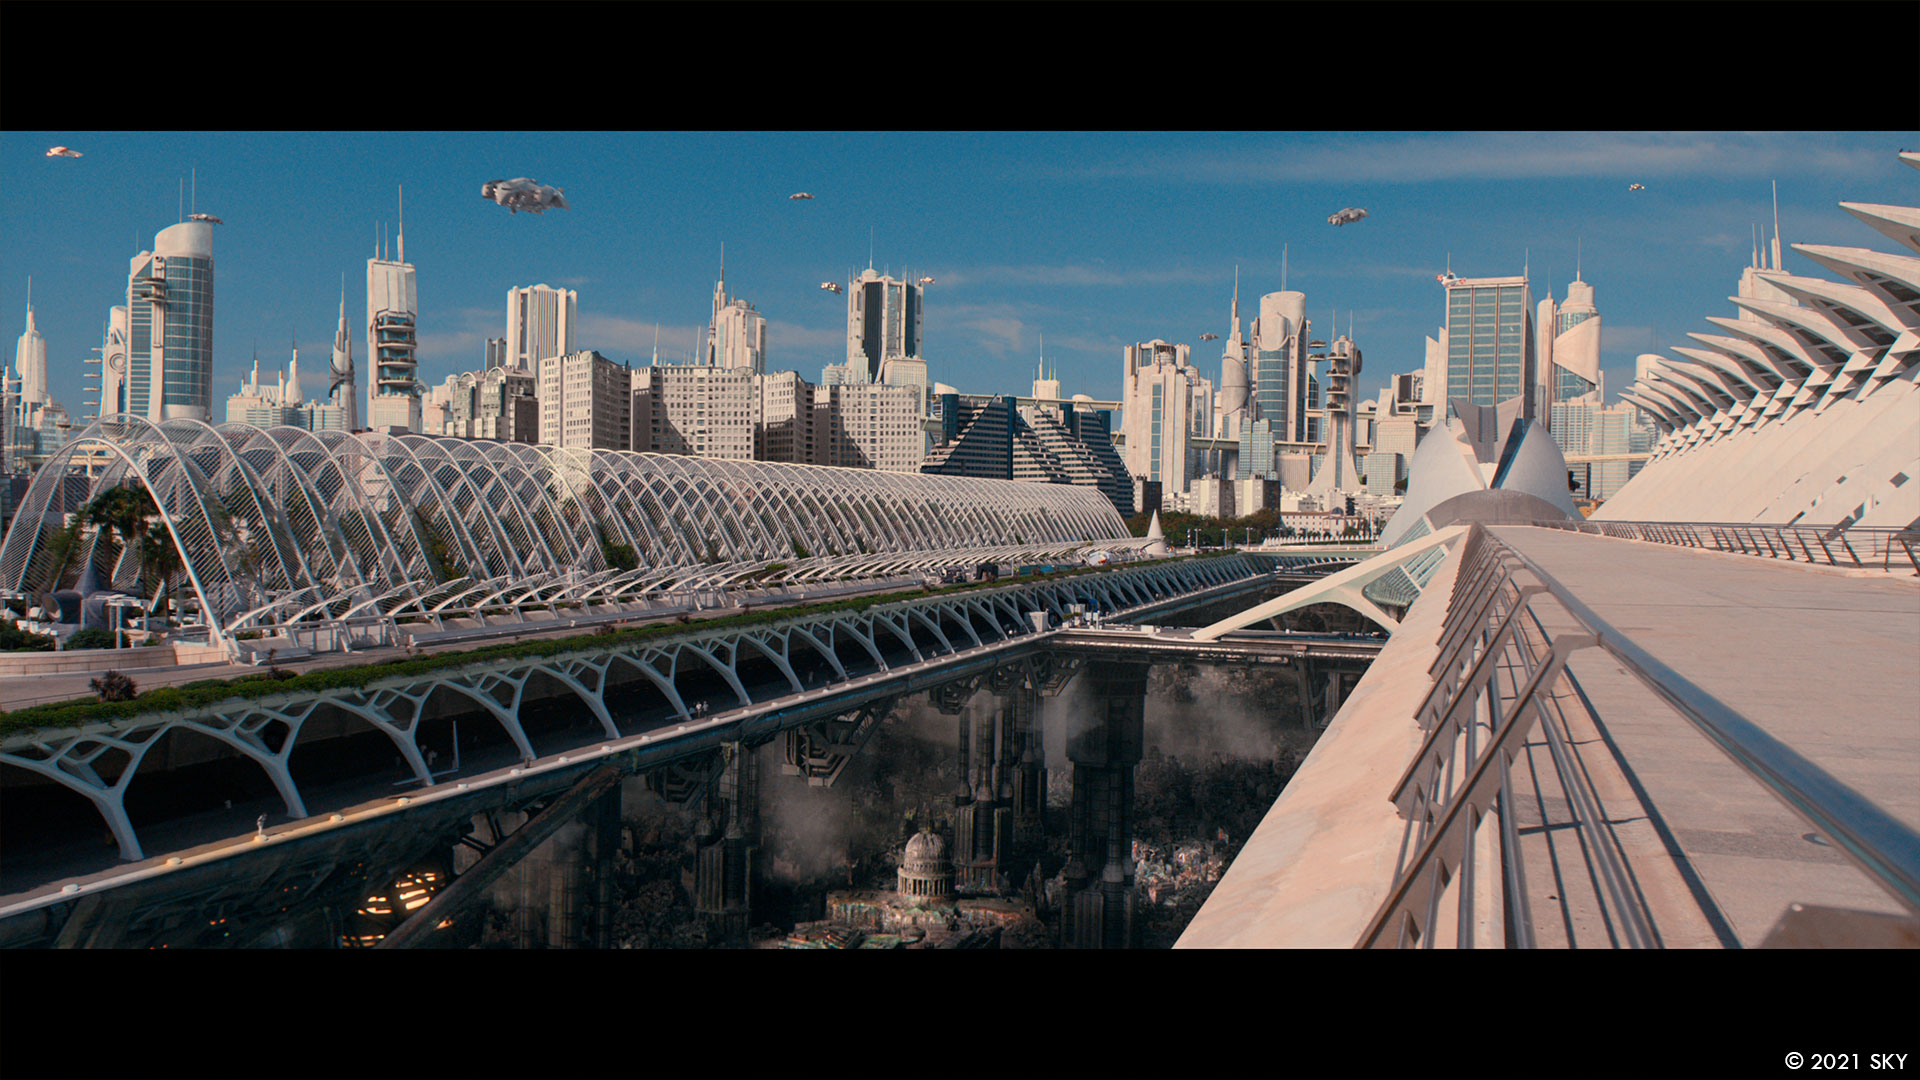
One of the biggest challenges was the visually evocative episode one opening sequence, which needed to have maximum impact. It required the creation of a full CG, wide panorama of a dystopian future London that had emerged from floodwater and was surrounded by a giant dam and in the shadow of hundreds of giant buildings; supporting the futuristic ‘new London’; (the ‘Commonworld’) built high up above. The depth of the old London buildings was over three hundred metres – twice the depth of the English channel!
The shots featured well known London landmarks – Westminster, St Paul’s, Tower Bridge – which all had to be accurately portrayed with a level of dilapidation that reflected the time that had passed as well as the flooding. Plus there was a whole cityscape of futuristic ‘new London’ buildings up above, to be constructed with giant skyscrapers, floating platforms, roads and monorails – to enhance the location shoot at futuristic ‘City of Arts and Sciences’ complex in Valencia, Spain.
There was also a desire to have a lot of atmosphere – shafts of volumetric light, clouds of dust, fog, steam from the engines of the platforms, low level vegetation and falling debris.
Although this had originally been envisaged as more of a dmp based sequence, it was built in 3d with a small team of assets artists, to allow a high level of detail in the shots.
A group of generic buildings was procedurally destroyed and thousands of these were placed around the scene to form the base of the old city. The landmark buildings were surrounded with debris and covered in ivy. Lighting was finessed to reveal enough of the painstakingly crafted detail and to give it scale, but meanwhile to allow the sense of threat and mystery to come across as well.
The hero vehicle – Ash’s Police Pod – which we see swooping through both parts of the city – went through a lot of changes as we matched it to the practical prop (a full-size replica shot on a gimbal) and then developed it in subtle ways to enhance the look and feel of it. Kieron and I planned out the moves of the craft and shot practicals against green screen as well as full CG versions. The trick here was matching the light reflections between practical and CG shots for the cockpit.
What kind of influences and references did you receive for London and the other environments?
As soon as I met Mark and Kieron on a recce in Valencia, Spain and saw their early concepts for the future London, I could see how we were going to tackle it creatively and this was the real jumping off point for me for the entire series. The level of decay, dilapidation and atmosphere of Old London was clear with the stark contrast of the clean, futuristic new London up above.
The concept artwork from the Mark Geraghty and his production design team was indicative of the ambition of the entire show, but still required shaping to fit the footage that was shot, the aesthetic of the show as it developed and not least the practical requirements of getting it built and delivered in the timeframe; all during lockdown.
The original storyboard barely changed from first viewing to pre-viz to final shot, which is quite rare. We all saw eye to eye on the aesthetic ambition. Mark would supply the concepts and we adapted them in close collaboration with him and his team.
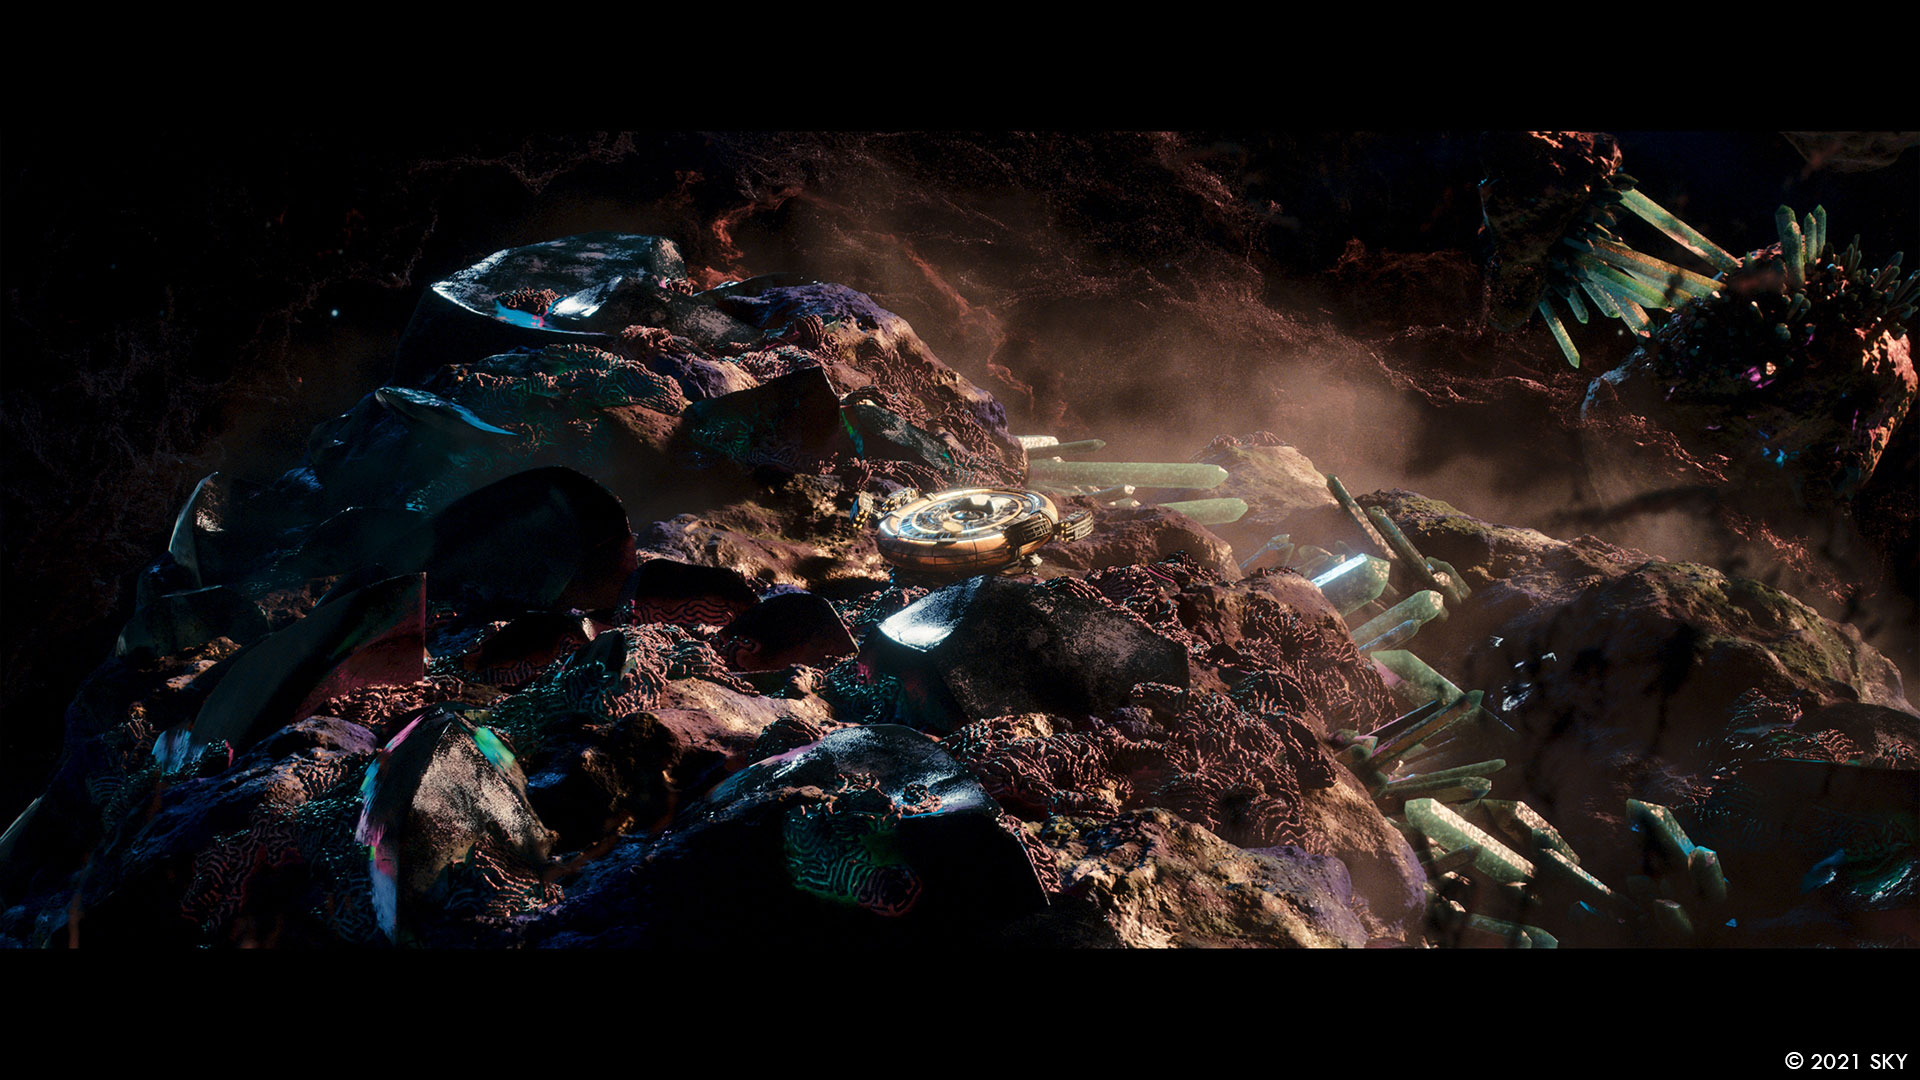
For the planet Pau Rosa, where the Hemlock crash lands in episode 2, Iona (Vrolyk) and Julie (Geary) were very specific about the look they wanted – foresty but with an alien feel to it.
For the prison planet, Nar 59 which features in episode 3 , Mark supplied some twirly-shaped rock structures which had the look of ink in water and we adapted it in collaboration with him to work with the plates that were shot. We made sure that the rocks and grass at the reservoir (in Oldham near Manchester) where we shot the plates for Nar 59 blended into the structures we created.
Did you use procedural tools for the environments?
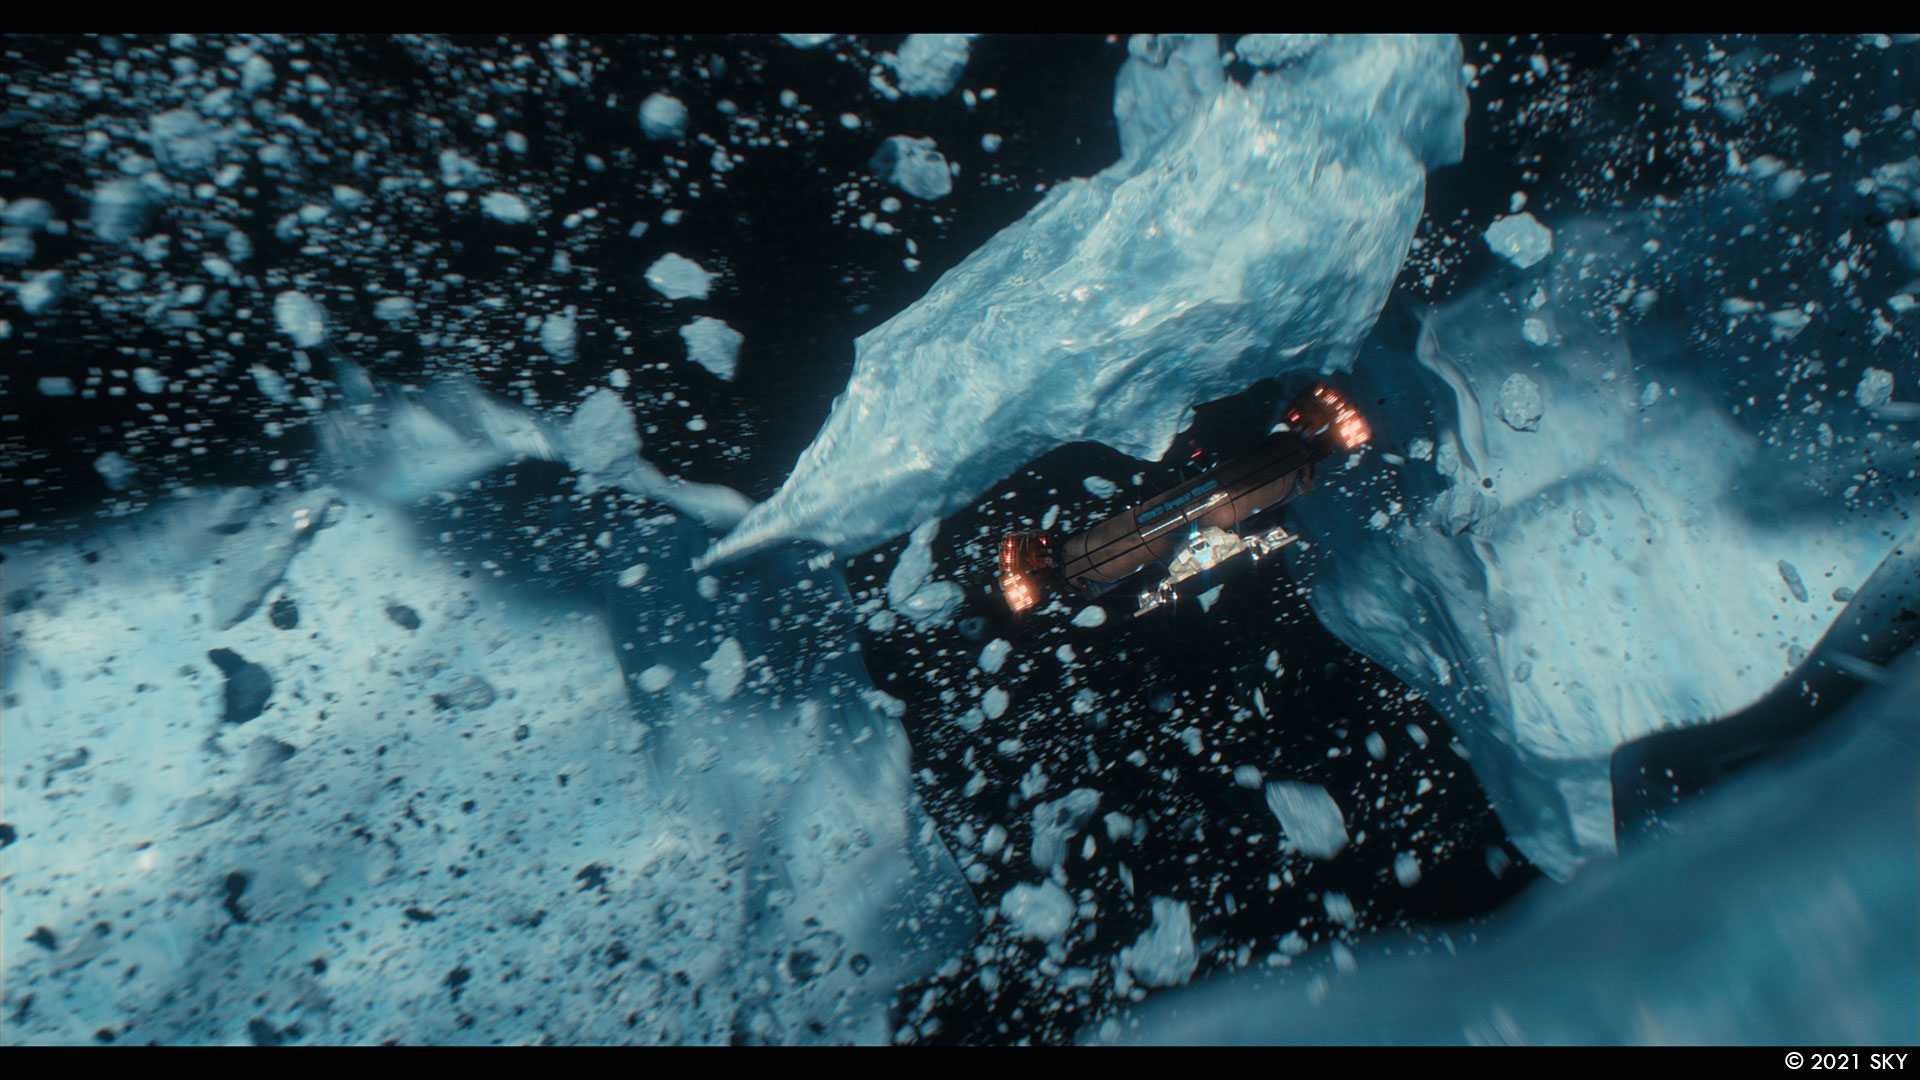
We used Houdini for most of the procedural work on Old London, Hestia Reef (a beautiful asteroid field known as the ‘wonders of the universe’ with coral-reefs and geysers in episode 4) and Kelp (a partially submerged planet in episode 7) but we did write a tool to aid us with the layout of the large environments, we were trying to emulate a USD-style workflow. We needed a way to layout the scenes but use gpu caches to keep the scenes light and then rebuild them for lighting with the published lookdev files loaded in the same place. We wrote a tool that would export the transforms of any node in a scene in a certain set and when the scene was rebuilt, using Shotgun, we could import the transform data which would populate the scene with the correct latest asset in the correct position in worldspace and in the same hierarchy. This proved very useful as we could publish a master layout of the environment and when we were in the shot phase we could tweak the layout per shot, publish it and it would override the master layout and when the shots were rebuilt it would always update with the latest lookdev. This also meant we could separate the modelling, texturing and lookdev of the assets out, publish them at the origin so working simultaneously on the assets and layout, which meant the environments were completed in a modular fashion.
Which one was the most complicated to create and why?
London most definitely – due to its complexity as I’ve described – with old dilapidated London hundreds of metres down below and sleek new London soaring up above and the landmarks and geography which needed to be accurate. We return to London more than once during the series with different aspects seen each time.
How did you create the water simulations?
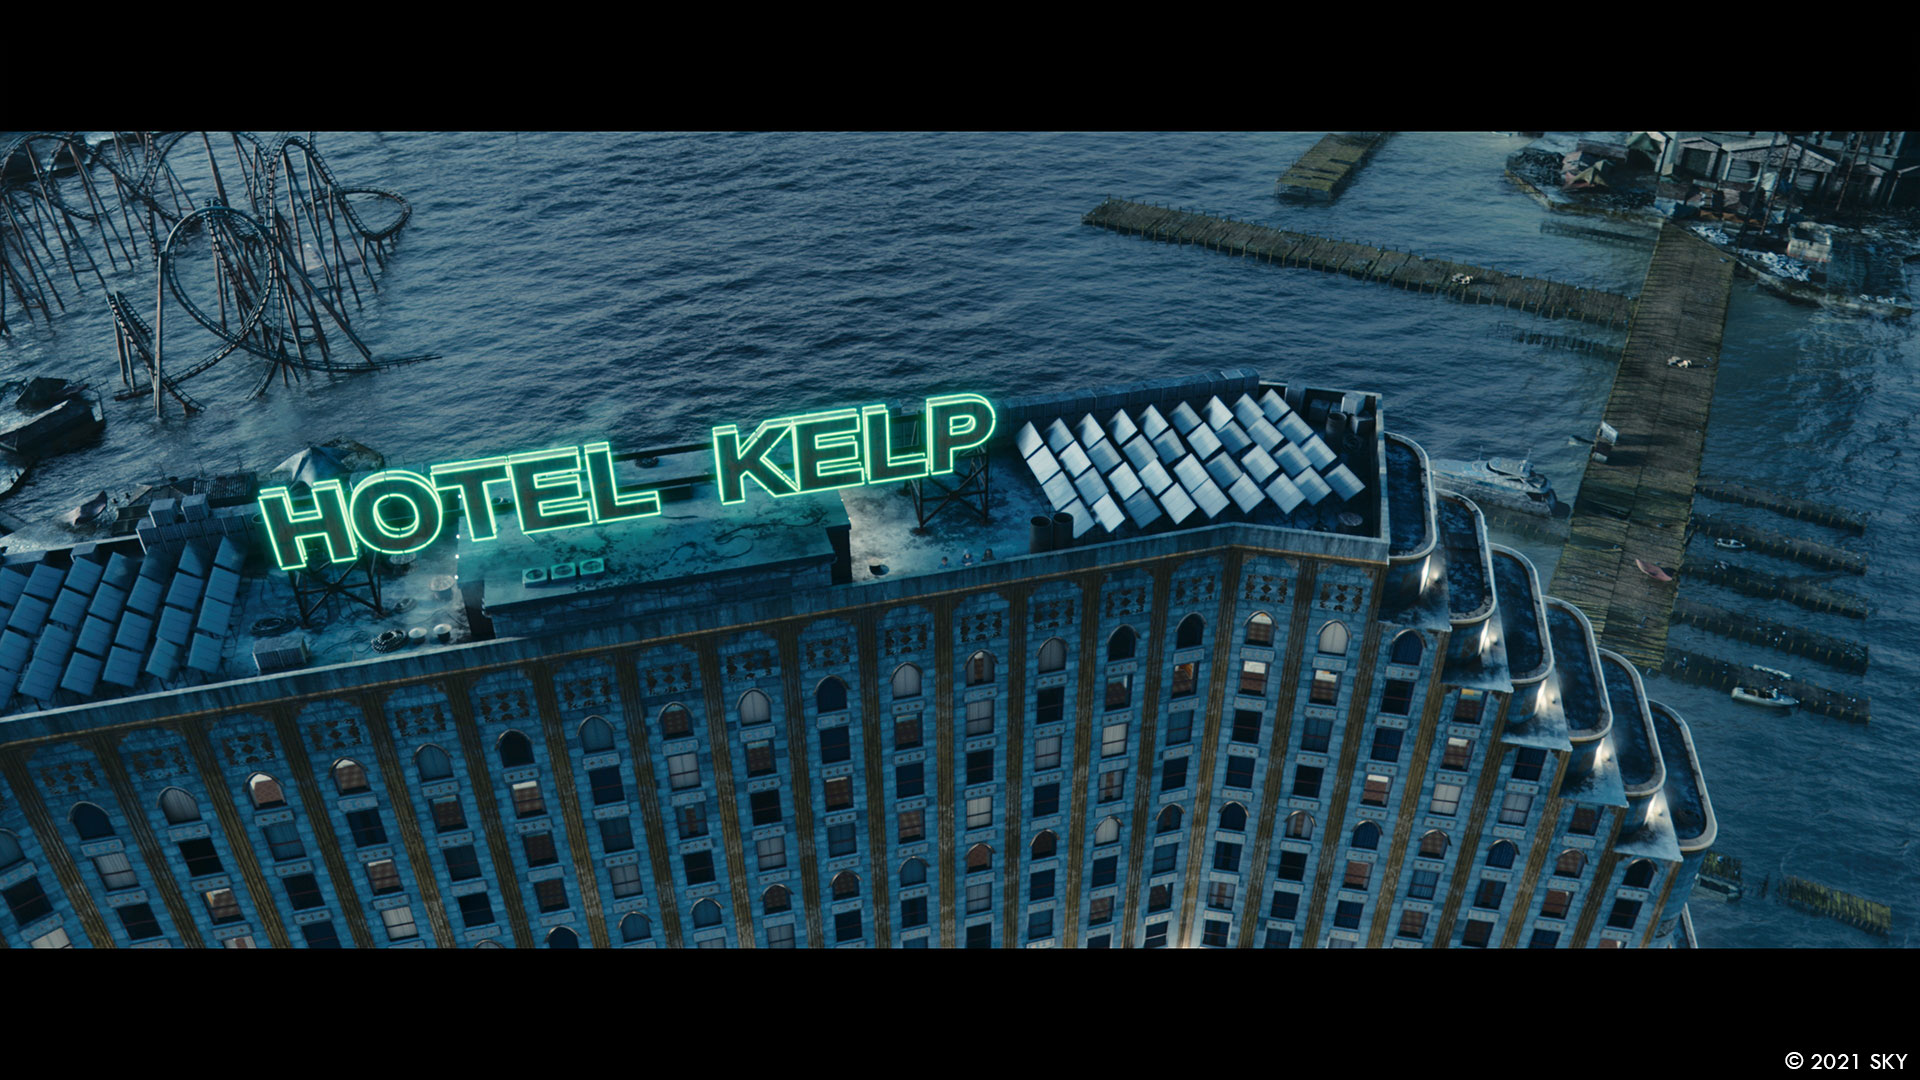
Our FX team was tasked with the generation of a calm ocean on the planet Kelp for episode 7. Kelp’s ocean has risen to cover the bottom part of the buildings and seabed – with the action focused on an eerie abandoned theme park, complete with a partially submerged roller coaster.
Having in mind the great number of buildings and the extremely tight deadline for this sequence, we decided to test the potential of rendering the ocean for production, with Arnold inside Maya, from the lighting department. Traditionally, these types of ocean surfaces are always rendered inside Houdini, avoiding the need to cache the almost infinite size of the water surface. This would mean though, that firstly we had to create a duplicate dummy look, for all of the reflected buildings that exist on the shots, plus that the lighting artists, would have to work on a software that they are not really familiar with, reducing their productivity and giving the team a lot of headaches on the process.
Knowing that, we decided to try to incorporate a gaming type of approach to our system, and test to see if the result could be something that could save a lot of frustration, by caching texture displacement maps, that lighting would then use to create the water surface during rendering. The extra tricky part was that we couldn’t just give lighting some tileable textures, as FX needed to know exactly the shape of the water at any given time and space.
In this way, we created a bespoke setup that could firstly create an ocean surface geometry with UV space relative to the minimum distance from the camera, and secondly could bake the standard Houdini spectra in multiple-UDIM texture sequences inside Houdini COPs, ready to be used in Maya. For some close up shots, finding the limitations of Arnold displacement compared to Houdini, we decided to bake the waves spectrum on an adaptively subdivided geometry, which to our surprise, allowed great reduction in rendering times both in FX and lighting.
With all that, the FX artists were able to do all of the standard Houdini spectrum look-dev and water sims, send everything to the farm, and pass everything to lighting, knowing that what they see in Houdini and its renderer, would match what was in the Arnold production renders.
Can you tell us more about the FX work on the desert storm and the spaceship crash?
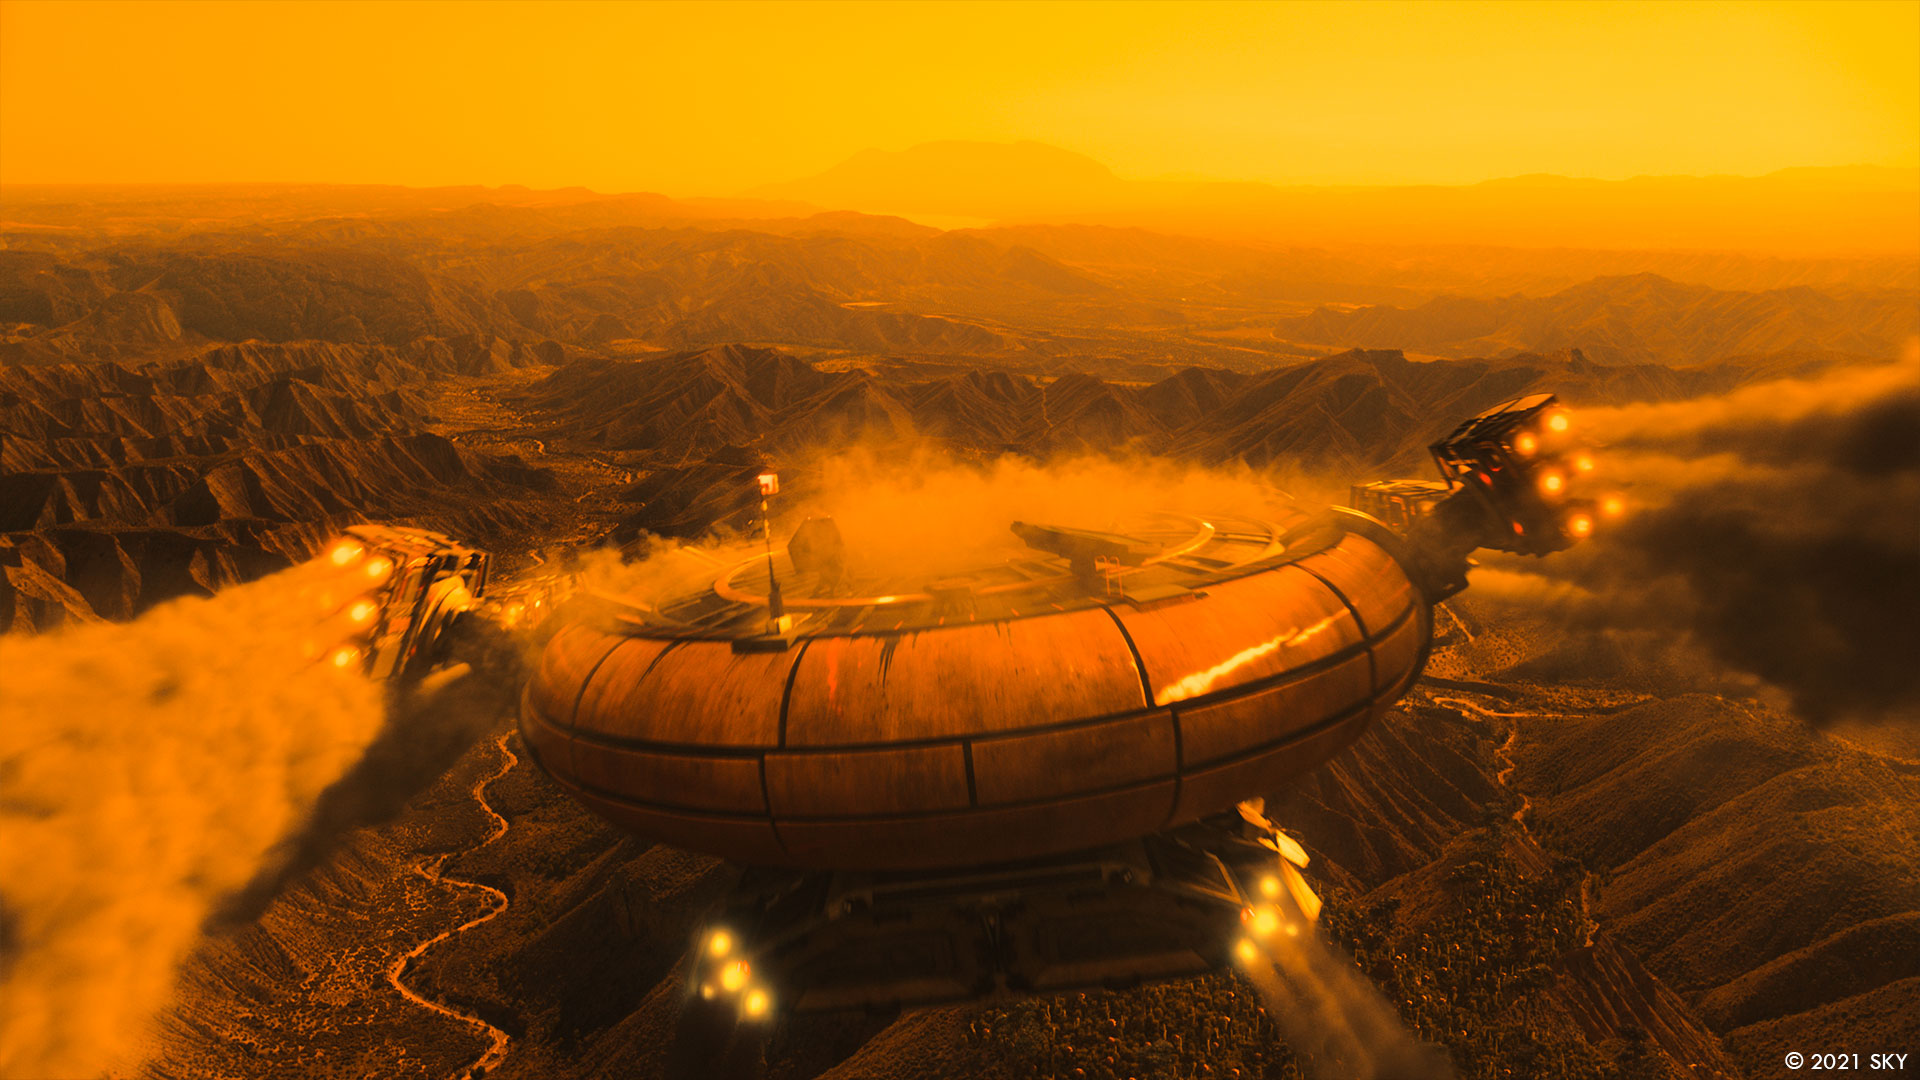
There’s a dramatic crash that takes place in the forest on the planet Pau Rosa in episode 2 involving the prisoner transport spaceship known as the Hemlock.
The Hemlock hits the ground and slows down on the back of trees and on the ground. The requirement on a behavior basis, was to be able to sell the scale of the shots, which is always challenging in full CG high action sequences, but keep the Hemlock intact and the field clear at the end of the sequence, as the set that they filmed the actors, didn’t have any extra broken trees or dirt slopes dragged from the spaceship.
Probably the longest actively running sequence in FX, as it was dependent on lots of departments, and the brief changed slightly (at the end it was a forest, compared to the starting bushes that we had in the beginning), which increased the difficulty to an exponential degree.
In destruction shots, there is always a great number of elements involved, so memory handling and storage can be a massive issue. From a technical standpoint, the FX team had to find a way to avoid fracturing thousands of trees, which would impose serious limitations on the simulation and rendering stage of the shots.
Our solution was the generation of template pre-fractured trees, generated as an alternative to the ones coming already from modelling, and the assembly of them as a combination of instanced geometries, that included the separate leaves as an extra instancing part. Knowing that we were working on this step before the tree assets were finished, meant that we should do it as much procedural as possible, and after doing some first tests we saw that there was no visible repetition between the pieces.
This allowed us to use instance collision geometries, improving massively the memory limitations of the rigid body simulations, and instanced render geometries, improving in the same way the speed and memory requirement at the lighting stage. The final caches produced were just points describing the instance geo to be picked, plus the transformation information, so we were also able to save on time and storage size too.
For the rest of the elements the workflow was the standard destruction workflow used in most of the impact shots, including big boulders, debris, dust and extra smaller particles trying to increase the visual noise, and make the massive scale of the shots more easily understood.
A partial practical set build was shot. On the day we built the real front of the ship we had just underneath the nose and the walkway out. We also filled all the sides in with lots of trees and that saved us on loads of visual effects for the slow coming stop shot as it allowed us to look in that direction.
For the desert storm on the planet Pau Rosa in episode 2, Kieron (Hawkes) wanted a sandstorm that consumes the planet in full, which the spaceship (the Hemlock) is escaping from. The look had to be similar to the pyroclastic cloud generated from a volcano, with some extra colourful lightning (done in 2d), acting as an imminent threat to the characters.
Apart from the time restrictions of a TV show, the main issue that we had to resolve was how to have the world around us destroyed without having to simulate everything, which would mean huge computation and storage requirements…
So, to resolve that we created a bespoke instancing system, which would take into account speed and inclination and feed it into the retiming speed and other parameters of the instance points. For the shape of the main asset, we did 7 variations of simulations, for the 3 main different types of behaviour of the individual clouds.
For the main background setup, needing a strong interaction with the mountains, we used a particle simulation that would expand through the terrain avoiding the mountains, providing the necessary points that the simulations would be instanced on. These particles, after being retimed to the appropriate expansion speed, provided the necessary data for us to select the relevant cache and frames adding a lot to the general pyroclastic look of the sandstorm.
Further to the main system, in the foreground we added a couple of fast moving simulations, less pyroclastic and more turbulent than the previous ones, that we instanced and placed closer to the camera, plus some extra ones emitted from the objects in the environment (such as spaceships, trees, rocks…), needed to cheat some necessary interaction. All of these elements were also including their own part of extra advected particles to give us more fine detail.
The main shaders of the sandstorm were also developed in FX, with extra hooks remaining free so that lighting could still override specific parameters of density and transparency, in a non destructive way, and control specific clouds in a very art directable way, without having to go back to FX for changes in the density, and save us a lot of really needed time. The instancing system also meant that the resolution that was reaching lighting was incredibly high. With the time limitations that we had though, this was another part that had to be optimised, and eventually lighting overrode this resolution according to the deliveries and making sure that the shots would be delivered on time.
How did you handle the zero g sequences?
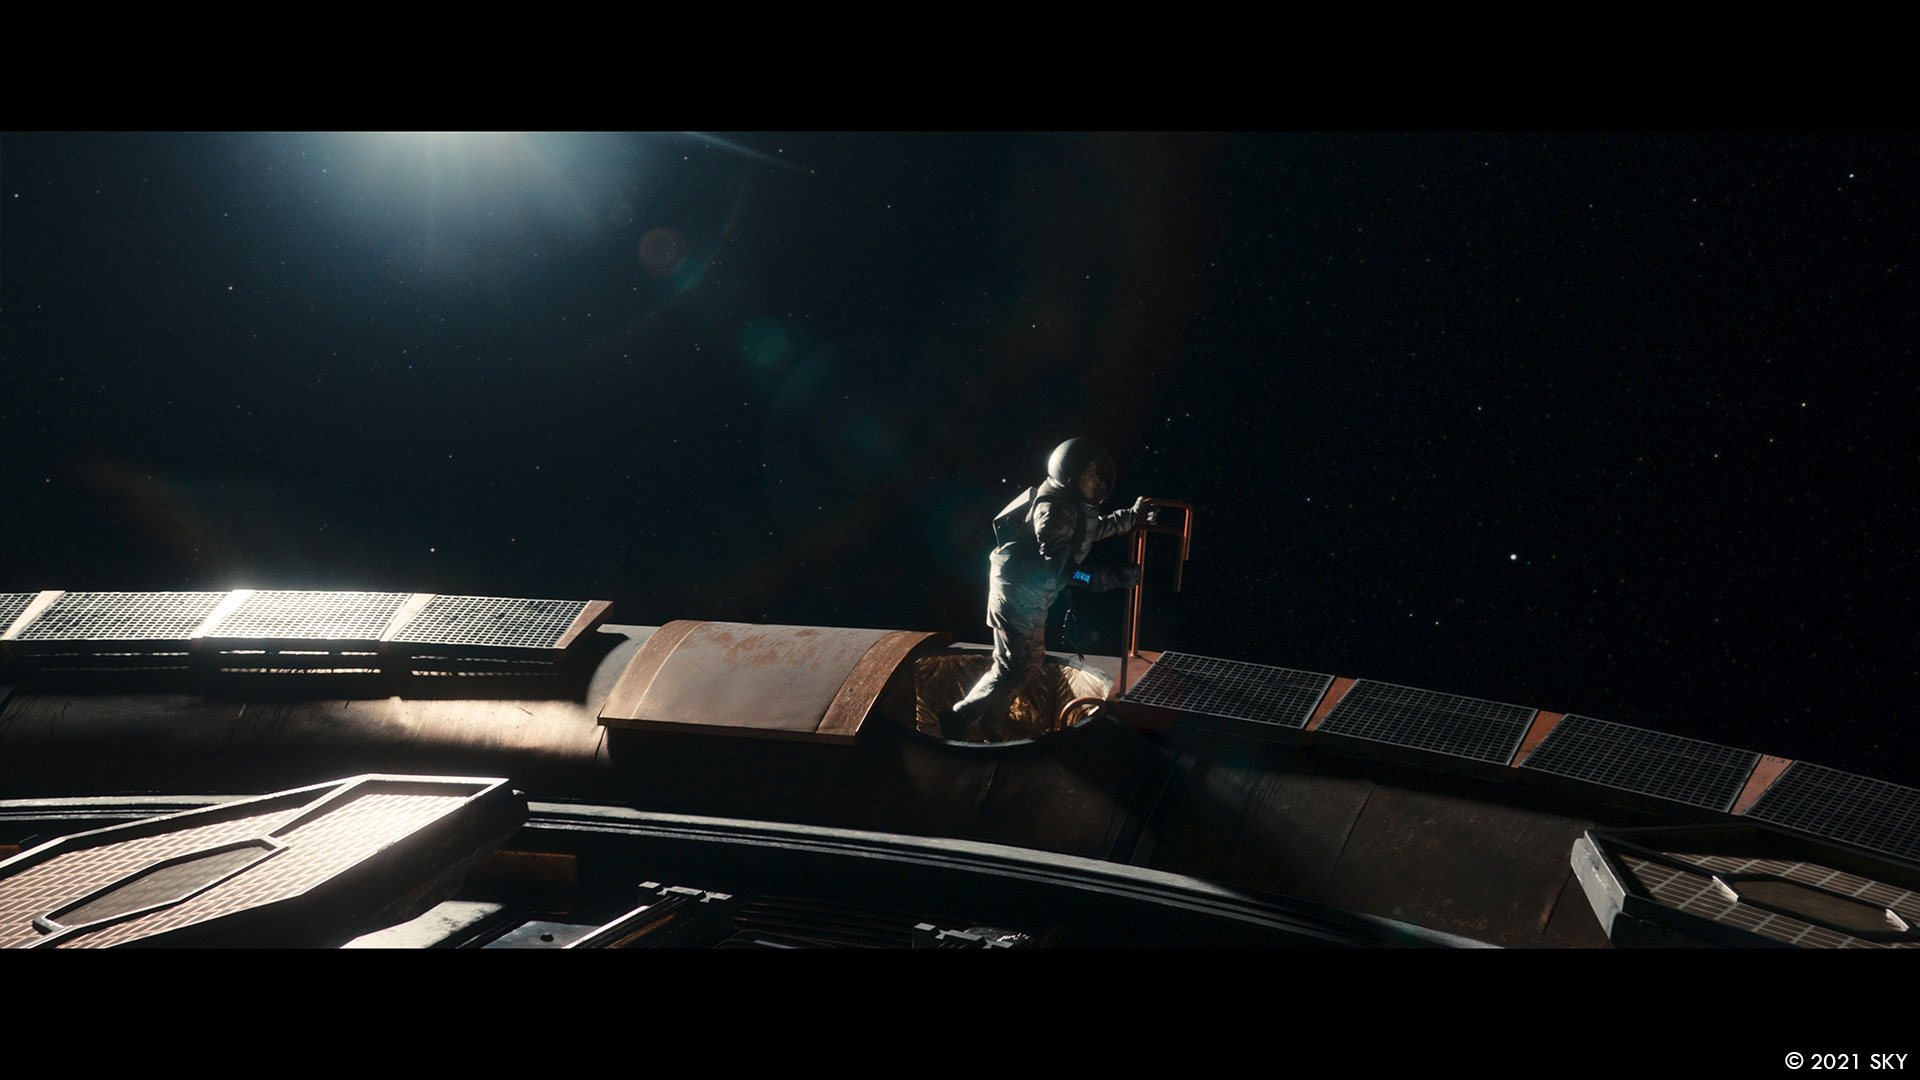
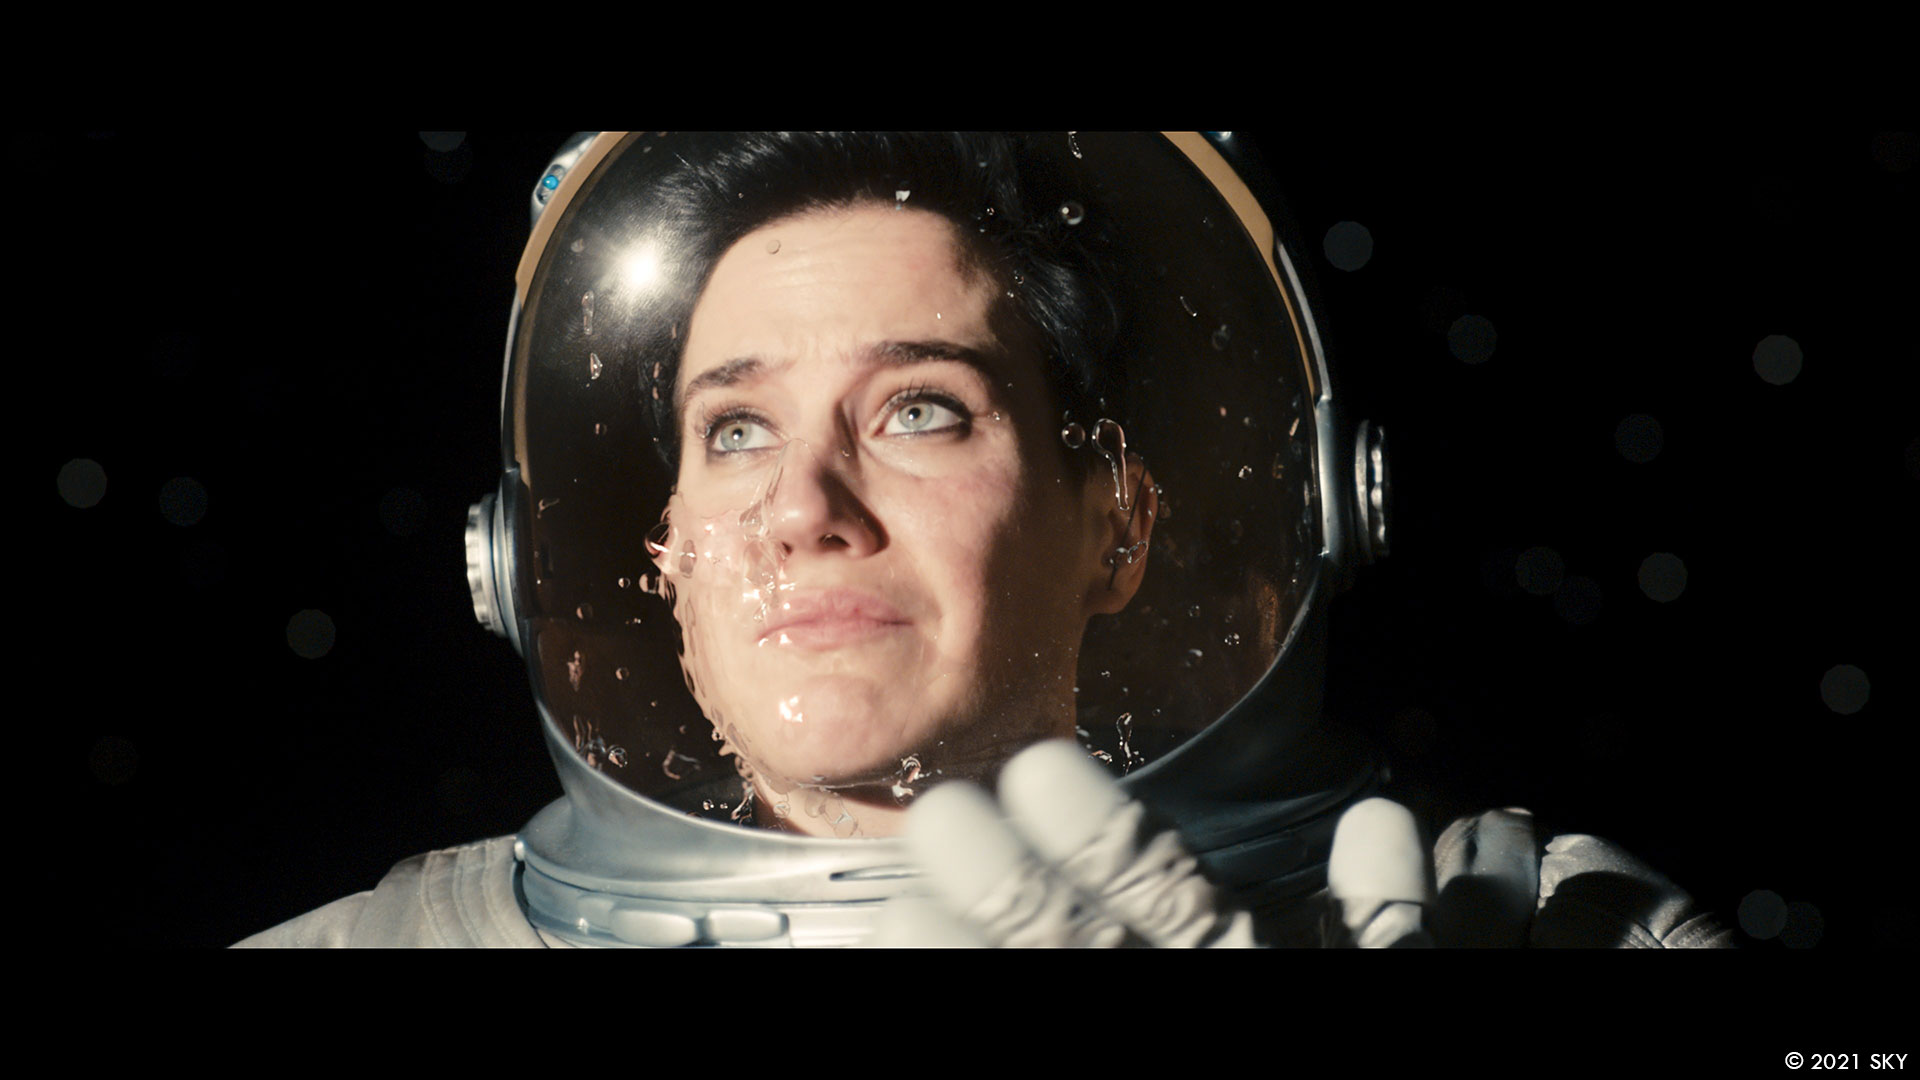
The unfamiliar physics of weightlessness made the dramatic space walk sequence in episode 8 challenging not only from a technical point of view but artistic as well. Also the emotional aspect of the story called for realism so we knew from the beginning that the viewers should not get distracted by VFX but help them to immerse into the story.
Milk’s FX team, led by Dimitris Lekanis, were key to some of the most challenging VFX sequences in the series and this was no exception. One of the characters ‘drowns’ after a malfunction allows water bubbles to enter her space helmet. Part of the challenge was to create the bubbles inside her helmet while ensuring that the water behaved absolutely believably – keeping as close to the science as possible while supporting the intensely tragic moment. When we eventually watched the drowning sequence in full for the first time we were all holding our breath, it’s a very evocative moment.
Our starting point was establishing the most accurate matchmove possible without the help of tracking markers, right through to controlling the subtle look of water on the actor’s skin in lighting and compositing; FX was not the only department with a full plate in this sequence!
Our FX team observed water behaviour in the NASA space station as part of their dev phase – we watched video footage of Canadian astronaut Chris Hadfield wringing out a cloth and the water behaves as if it is ‘sticky’ in space.
In the reference video we identified the two main attributes of the water, the adhesion and the cohesion. Adhesion has the ability to stick and expand on the skin surface, cohesion as the surface tension of the water, always trying to form spherical bubbles. In our example these forces even though opposing are able to find an equilibrium, which with the addition of motion and inertia, give to the example from the space station these beautiful oscillations. This last part was identified as the key point for selling the realism of the effect.
Following this roadmap, we started by fine tuning the existing FLIP solver in Houdini, mainly investing in the proper scale of the simulation in conjunction with the surface tension already provided by the solver, testing it on a static face of the character. After finding a good place with how quickly the water was becoming spherical we started experimenting on how we could achieve a very fine-tuned adhesion model, as the one provided by Houdini was only able to transfer velocities from the collision geometry, and doesn’t really deliver the desired effect.
Our approach was to generate two opposing force fields, one for inside the main water bubble and one for outside the bubble. These two fields were masked to only apply at the desired areas close to the skin and at the outline intersection, between the bubble and the face, and their main direction was a mixture between the opposite direction of the closest outline point with a small part sticking closer to the face. After being able to reach a desired equilibrium stage we continued looking at how we could keep the setup holding its shape on a moving body/face. As the standard collision detection was not able to keep the shape that we wanted, we firstly localized the motion by 50%, and then advected a bigger area of the liquid to the direction of the body/face. In this way, we were able to keep the main part of the bubble’s shape without ruining the edges to the skin.
At this point we reached a milestone, where our simulation model was behaving very consistently across the animation in the different shots, and we were able to tackle the last part of the setup which was the specific behavior matching the script, and the performance of the actor, without having to change any of the physical properties of the water. For the timing of the main bubble we animated some shapes which we later converted into a force field to move the bubble slowly between the different parts of the body. The extra bubbles were sourced from a particle simulation, which could give us a force field for the smaller bubbles to follow as long as they didn’t collide with any other or the main one. After the collision on the big change in direction, the general simulation would take control. In some of the shots, we had to add some specific moving bubbles that were interacting with the actress’s eyes. For these ones animation provided us with the main shape, and we fed them afterwards to our main simulation model.
One tricky part of the performance was that of the mouth, as we needed the actor to push and pull water into and out of the mouth, similarly to the acting performance. For this we started by measuring the distance between the upper and the lower lips and, again, creating an extra force field that matched the performance required with some exceptions.
In addition, we spent a lot of time building templates for the visors, the lens flares, depth of field and all the extra details that go into these shots. It not only helped us up to keep consistency through the sequence but it gave us a common language for feedback. This was crucial since the whole team was working from home and communication was limited to video conferences.
There is no doubt that the abundant information that NASA made available to the public set the course for the sequence. However, the final details come down to craftsmanship rather than technology. The extra precision added by the matchmove team, the small changes that FX had to add into some of the simulations, the subtleties in the shaders and lights, the compositors adding visors, blooms, flares and matching the depth of field are all made by hand and all that is due to a huge team effort and to a talented crew.

As with every sci-fi show, Intergalactic is full of graphics and holograms. How did you create and animate them?
Mark Geraghty’s team in the art department supplied all the graphics and set up a style for them. We then added them into all the relevant shots. Some shots require interaction with the graphics and those were hand animated by compositors. We used the tools available in Nuke to make the transitions needed.
From our early chats with Kieron we discussed that the holograms had to have some punk rock colour scheme in them, so they were in line with the overall show look. Using Nuke point render allowed us to tweak all the elements and add the colour palette that we were after. Thus, we moved away from the typical 2D treatment and added depth into the hologram’s look.

Which sequence or shot was the most challenging?
London for sure. But the evocative and tragic space walk sequence in which Verona drowns in her space helmet in episode 8 comes a close second.
Is there something specific that gives you some really short nights?
Probably going into lockdown and wondering how we were going to deliver everything on schedule whilst working remotely. In fact, the team were total superheroes and managed it amazingly and we got on top of the ‘new’ way of working from home and got focused very rapidly.
What is your favorite shot or sequence?
The Tower Bridge shot in the London sequence, definitely. Seeing it through from Mark’s initial concept and then getting that look in the main shot!
What is your best memory on this show?
The new London ‘Commonworld’ shoot in Valencia and the Pau Rosa scenes which were shot in the Gorafe desert (also in Spain).
How long have you worked on this show?
Milk began development work on Intergalactic in July 2019 with the shoot and asset build towards the end of 2019. All shot production work was completed during the 2020 lockdowns and delivered in December 2020.
What’s the VFX shots count?
850.
What was the size of your team?
65.
What is your next project?
I’ve got another major episodic TV series in development right now – Milk is the main vendor again so we’re involved right from the start which is always the best way to work to maximise creativity, budget and time!
Milk’s core team on Intergalactic were:
- Jean Claude Deguara – VFX Supervisor
- Kat Mann – VFX Producer
- Matias Derkacz – Head of 2D, In-house VFX supervisor
- Neil Roche – Head of 3D
- Sam Lucas – Head of Modelling
- Dimitris Lekanis – Head of FX
- Joe Tarrant – Animation Supervisor
- Adrian Williams – Head of Lighting
- Simon Wicker – Head of Environment
- Amy Felce – Head of Tracking
- Darren Byford – Lighting Pipeline TD
- Dave Cook – CG Supervisor
- Felipe Canfora – CG Supervisor
- Additional 2D support – Aled Rhys-Jones and Egg VFX
A big thanks for your time.
// Intergalactic – VFX Breakdown – Milk VFX
WANT TO KNOW MORE?
Milk VFX: Dedicated page about Intergalactic on Milk VFX website.
Sky: You can now watch Intergalactic on Sky One.
© Vincent Frei – The Art of VFX – 2021


