

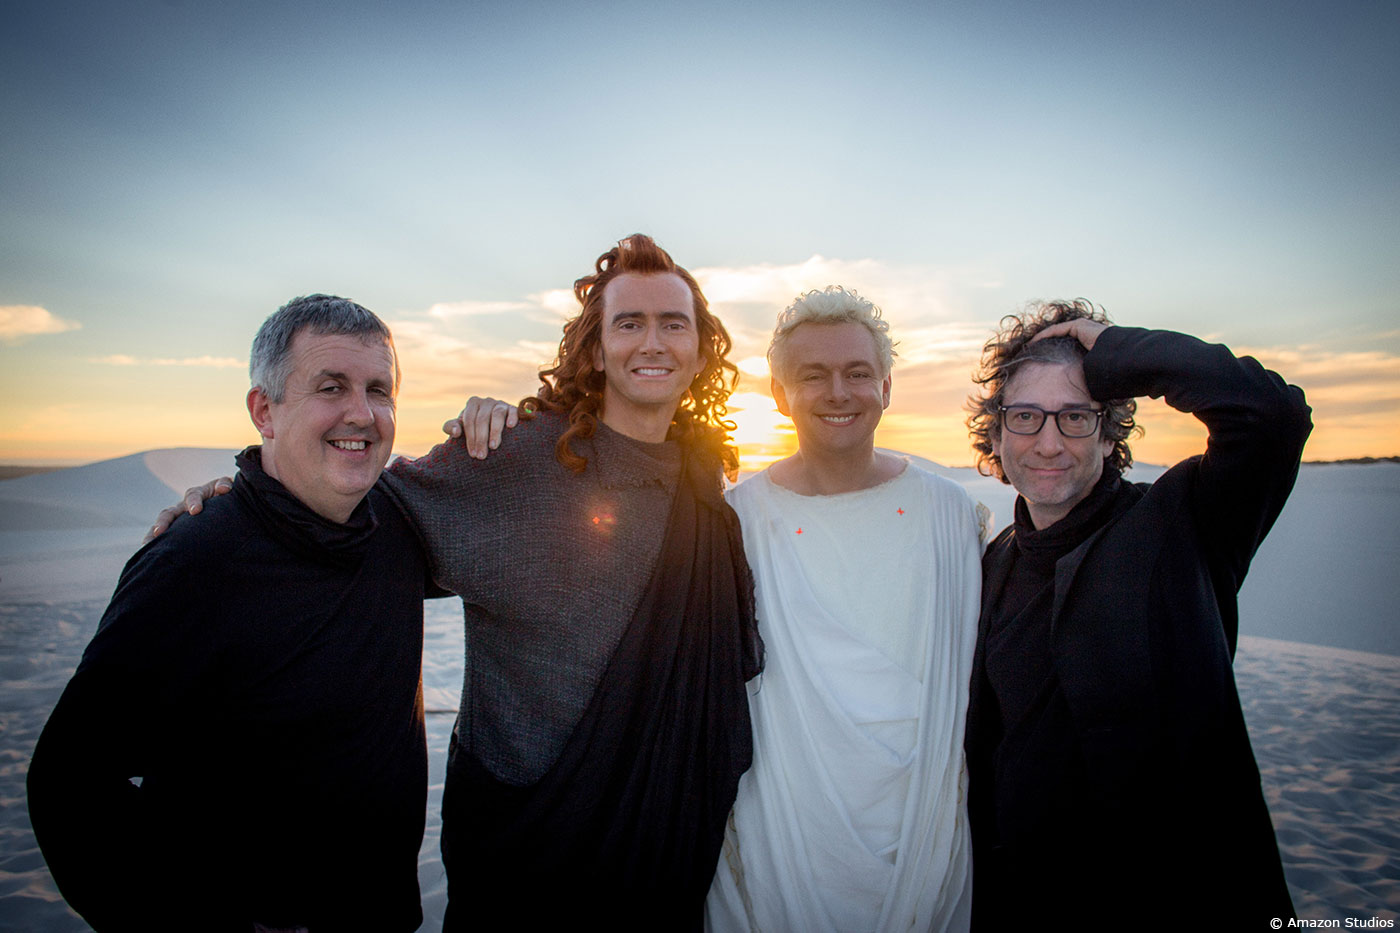
Jean-Claude Deguara started his career in visual effects in 1995. He worked in many studios such as MPC and The Mill. In 2013, he co-founded Milk Visual Effects. As a VFX supervisor, he took care of the effects of projects like JONATHAN STRANGE & MR. NORRELL, BEOWULF: RETURN TO THE SHIELDLANDS and SHERLOCK. He talks to us today about his work on GOOD OMENS.
What is your background?
I’m a visual effects supervisor and co-founder of London-based Milk Visual Effects. We set up Milk in 2013 and have since created a range of award-winning VFX work for film and TV. Our credits include ALTERED CARBON; ORIGIN, SHERLOCK; ANNIHILATION; ADRIFT; FANTASTIC BEASTS A WHERE TO FIND THEM; EX MACHINA and of course GOOD OMENS.
How did you and Milk VFX get involved on this show?
We came on board very early in pre-production at the pre-script stage.
How was the collaboration with author and showrunner Neil Gaiman and director Douglas McKinnon?
With the sheer volume and variety of work – with 650 shots and a five-month postproduction turnaround, and a crew of 60, it was key to be in constant conversation with Neil and Douglas throughout the entire process – both in pre and postproduction and during the shoot. They were readily available to us throughout so we could always ask them questions and keep the team moving forward. We had constant access to Neil, which was, quite frankly, wonderful! There was never a question that couldn’t be answered! And he would often quote from the book to advise us creatively as we developed the VFX. You don’t often get that level of detail when you’re developing the VFX. It also meant we were able to show him concepts the team were developing in the studio while I was on set in South Africa with him.
The planning and development time in pre-production was essential. During pre production we broke down all six scripts with Douglas Mackinnon to plan the methodology for the VFX; working out and refining how to best use VFX to support the storytelling. It was a very collaborative process with Douglas – often we would work with him to decipher and work out how to translate Neil’s vision in words to life on screen and what was workable.
We created everything from creatures (Satan exploding up out of the ground; a Kraken; a Hellhound; a demon and a snake) to environments (Heaven – a penthouse with views of major world landmarks, a busy Soho street); feathered wings for Michal Sheen’s angel Aziraphale and David Tennant’s demon Crowley and a CG Bentley, in which Tennant’s Crowley hurtles around London. We also had a large effects team working on a whole range of effects over the six episodes – from setting the M25 and the Bentley on fire; a flaming sword; a call centre filled with maggots to a sequence in which Crowley (Tennant) travels through the internet at high speed!
We couldn’t dwell on any one effect for too long. We’d have a scene with a major effect and it wouldn’t be repeated – as the story moved swiftly on to the next scene in the build up to the apocalypse.
What was their expectations and approach about the visual effects?
Despite the fantasy nature of the subject matter it was important for Gaiman and Mackinnon that the CG elements did not stand out too much. We needed to ensure the worlds and characters were always kept grounded in reality and be immediately recognisible. A good example is how we approached Heaven and Hell. These key locations are essentially are based around an office block! Nothing too fantastical. But they are, as you would expect, completely different and deliberately so. Hell is the basement, which was shot in a disused abattoir in South Africa whilst Heaven is a full CG environment located in the penthouse with a panorama view over a cityscape featuring landmarks such as the Eiffel Tower, the Shard and the Pyramids.
How did you organize the work with your VFX Producer?
Milk’s VFX Producer Jenna Powell worked closely with the production VFX Producer Alan Church to ensure a smooth workflow throughout shoot and post production. The challenge was the five-month postproduction turnaround for our 650 shots. It was important to have strong crew across all VFX disciplines as they worked together on multiple sequences concurrently. So you’re starting in tracking on one, in effects on another, and compositing and finishing everything off on another. It was a big logistical challenge but certainly the kind that we relish and are well versed in at Milk!
How did you work with the art department?
We worked with Michael Ralph on a variety of assets and environments. In particular the Soho Street sequences in which Michael Sheen’s character Aziraphale’s bookshop is situated. Michael gave us all of his artwork once approved; for example the look and feel of heaven (which was based on the top of London’s Sky Garden) which went fully CG and also The Garden of Eden.
Can you explain in detail about your environment work on the Garden and Soho?
The Garden of Eden:
Previz for the shot was created using Google Earth Studio. The exterior landscape of the desert and sky was a normal layered 2.5D matte painting projected back onto simple geometry and cards. Eden itself (consisting of the outer wall, interior terrain and vegetation) was a full 3D build created in Cinema 4D. We used several Mograph Cloners to randomly populate the interior with lush jungle and made heavy use of Arnold’s procedural system to keep the scene light and flexible. Final rendering was performed on our Arnold render farm and we passed off scene geometry, camera data and the rendered layers to Comp where they used Nuke to add in drifting haze and smoke, a traditional flock of birds and animated waterfalls to bring the shot alive. The main 3D asset was then re-used for other shots through-out the Eden sequence and augmented with more traditional 2D matte painted elements to add details in closer shots.
Soho:
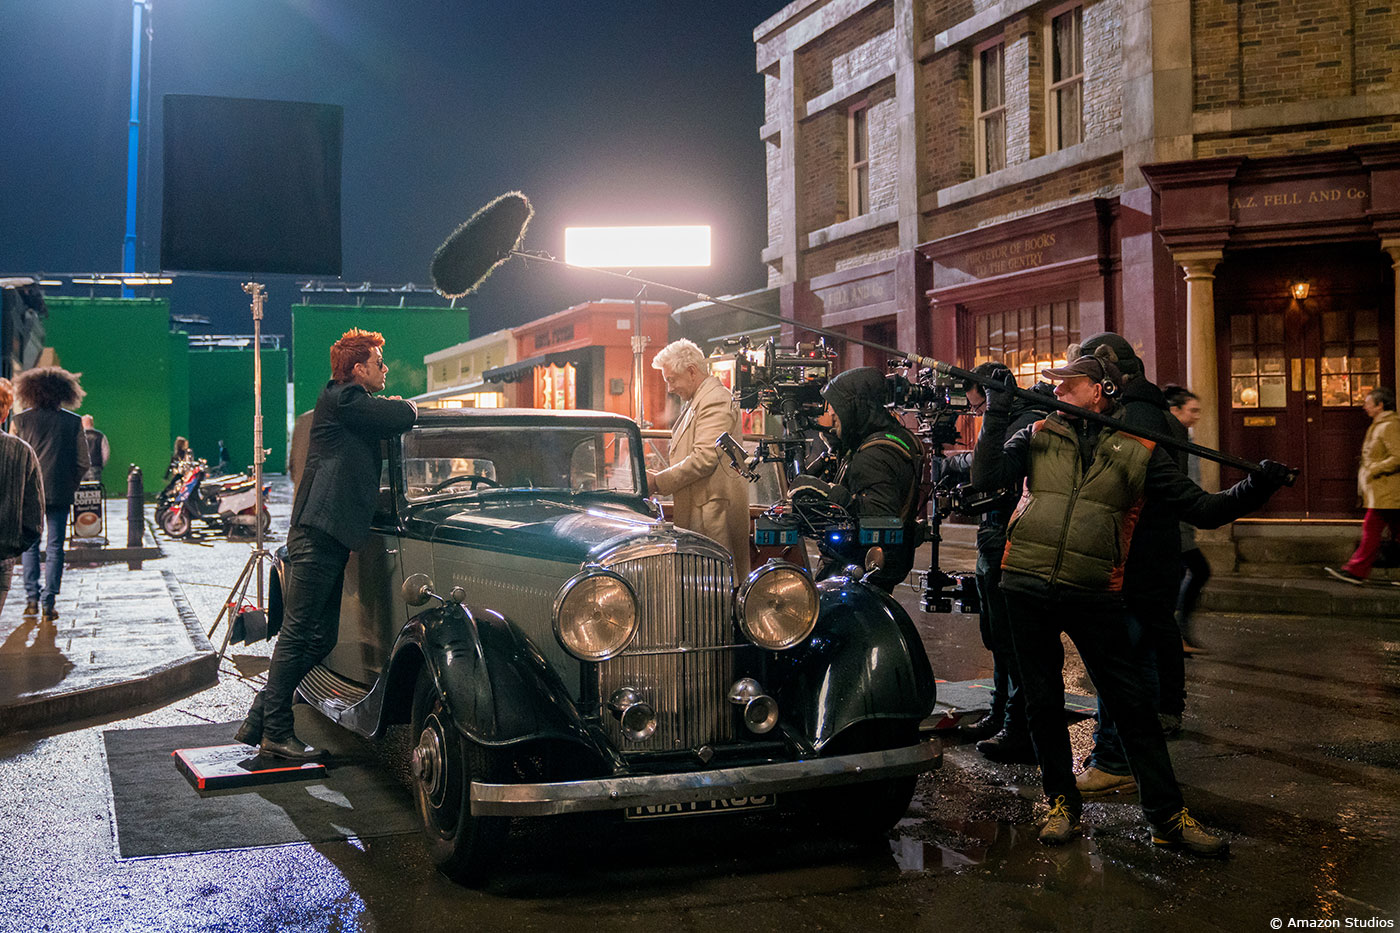
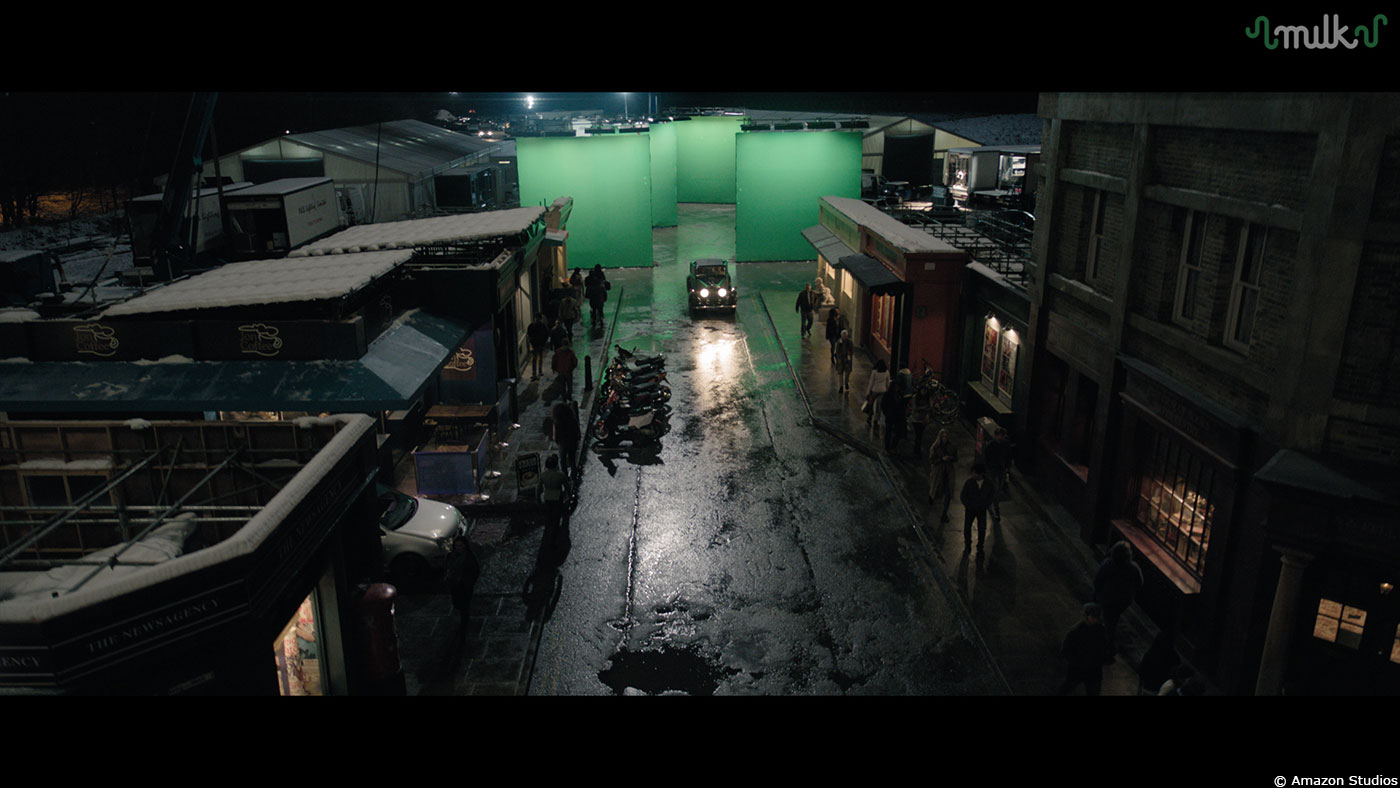
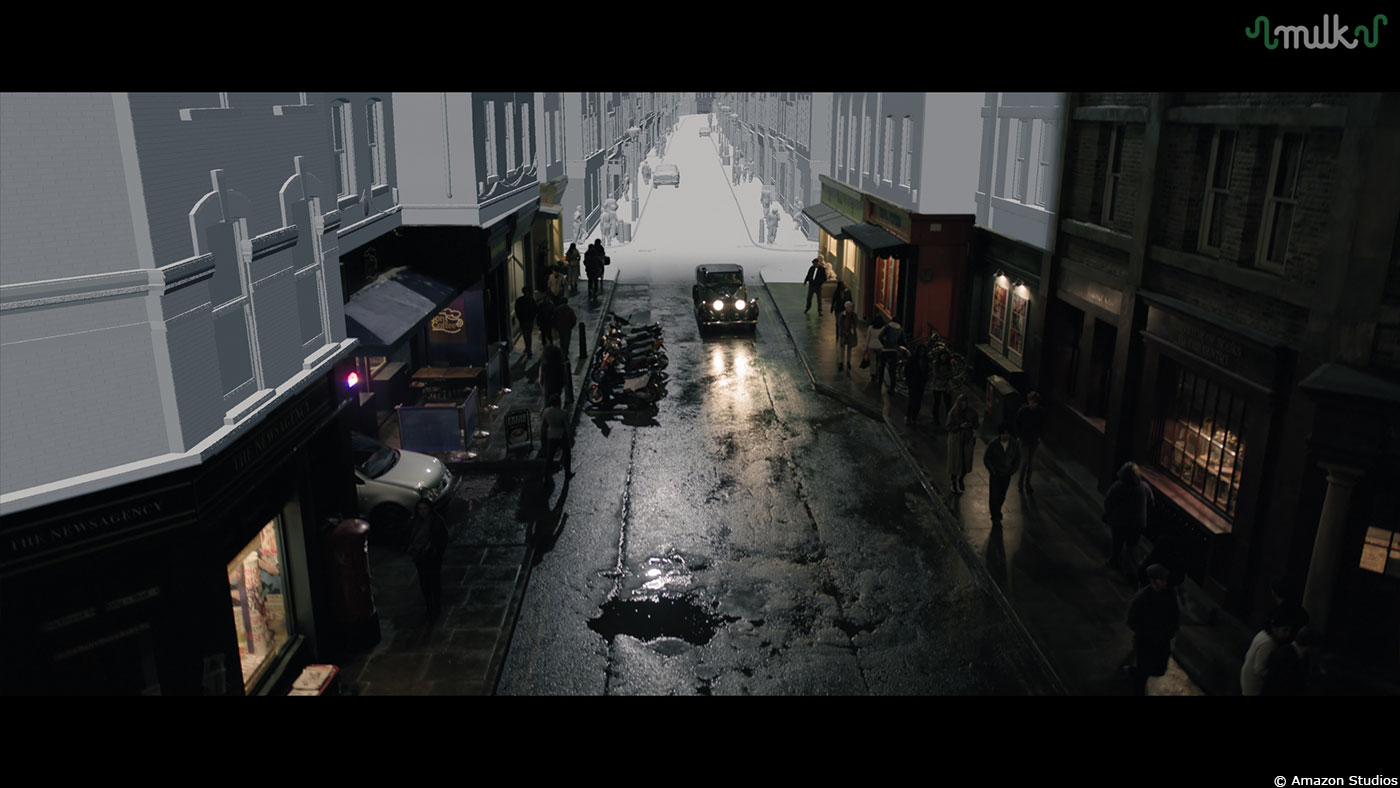
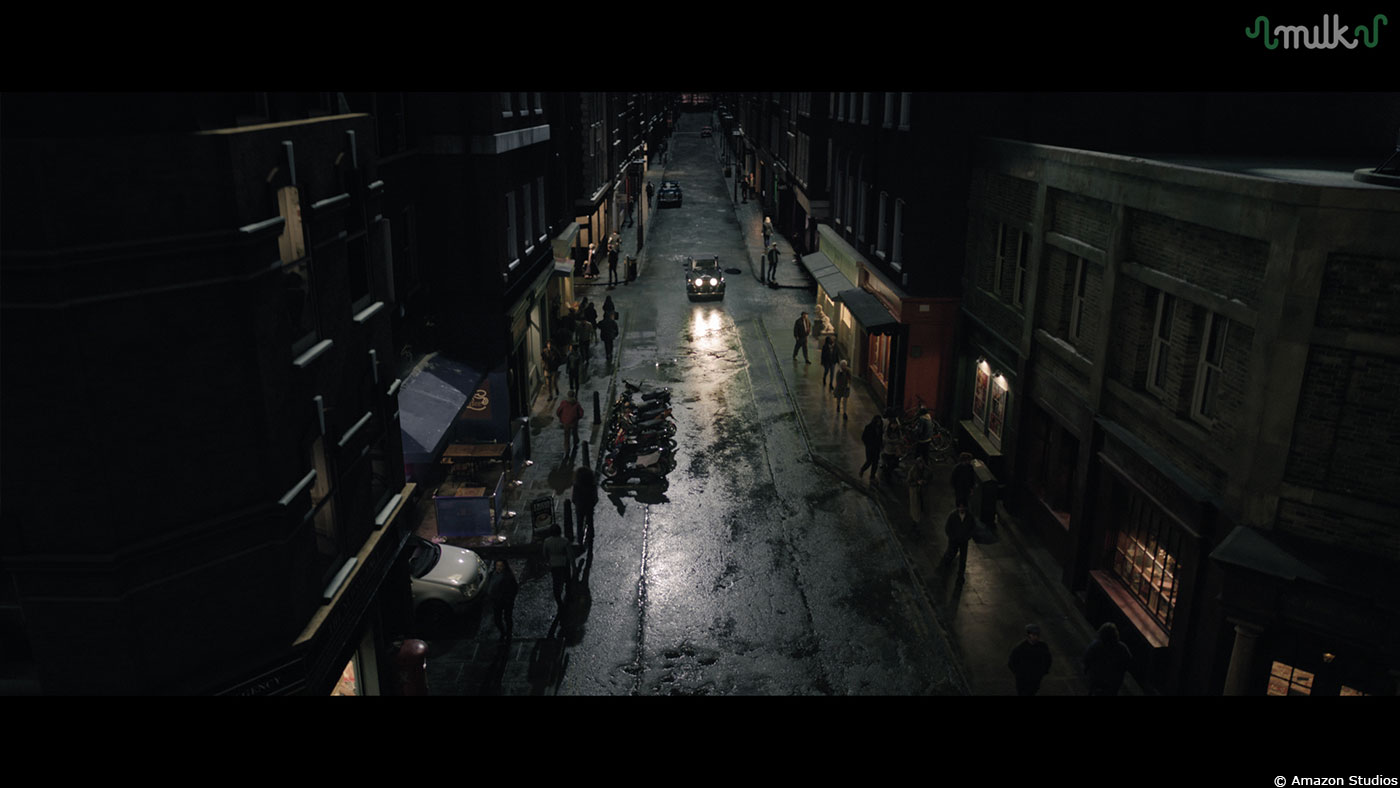
Production designer Michael Ralph created a set based on Soho’s Berwick Street, comprising a two-block street exterior constructed up to the top of the first story, with the complete bookshop — inside and out — standing on the corner. Four 20×20-foot mobile green screens helped our environment team complete the upper levels of the buildings and extend the road into the far distance. We photo scanned both the set and the original Berwick Street location, combining the reference to build digital assets capturing the district’s unique flavour, for scenes during both day and nighttime.
Douglas Mackinnon wanted crowds of people moving around constantly so on shooting days, crowds of extras thronged the main section of street and a steady stream of vehicles turned in from a junction partway down. Areas outside this central zone remained empty, enabling us to drop in digital people and traffic without having to do takeovers from live-action performers and cars. Milk had a 1,000-frame cycle of cars and people that they dropped into every scene. We kept the real cars always pulling in round the corner and devised it so there was always a bit of gridlock going on at the back.
Where was filmed the various part of the series?
GOOD OMENS was filmed at the following locations: West London Studios, Crystal Palace, West London, North West London and South Africa (in and around Cape Town).
The series has lots of transformations. How did you design and create these transformations?
The Internet:
One major effect sequence involved travelling through the Internet, which was shot in South Africa. Our brief was to make the Demons Crowley and Hastur fly down the Internet at break-neck fast speed. We created an effects based set up which featured a tunnel built from procedurally generated, pulsing cubes. David Tennant (Crowley) was in a rig where he could twist and roll at speed while Ned Dennehy (Hastur) was on a wire. The rig arm crossed over David’s face and body as he span and rather than painting it out and replacing them, we opted to create glitch-type moments to obscure it instead and firmly establish the digital look of this dramatic sequence.
Maggots:
One of the character transformations consisted of millions of maggots pouring into a room in a Call Centre to reveal the demon Hastur – who has travelled via the Internet and emerges via the maggots from the mouthpiece of a call centre phone microphone. In one continuous shot we had to find a way of seeing the maggots pile up into huge squirming mounds, engulfing a call centre operator, and then morph into the Hastur’s shape, leaving none behind after the final reveal.
The challenge was therefore in both the shot choreography and the technical difficulties of how to simulate so many maggots that looked believable at distance and close-up. In order to seamlessly blend between two live action plates we made sure that the mounds of maggots filled the screen, allowing for a CG camera transition at this point. The shape and timing of the mounds was incredibly important and so we decided to use an animated surface that could be sculpted by hand and keyframed to hit exact beats. This later became a collision surface for a dynamic top layer of maggots. The simulation was initially developed as sets of connected rigid body cubes, with the head of each maggot being driven by an oscillating force. This gave very accurate interaction between maggots but was hard to reach the number on-screen that we needed. To work around this we simplified the calculation by making each maggot a single hair. In order to efficiently render all of this geometry with sufficient detail we instanced rigid slices of the full resolution asset onto the hair curves. This enabled us to work with a small number of unique slices that were instanced millions of times, rather than millions of uniquely deforming maggots.
Let’s talk about the CG characters. Can you explain in detail about their creation?
Many of the main VFX features such as Satan (voiced by Benedict Cumberbatch), appear only once in the six part series as the story moves swiftly towards the apocalypse; so we had to strike a careful balance between delivering impact yet ensuring they were immediately recognisible and grounded in reality. Given our fast five-month post-production turnaround, we had our key teams working concurrently on creatures such as a Kraken; a Hellhound; a small, portly demon called Usher who meets his demise in a bath of holy water, and the infamous snake in the Garden of Eden.
We have incorporated Ziva into our pipeline, which ensured our rigging and modeling teams maximised the development and build phases in the time frame. For example, the muscle, fat and skin simulations are all solved on the farm, the animators can publish a scene and then the next day review the creature fx in dailies. As the Ziva simulations are an automated process, most of the creature fx work is at the front end, which would be the building of the muscle and fat rigs, about 90% of the muscle simulations solve correctly on the farm this means the creature fx artists are only working on the 10% which are problematic making us more efficient which is very important when working to a tight deadline.
We use our proprietary software CreatureTools for rigging all our creatures. It is a modular rigging package which allows us very quickly build animation rigs for previz or blocking and we build our deformation muscle and fat rigs in Ziva VFX. It means the animators can start work quickly and there is a lot of consistency between the rigs.
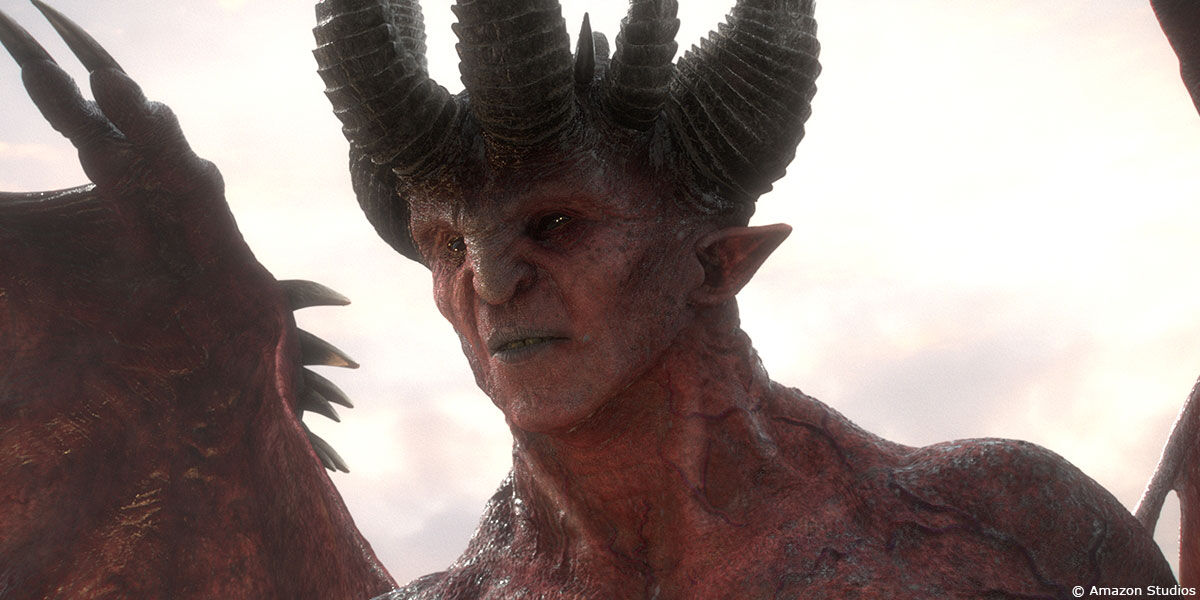
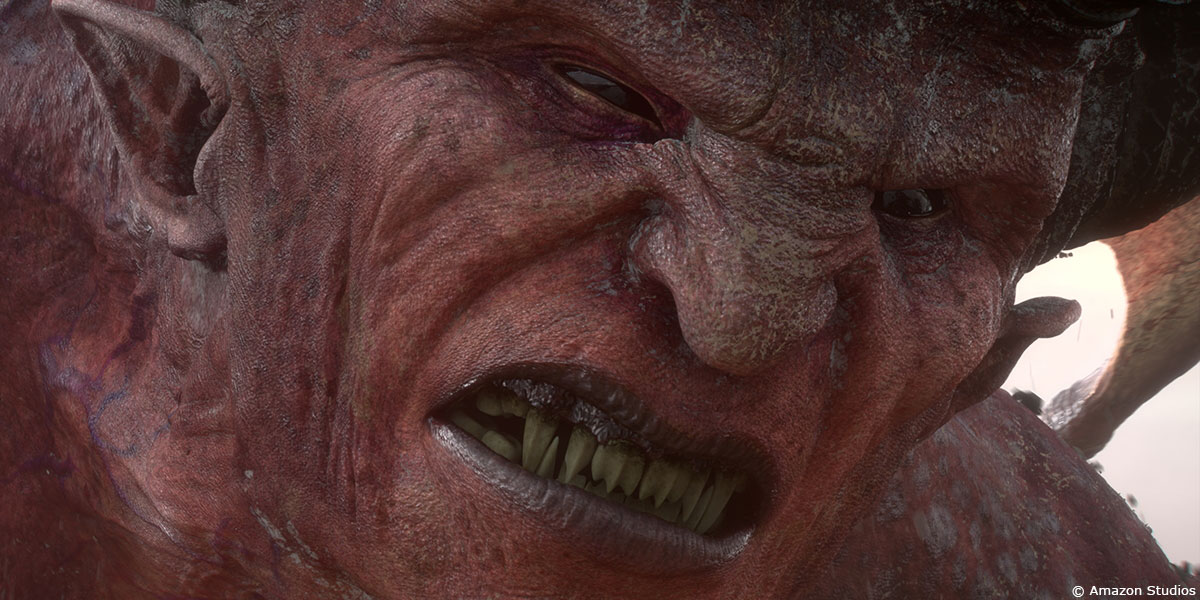
Satan:
Near the climax of GOOD OMENS, Aziraphale, Crowley and Adam witness the arrival of Satan. In the early development phase, we were briefed to highlight Satan’s enormous size (about 400 foot) without making him too comical. He needed to have instant impact given that he appears on screen for just this one long sequence and we don’t see him again.
Our first concept was quite ‘horror’ and was pretty scary, but Neil wanted him simpler and more immediately recognisible. Our concept artist created a horned crown, which along with his large, muscled, red body delivered the look Neil had envisioned.
We built the basic model and then, once Cumberbatch was cast, the modeling team introduced some of his facial characteristics into Satan’s FACS-based blend shape set. Video reference of the actor’s voice performance, captured on a camera phone, helped inform the final key frame animation.
The final Satan was a full Ziva VFX build, complete with skeleton, muscles, fat and skin. The team set up muscle scene, fat scene in a path to an Alembic cache of the skeleton so that they ended up with a blended mesh of Satan with all the muscle detail on it. We then did another skin pass on the face, to add extra wrinkles and loosen things up. A key challenge for our animation team, lead by Joe Tarrant, lay in animating a creature of the immense scale of Satan. They needed to ensure the balance and timing of his movements felt absolutely realistic.
Our Effects team, lead by James Reid, layered multiple effects simulations to shatter the airfield tarmac and generate clouds of smoke and dust, optimizing setups so that only those particles visible on camera were simulated. The challenge was maintaining a focus on the enormous size and impact of Satan while still showing the explosion of the concrete, smoke and rubble as he emerges.
Extrapolating from live-action plates shot at an airbase, the VFX team built a CG environment and inserted live-action of the performers into otherwise fully digital shots of the gigantic red-skinned devil bursting out of the ground.
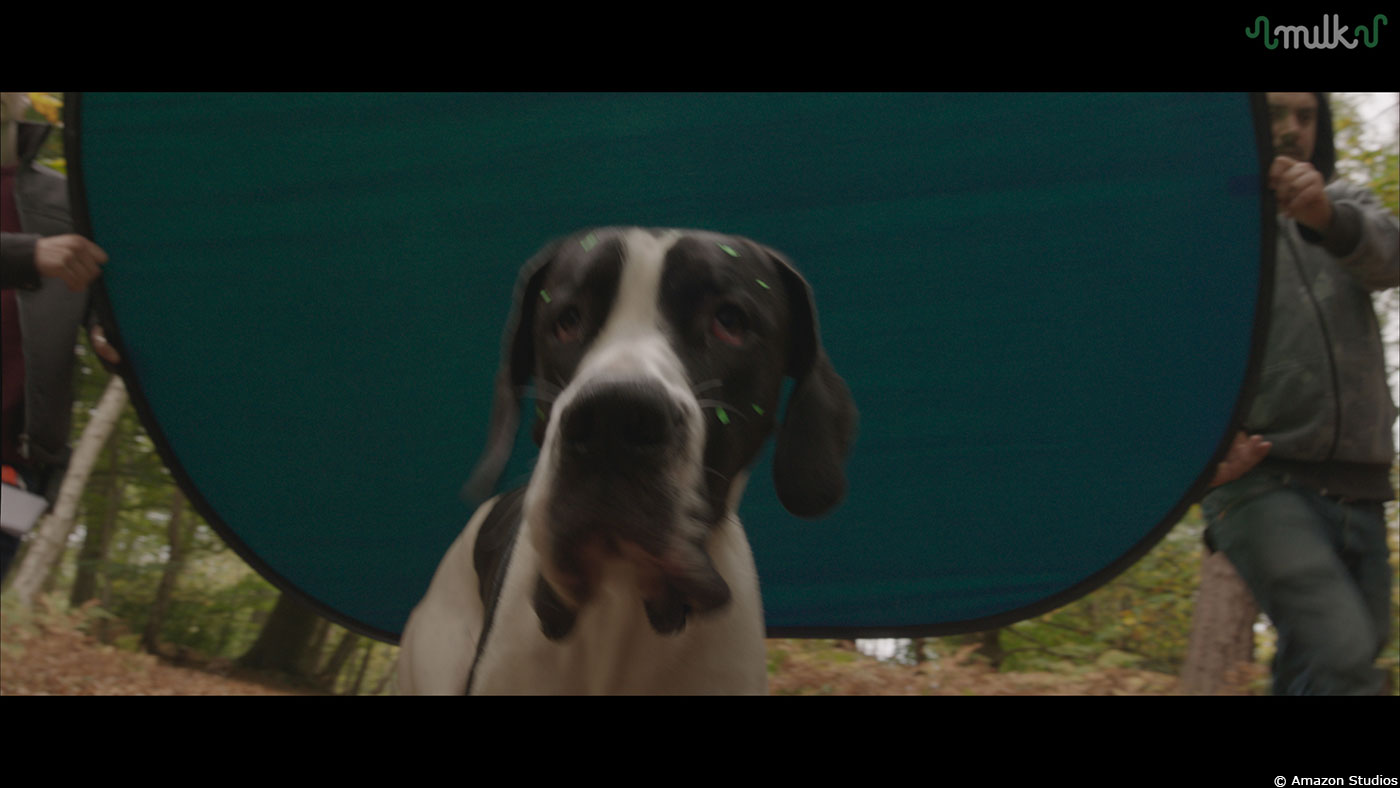
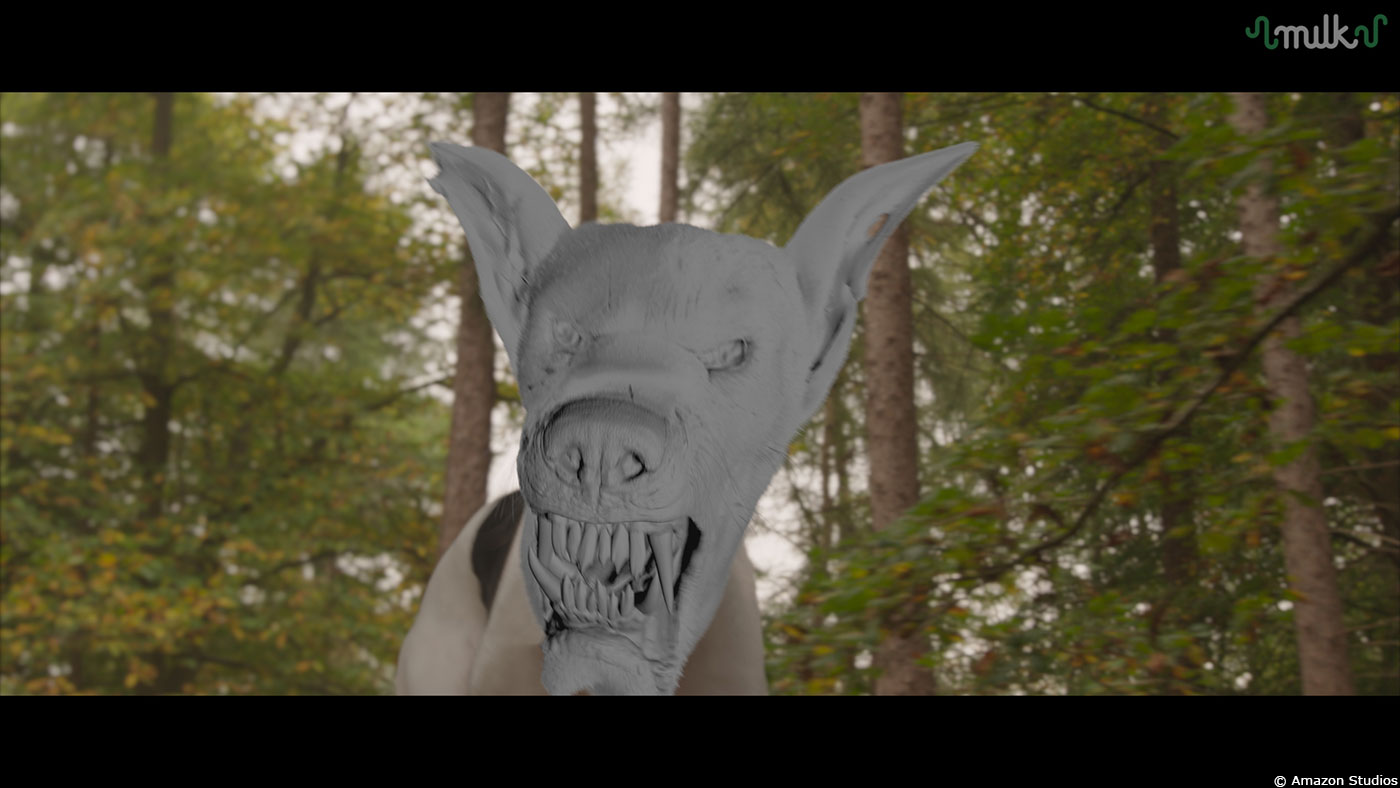
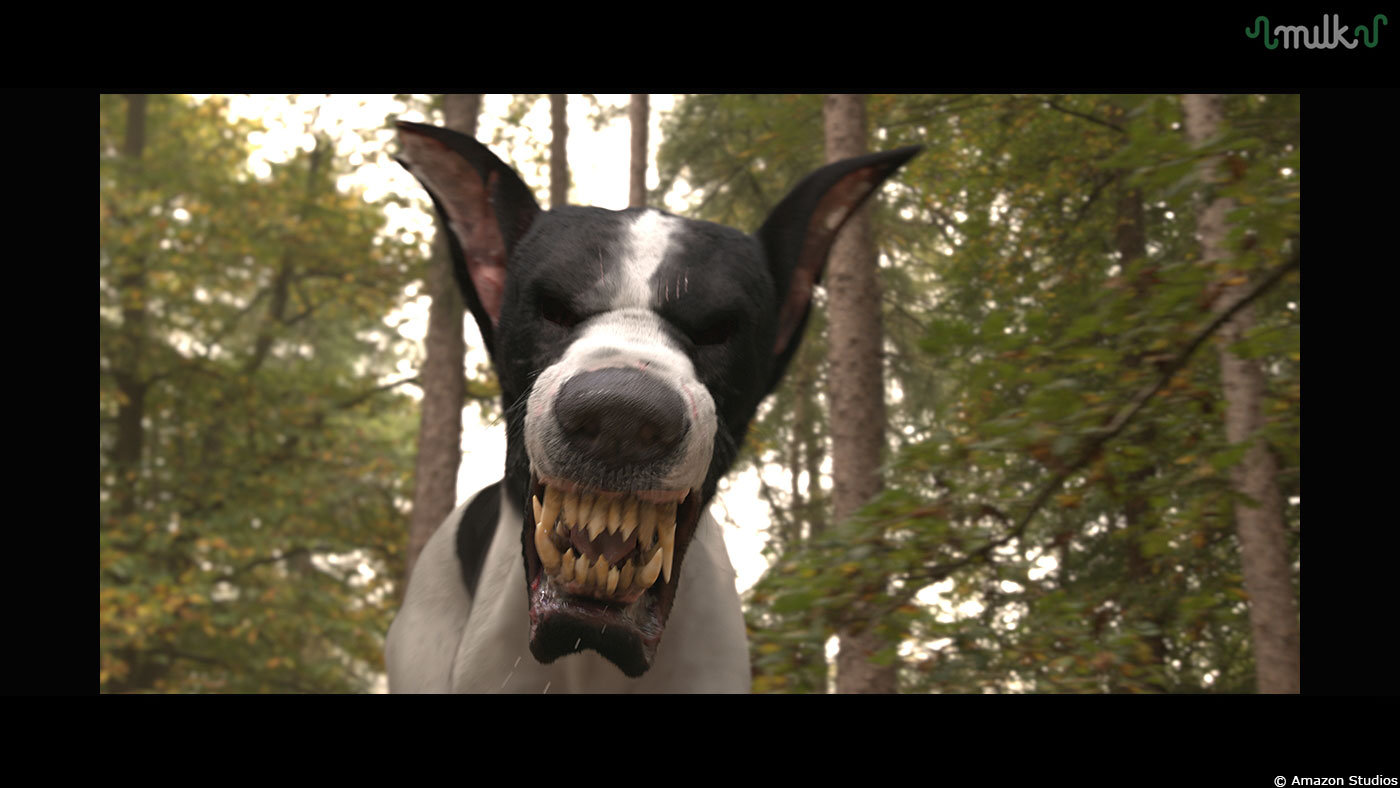
Hellhound:
Beelzebub (Anna Maxwell Martin) sends the Antichrist (a boy called Adam) a giant Hellhound. By giving the giant beast a scary name, Adam will set Armageddon in motion. In reality, Adam really just wants a loveable pet and transforms the Hellhound into a miniature hound called, simply, ‘Dog.’ A Great Dane performed as the Hellhound, photographed in a forest location while a grip kept pace with a small square of blue screen. We tracked the live-action and performed a digital head and neck replacement. Sam Lucas modeled the head in Autodesk Maya, matching the real dog’s anatomy before stretching its features into something quite hellish and grotesque. A final round of sculpting followed in Pixologic ZBrush, with artists refining 40-odd blend shapes for facial expression.
Once our rigging team got the first iteration of the blend shapes, they passed the asset off to animation for feedback. They then added an extra level of tweakers around the lips. In the creature effects phase, they used Ziva VFX to add soft body jiggle around the bottom of the lips and jowls.
Usher:
One of our favourite characters was a small, rotund, quirky demon creature called the Usher. He is a fully rigged CG character. Our team took a fully concepted image and adapted it to the performance and physicality of the actor. To get the weight of Usher’s rotund body the rigging team, lead by Neil Roche, used Ziva VFX to run a soft body simulation on the fatty parts of the creature, which gave him a realistic jiggle. They then added a skin simulation using Ziva’s cloth solver to give an extra layer of wrinkling across Usher’s skin. Finally they used nCloth in Maya to simulate his sash and medals.
We had a performance of the voice actor which we referenced for the lip sync and facial animation. All of the body movements and gestures we animated fully as the proportions are so different to those of a human.
Usher meets his demise in a bathtub of holy water. The brief was for him to fully disintegrate during the length of the shot without splashing a nearby demon who could not be touched by the water. To achieve this the effects team had to choreograph the particle simulation by damping its velocity in specific areas and were careful that the input animation was not too violent. The disintegration effect was made more interesting by transforming the character into inky smoke that moved with the water and then dissipated to nothing.
The Kraken:
Our Kraken pays homage to Ray Harryhausen and his work on CLASH OF THE TITANS. Our ambitious teams worked to create the immense scale of the Kraken and take water simulations to the next level. The top half of the Kraken body comes up out of the water and we used a complex ocean / water simulation system that was originally developed for our ocean work on feature film ADRIFT.
The interior boat shots with the Kraken’s tentacles were also full CG environments, we had to create the ocean and water effects / splashes and interaction to work with the tentacle animation. We didn’t need the full CG creature for these shots as we only saw the tentacles – so we had a tentacle rig that we would bring into our animation scenes and animate to make you feel like the boat with the terrified fishermen inside was being grabbed and attacked by the Kraken.
How does the size of the Kraken and Satan affects the animation and textures work?
The immense scale of the Kraken and Satan affects the animation for these characters significantly. With Satan towering at 400 feet tall and the Kraken being a similar size means that you have to animate them with great size and mass in mind in order for them to feel realistic and believable. It wouldn’t have suited those characters to animate them in a slow and lumbering manner. It’s a careful balance of animation and timing that needs to feel physically correct in order to be believable and realistic. If you were to animate them at a normal human scale they would feel ‘off’ and would not command the grand presence that we strove to give them on the screen.
For both Satan and the Kraken, texture wise, we had to be clever about UV space taking up a lot more UDIM’s than normal so we could dial up the detail in for when we get close up. The main challenge for Satan, as he was pretty much just red was making him look good and detailed in both really wide shots and extreme close ups without having different sets of textures. We mainly used Mari for textures but used a lot of vector displacement from zBrush, cavity maps and layers of micro bump and skin detail using software called Cronobo.
The main body of the Kraken was simpler as we knew we’d never be too close. He was done in the same way as Satan but without the extra close up detail. The tentacles surrounding him and on his head were all made high-res and needed extra detail when they are seen close up smashing against the windows seen from inside the fishing boat. What helped sell the scale was the water splashing around him from our effects team, the extra debris and seaweed over him and the established ship resting on his head.
Which CG character is your favourite?
The Hellhound. I really enjoyed the comedy of this sequence – where you go from a powerful, menacing hellhound conjured up by Beelzebub and end up with a cute little pup in its place when the Antichrist (Adam) imagines the kind of dog he’d really like!
Crowley is driving a beautiful Bentley. Can you explain in detail about its creation?
The digital Bentley featured in scenes showing the car tearing around London and the countryside at 90 miles per hour. Ultimately David Tennant’s Crowley drives through hell fire on the M25, it catches fire and burns continuously as he heads towards the site of Armageddon. The production located a real Bentley 3.5 Derby Coupe Thrupp & Maberly 1934, which we photo scanned and modelled in intricate detail. We introduced subtle imperfections to the body panels, ensuring the CG Bentley had the same handcrafted appearance as the real thing and would hold up in full screen shots, including continuous transitions from the street through a window to the actors in an interior replica car. In order to get the high speed required we shot plates on location from multiple cameras, including on a motorbike to achieve the high-speed bursts. Later production filled the car with smoke and our effects team added CG fire and burning textures to the exterior of our CG car, which intensified as he continued his journey.
How did you create the various shaders and textures?
Alongside having the onset reference that was taken on the day of shooting we were lucky enough for the owner of the Bentley to bring his car over to our London studio for a few hours so that myself and some of the artists could get a more hands on experience for how the asset looked and felt. We took an abundance of extra detailed photos close up and form every angle possible just to give us enough coverage in terms of texture detail for how close we would actually get to the car in some of the shots. Anything like smudges on the glass windows, nicks and scratches on the chrome areas, small bits of rust and dirt in the creases and grooves of the car were all captured in photos. This then gave our texture artist enough information to start building the different layers and various texture channels that was needed for the look development.
What helped a great deal was actually having the Bentley lined up in some reference plates of each shot so that we could more accurately balance and dial in the shader values according to the lighting conditions. In the initial stages of the lookdev we treated the asset like it was fresh off the factory floor in terms of looks, once we had the basic colours and base materials down e.g: metal, chrome, glass, rubber, plastic, we then started to bring it to life by mixing in other properties, in the same way that car paint behaves with its gloss and reflection falloff (fresnel). Trying to keep it as non-destructive as possible all the extra detail like dirt, scratches, rust and other texture details were then plugged into a layered shader that gave total us control over how much of it we would see in shot. We set a base amount of dirt detail that matched the images and set ref we had taken and then depending on which shots it would be in, or according to Douglas and Neil’s feedback, we were able to mix more or remove less without affecting the overall look of the Bentley.
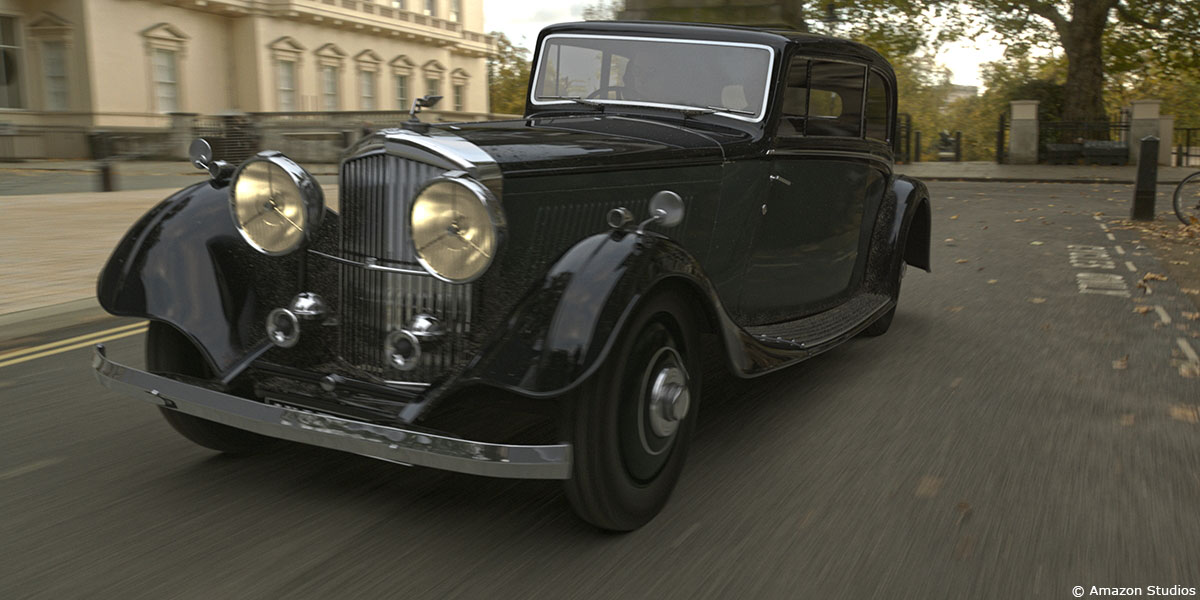
How did you film the background elements for the driving comp shots?
The digital Bentley featured in scenes showing the car tearing around central London and the countryside. Myself and effects cameraman Lester Dunton photographed background plates from a GMC pickup rigged with three Arri Alexa cameras running simultaneously. I controlled the main rear-facing camera, mounted on a remote head for dynamic moves. The other two cameras were locked on the sides, giving us left and right views we would adjust for three-quarter plates. We put a Kodak 4K 360 PIXPRO camera on the roof to help with capturing car reflections. The crew also mounted a single camera on a motorbike and we used the motorbike for speed bursts, getting from 0-30 as quickly as we could and ramping up the speed if we needed to. One transition shot shows the Bentley weaving through traffic and drawing alongside the camera, which pushes in through the window to settle on a closeup of the occupants. Our compositing team, lead by Matias Derkacz blended the CG Bentley into plates stitched together from the truck footage, then transitioned to a greenscreen studio shot of David Tennant and Michael Sheen inside the partial car. Animators swerved in CG vehicles — including a classic black London cab — to increase the sense of peril.
Later the Bentley is on fire. Can you explain about the creation of the FX elements?
The CG Bentley was tracked into the plate and its geometry used as a fuel source for the fire. Careful attention was paid to real fire footage at a similar scale for reference, with a fair amount of time spent on matching its shapes and speed of movement. We chose not to emit much smoke so as to not overwhelm the live action and give it a subtle fantasy look.
How did you handle the animation for the fire?
A real Bentley was set on fire (don’t worry it was just a shell!) and that footage was used for reference. The speed of the flames was critical in avoiding a liquid feel and helped to achieve the required sense of energy and liveliness. Fast moving noise travelling along the length of the flames added to the flickery effect.
What was the main challenge for the various fires?
Fast moving objects are always a challenge when simulating fire as the distance travelled between frames requires a huge number of substeps in the simulation to create a smooth look. In the case of the moving Bentley our effects team, lead by James Reid, had the additional problem of the collision object moving through the emitted fire volume and erasing itself. To work around this therefore, they removed a proportion of the car’s translation from its original animation and created a much more manageable simulation environment. This translation was later restored before rendering. In addition to the technical challenges, it was important to have created a robust generic setup to cope with the sheer amount of fire shots with minimal per shot tweaking.
The Wall of Fire posed an unusual challenge in that it had to resemble still photo reference of a napalm strike, whilst maintaining a look of constant heat and size. To achieve this effect we created a detailed explosion simulation and spent time on building this into a loopable asset. This was done by animating the object’s scale to give a consistent size, and by blending the final voxel values back to those near the start of the simulation. We were then able to randomly offset the result in time and instance it across an object that could be placed and sculpted to define the silhouette of the Wall of Fire per shot.
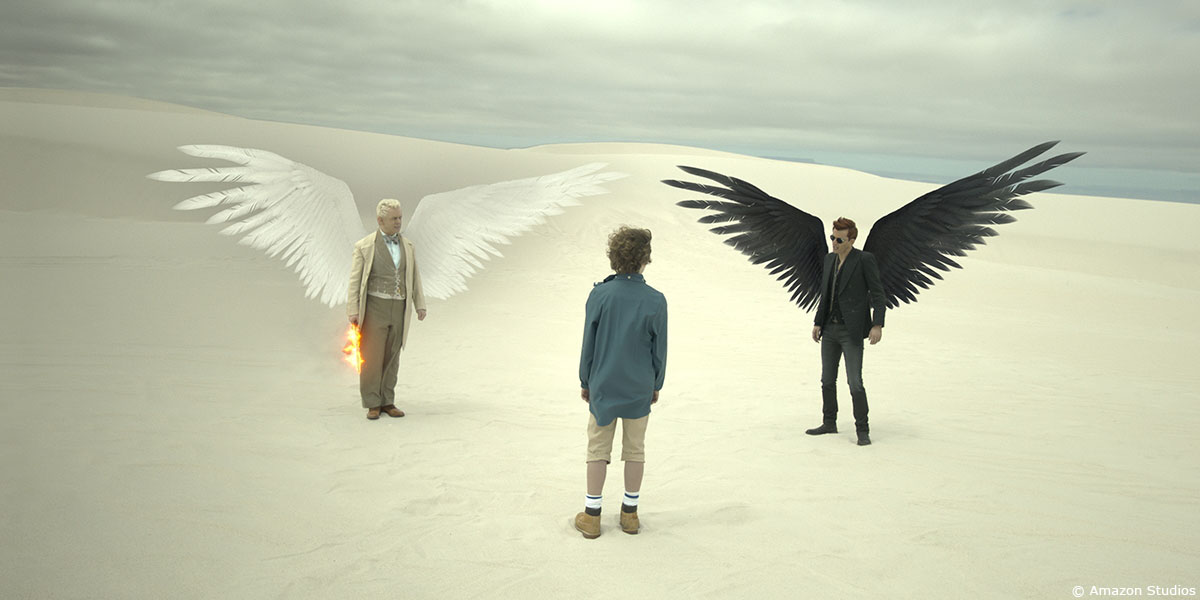
Can you explain in detail about the design and the creation of the Wings?
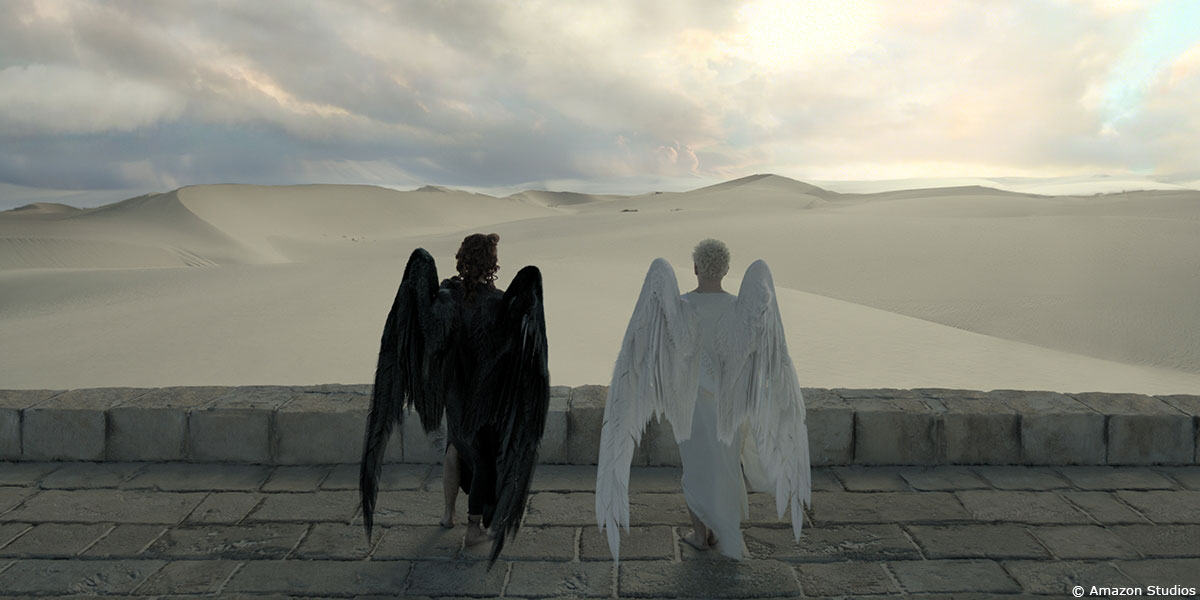
Crowley and Aziraphale both have large wings when seen in their real forms. Initially, our concept artist Grant Bonser designed bat-style wings for Crowley but Neil Gaiman preferred to have feathers for both the demons and angels.
We built each feather based on swan wings – which was most appropriate to the concept. We started building the feathers in geometry so that we had a map for our groom team to develop each feather. The wings were laid out in an anatomically correct way, with primary feathers (the long finger like feathers that feature at ends of wings); secondaries (above those on the ends of the wings) and coverts (top wings / fluffier wings). The wings were then re-groomed into feathers using Yeti. We modelled in a swan’s wing bone structure and this was then all passed to the rigging team to ensure the feathers folded correctly and worked well together. Working together, the groom, modelling and rigging and animation teams refined the wings, referencing heavily the way a swan’s wing physically folds and behaves to ensure that when doing our wing simulations, everything behaved realistically.
We decided to create the wing texturing in the look development phase. It was all shader based so that we could have complete control over colour variants and no one feather was the same hue, to break up the overall look making it more realistic.
Getting the right balance of iridescence on the black feathers and then ensuring the white feathers had enough detail and variation to stand out was challenging. We spent time in the look development stages tweaking the shaders and then when we got to actual shot production we were working very closely with Neil and our groom and creature effects team so that we were able to get a look that he and Douglas were really happy with.
Some of the shots needed to have a bespoke groom set up as we soon realised that when the animators were posing the wings at some angles they would not capture the correct shape or volume that was required for that specific shot, but this gave us the freedom to sculpt the groom and make sure that none of the detail was lost and so the wings looked and felt a part of the actors as they progressed thought the scene.
Are there any other invisible effects you want to reveal to us?
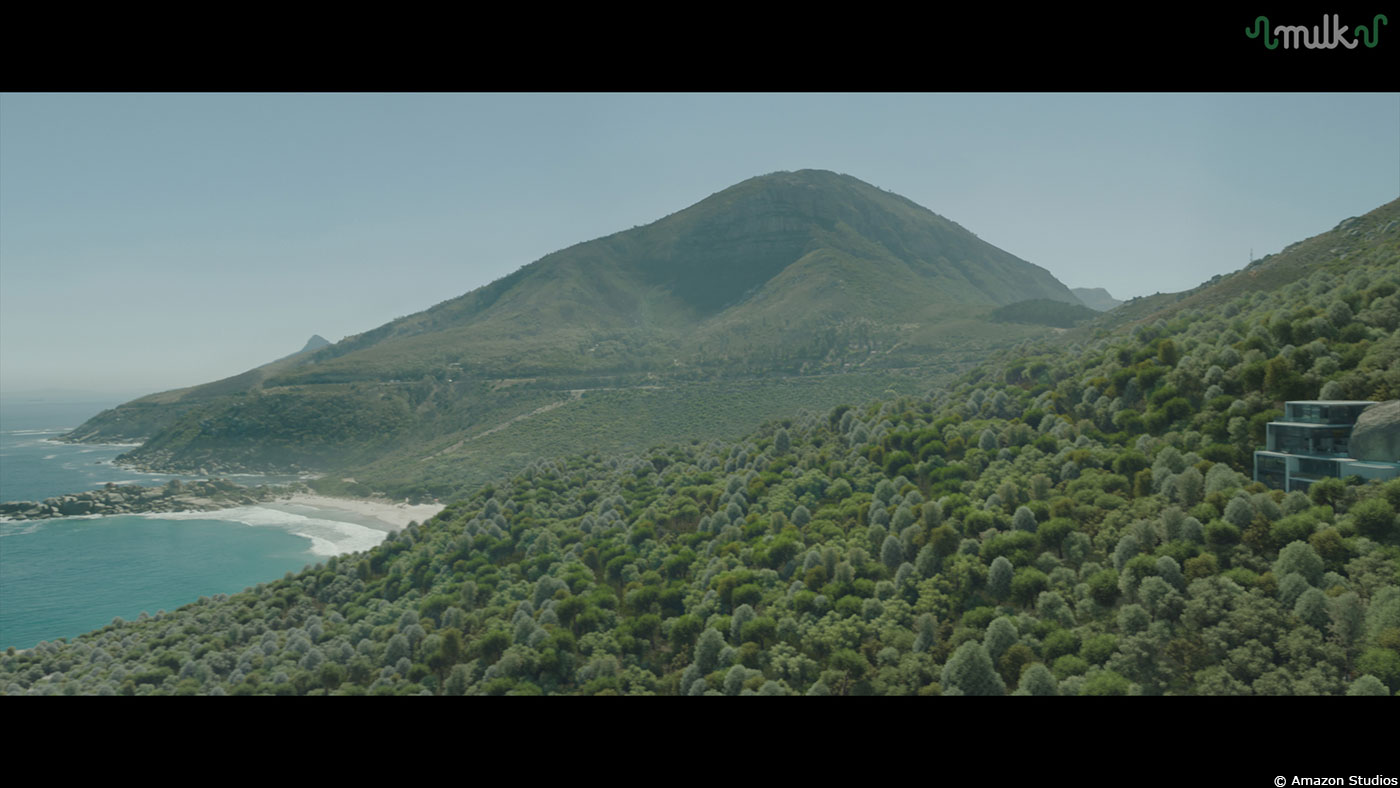
In order to achieve the aerial establishing shot of Anathema Device’s Malibu residence – which Douglas had opted to shoot on location in the coastal Cape Town suburb of Llandudno – we had to cover a couple of miles square of residential coastal hillside with green trees, except for the Device house itself. Douglas and I hadn’t planned visual effects for this shot; but luckily it was already being captured using a drone. I redeployed it to photoscan the complete location and capture the data needed to re-create the terrain in 3D. Our team replicated the hillside in geometry and scattered trees across it. We then replaced the real building’s glass balustrades with frosted panels, neatly avoiding the need to replace reflections of the town with those of the digital forest.

Which sequence or shot was the most challenging?
The sheer variety of VFX work was the major challenge – from environments, to creatures, to effects; where many of the key features such as Satan or the Kraken only appear once throughout the six part series!
The wall of fire around the M25 was challenging for our effects team as it had to burn continuously – as described previously.
Is there something specific that gives you some really short nights?
Probably the planning and the short five month post production turnaround time in which we had to create 650 shots, spanning six episodes with numerous creatures, effects and environments while remaining absolutely true to Neil and Douglas’ fast-paced fantasy-comedy vision.
What is your favourite shot or sequence?
The CG Bentley speeding through London streets with Crowley at the wheel.
I also really enjoyed the alien spaceship sequence. It’s not often you get to create VFX in a comedy context! In GOOD OMENS, whatever Adam, the Antichrist thinks about, becomes reality – however, as a twelve-year-old child this means reality is rather offbeat – and the alien spaceship is a great example!
We totally relished the opportunity to bring to life Neil Gaiman and Douglas Mackinnon’s entire awesome apocalyptic vision for GOOD OMENS!
What is your best memory on this show?
Seeing the look on Douglas and Neil’s faces when we showed them the Soho Street sequence for the first time! We were delighted to have hit the mark!
How long have you worked on this show?
Two years from our involvement pre-production to delivery
What’s the VFX shots count?
650.
What was the size of your team?
60.
What is your next project?
We’re currently working on creature lead feature film 4Kids And It; Sky/Amazon’s Britannia and a number of other film and TV projects.
What are the four movies that gave you the passion for cinema?
JURASSIC PARK, JAWS, CLASH OF THE TITANS, THE EMPIRE STRIKES BACK.
GOOD OMENS Milk VFX crew leads:
VFX Supervisor: Jean-Claude Deguara
VFX Producer: Jenna Powell
Onset Supervisor: David Jones
VFX Editor: Andrea Pirisi
CG Supervisor: Adrian Williams
2D Supervisor: Matias Derkacz
Animation Lead: Joe Tarrant
Environment Lead: Simon Wicker
FX Lead: James Reid
Modelling Lead: Sam Lucas
Rigging Lead: Neil Roche
Tracking Lead: Amy Felce
Paint & Roto Lead: Natalie Lacey
A big thanks for your time.
WANT TO KNOW MORE?
Milk Visual Effects: Dedicated page about GOOD OMENS on Milk VFX website.
Amazon Prime: You can watch GOOD OMENS now on Amazon Prime.
© Vincent Frei – The Art of VFX – 2019


, Rob Price (Zoic VFX Supervisor) & Danica Tsang (Zoic VFX Producer)")
 & Lynzi Grant (Production VFX Producer)")