
In 2017, Jelmer Boskma explained the work of Scanline VFX on GUARDIANS OF THE GALAXY VOL. 2. He talks to us today about his work on ANT-MAN AND THE WASP.
How did you get involved on this show?
We got involved on the show by doing an animation test for the movement and flying style of Wasp. This being a new character in the Marvel cinematic universe, we had a pretty open brief with regards to figuring out how she would navigate herself through the air. Lead animator Mattias Brunosson was assigned the task to come up with a variety of flourishes and signature moves that gave Wasp her unique flavor of movement. He and animation supervisor Eric Petey ended up presenting a 20 second clip of Wasp shrinking and locating a bomb on a helicopter. Her movement had a feeling of military precision in the most elegant of ways, combining skydiving, ballet, and parkour.
How was the collaboration with director Peyton Reed and VFX Supervisor Stephane Ceretti?
Most of our day to day communication with Peyton happened through Stephane and VFX producer Susan Pickett. We would talk to them through cineSync sessions about 3 times a week to review and discuss the work. Peyton was very much involved with the animation process as he had a very clear vision of the performances he expected us to deliver. Our meetings with Stef and Susan were, besides focused and productive, simply a lot of fun. There was always room for a laugh or an open mind to new ideas or changes in direction. In the end we are all trying to create the best film we can, and the creative chemistry between all parties involved really helped with that effort.
What was his expectations and approaches about the visual effects?
Stef and Peyton both felt that there was room to explore some new avenues with regards to some of the effects we had seen previously in the first instalment of ANT-MAN. In the first film, the ants were designed to be a little less monstrous looking to help sell the idea that these ‘little’ guys were friendly and on our side. This time around the ants were built with more realistic proportions and detail to help sell their believability. The ‘disco trail’ effect we see when the characters shrink had been visualized pretty clearly in the first movie, and we ended up mostly sticking to what had been established already. We did not have to emphasize or explain it as much, and thus it was used in a more subtle way generally. It was mainly an effort to ensure seamless integration and photorealism was achieved in every single shot.
How did you organize the work with your VFX Producer?
My producer, Marcus Goodwin is the man who kept us on schedule and within budget. If it was up to me we would be polishing and refining our work to no end. It is not just helpful, but simply a necessity to have someone there who can reel things in and keep us moving forward and ensure we finish on time. Marcus brought on Digital Production Manager Olivia Goh, to help break down the work into a schedule we could stick to and assign lead artists to the the various sequences we were going to be working on.
How did you split the work amongst the Scanline VFX offices?
The bulk of the work was done by our Vancouver team. All modeling, lookdev, rigging, animation and most shot lighting was done by our artists there. Compositing tasks were split between teams in Vancouver and Los Angeles on a sequential basis. Brent Prevatt supervised the compositing team in LA, whilst Comp Supervisors Michael Porterfield and Micah Gallagher oversaw the compositing work for sequences done in Vancouver.
What are the sequences made by Scanline VFX?
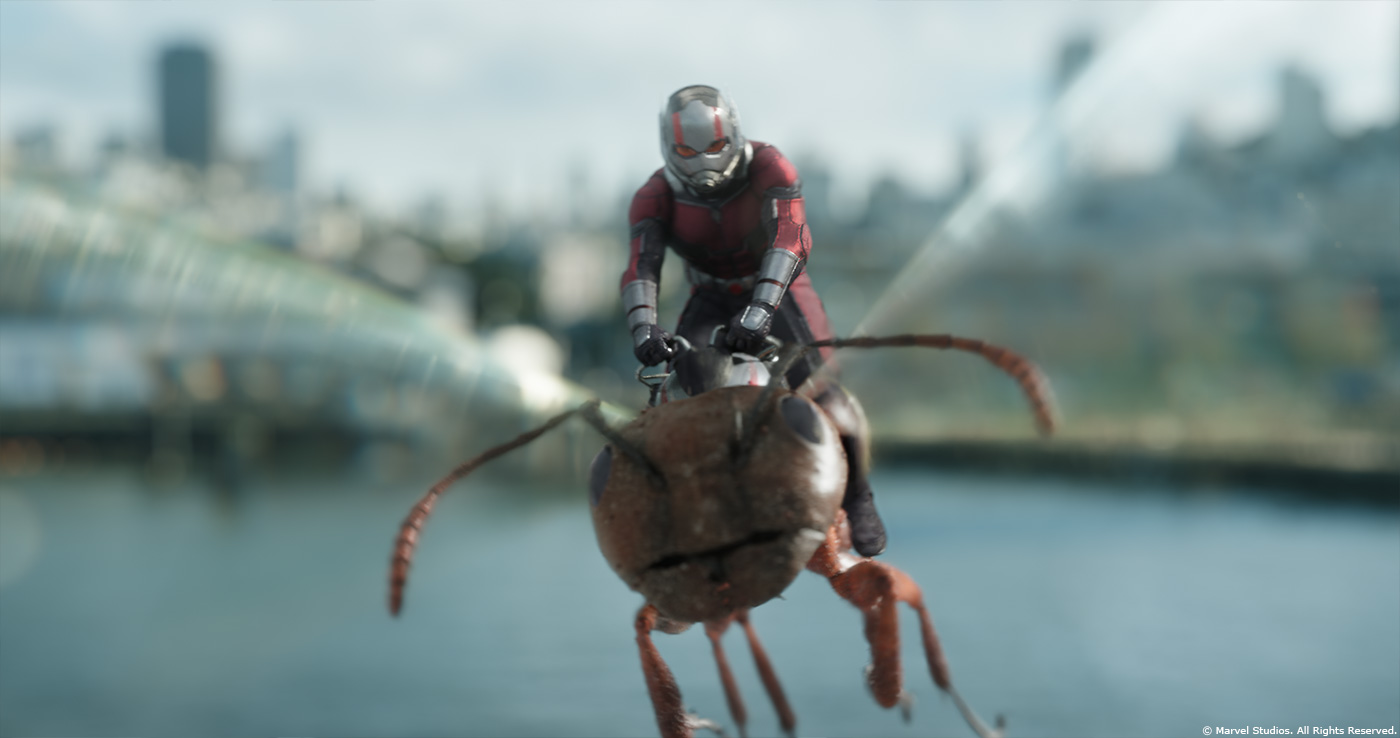
We were awarded the Restaurant and Kitchen Fight sequences, Waterfront and San Francisco Bay scenes, shots of the giant ant in Scott’s apartment, the post credits Quantum Realm shots and a variety of one-off’s scattered throughout the film. Besides that we also built the CG digi-doubles for both Ant-Man and the Wasp.
Can you explain in detail about the creation of Ant-Man, The Wasp and The Ghost?
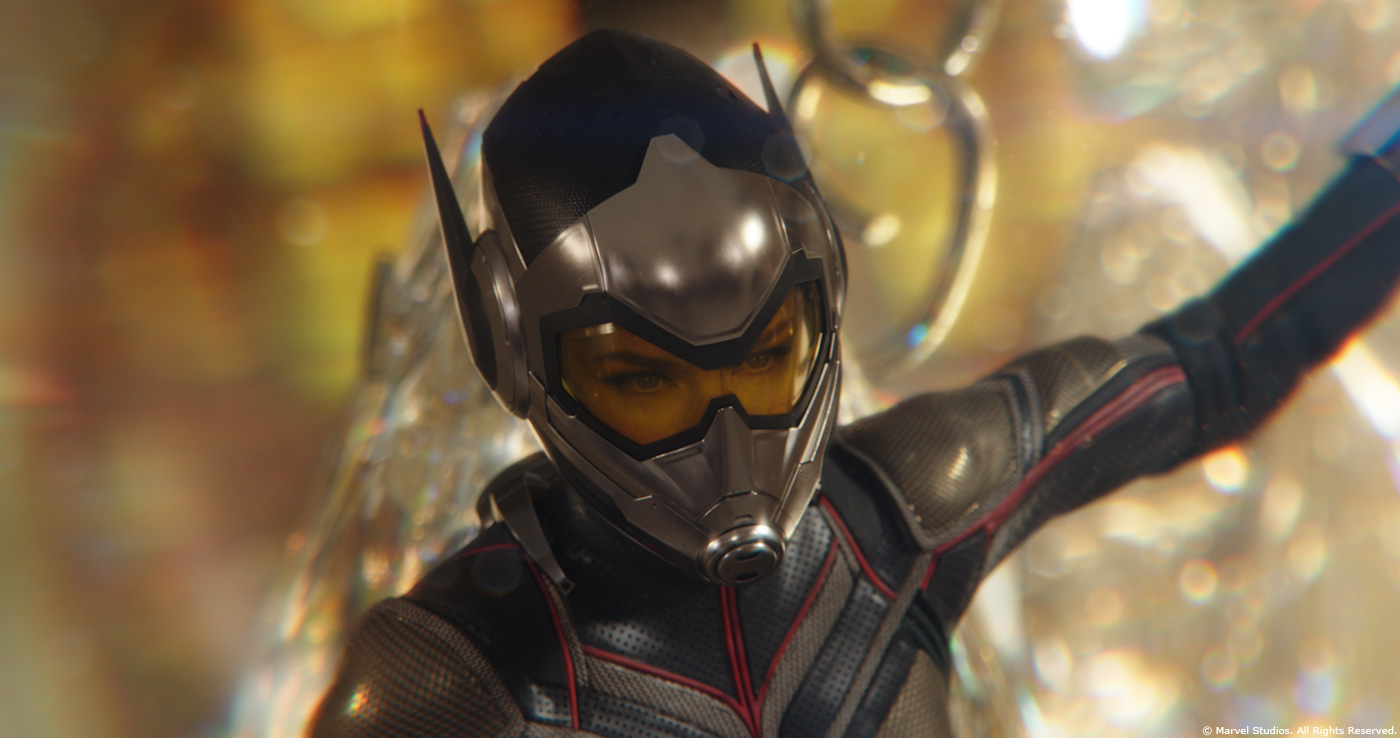
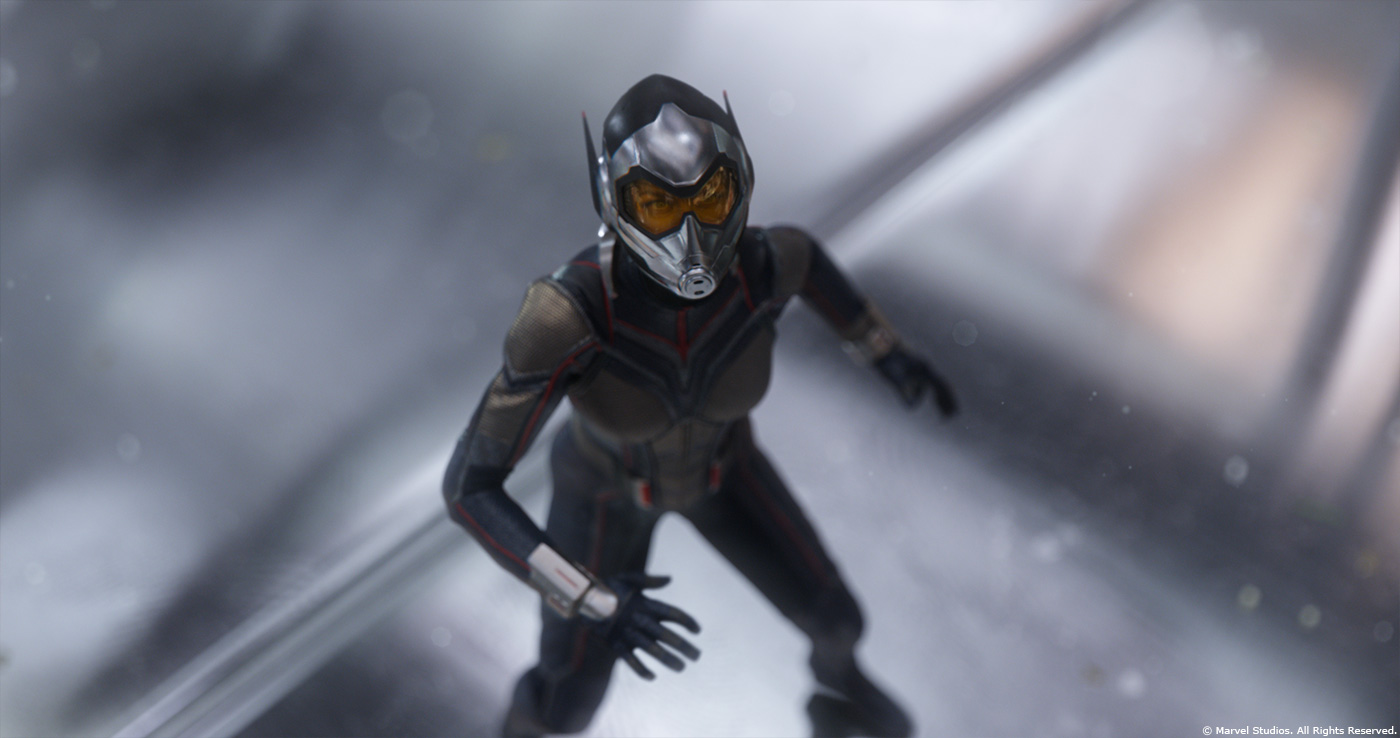
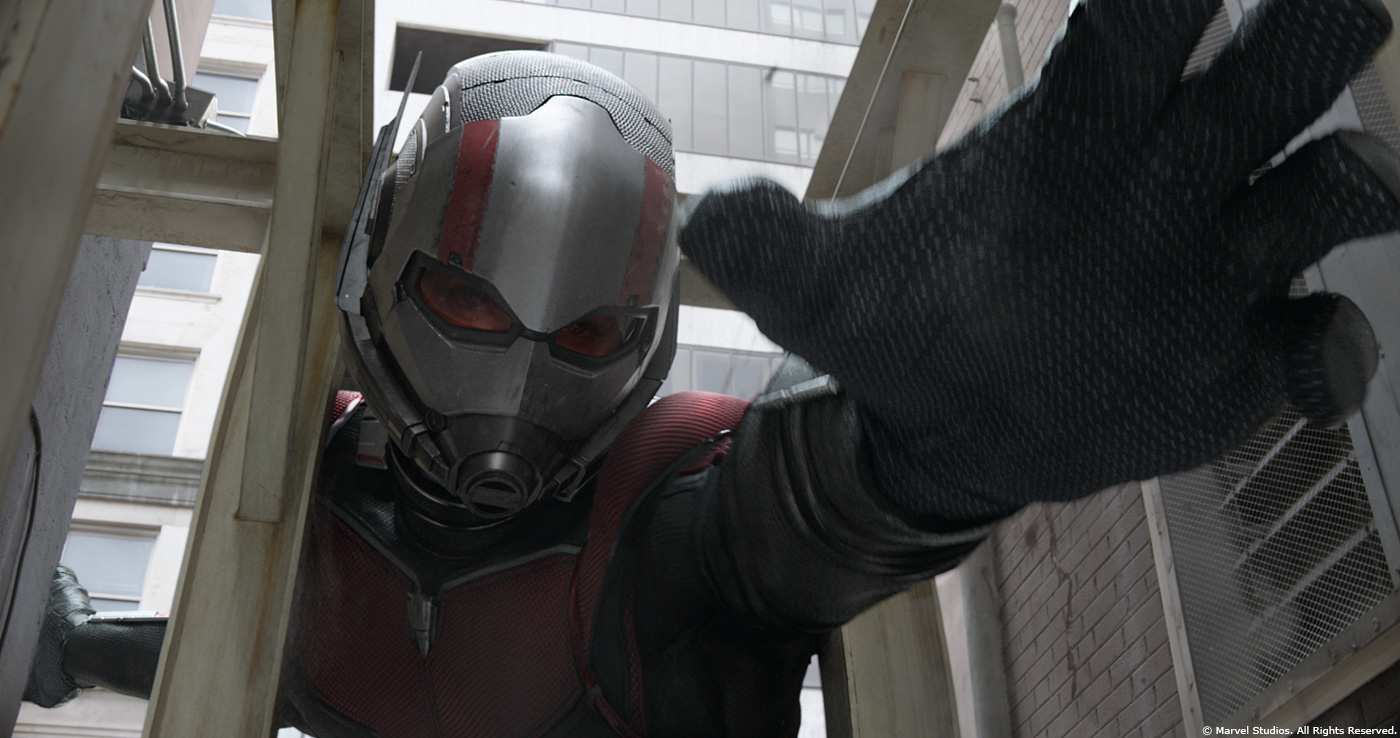
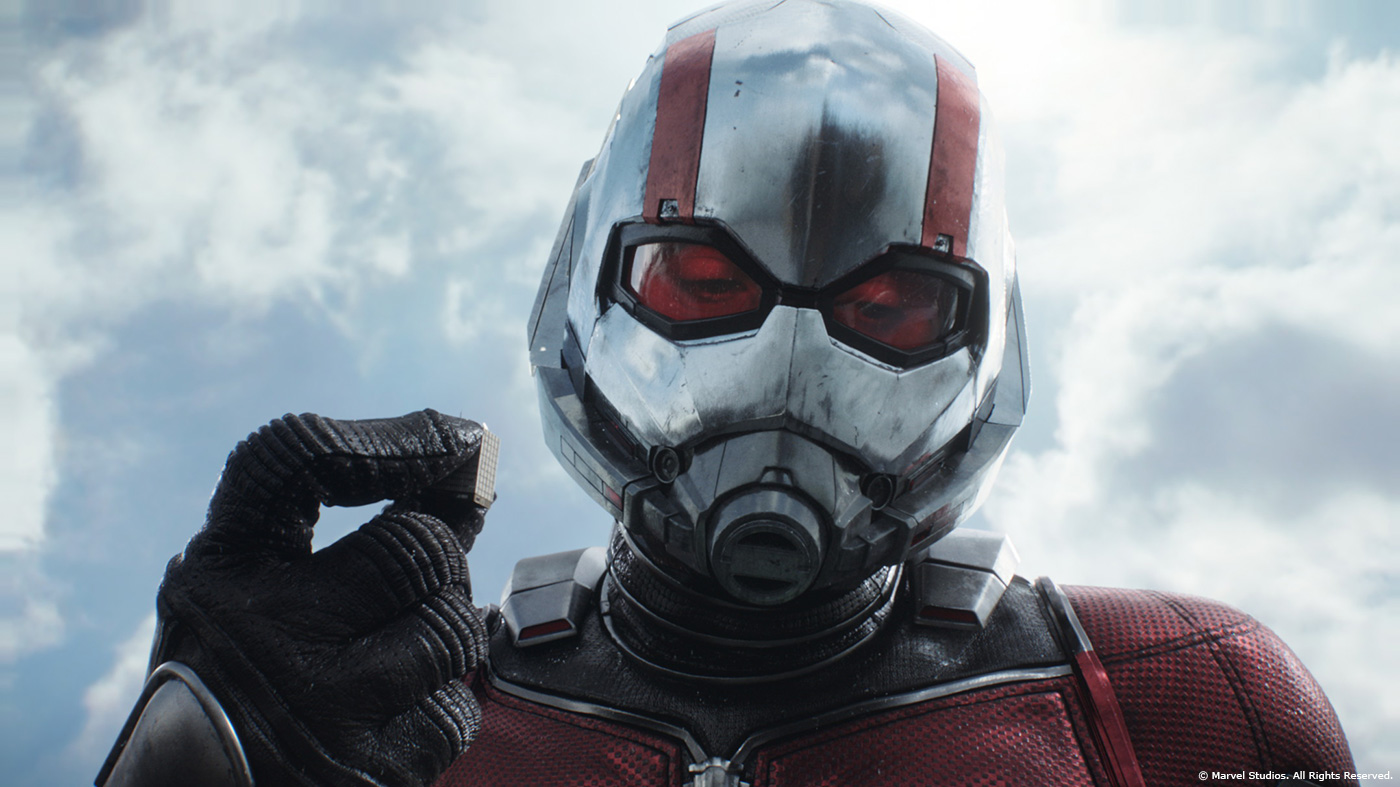
The challenge with both Ant-Man and the Wasp was figuring out the moving components of their suits. Both characters wear helmets that unfold from and retract into a compact little mechanical piece sitting on the back of their necks. Figuring out how to fit the much larger helmets into these small packages was one of the challenges for our modeling department, led by modeling supervisor Magnus Skagerlund. For Wasp we designed the final look of her unfolded wings as well as the mechanism on how they unfold from her backpack. In our initial test, Wasp’s wings had a very organic look them. Almost like dragonfly wings, with lot’s of iridescent colors. The final wings ended up having a much more hi-tech fabricated mechanical look, fitting in with the design language of the rest of the costume. We tried to come up with a system of sliding plates and telescoping parts to make the unfolding process look as believable as possible. Especially because we knew it had to happen in slow-motion shots as well. Both models were built using scan data of the actors provided by Clear Angle Studios. We had scans of the actors both in their costume and in a tight fitting bodysuit, to give us the closest possible match to their actual body proportions. We used this data to build two underlying body models that drove the dynamic cloth simulations of the suits. Even though we had shots featuring Ghost, the asset was build by our friends over at DNEG. We ingested their asset and they received our Ant-Man and Wasp assets.

How did you create the various shaders and textures?
We received excellent high resolution texture photography from the crew on set, which we utilized heavily to extract all the data we needed for our textures. Both characters’ costumes were fabricated with rather complex patterned fabrics, displaying a variety of reflective properties. Both costumes featured 3D printed components which looked fantastic on set, but were quite tricky to mimic precisely in CG. Cleanly extracting, touching up and rebuilding all that data was a meticulous process done by hand by our brilliant texture artist Jami Gigot and asset lead/texture artist Ken Lee, who were given the task to take care of the both textures and lookdev for Ant-Man and The Wasp.
Can you tell us more about their rigging and animation?
I touched on this a little in the previous question regarding their build, but getting clean animation out of the complex unfolding components was the main challenge for us with regards to the rigging of the characters. The final process ended up being a close collaborative effort between our rigging and modeling department, providing animated alembic caches of unfolding wings and helmets. Another interesting thing to talk about with regards to their rigs, is that our rigging supervisor Jim Su introduced a rather time saving element of baking down dynamic cloth simulations into the rig. We selected a group of key poses from our general Range of Motion setup and ran dynamic cloth simulations on those. The result of those sims was then broken down into a few frames per pose and piped back into the rig as key driven blendshapes. The initial setup time was time consuming, but in the end saved us an enormous amount of simulation time. Especially for shots with minimal movement, where we were getting great dynamic looking cloth deformations, without having to spend hours simulating it every time.

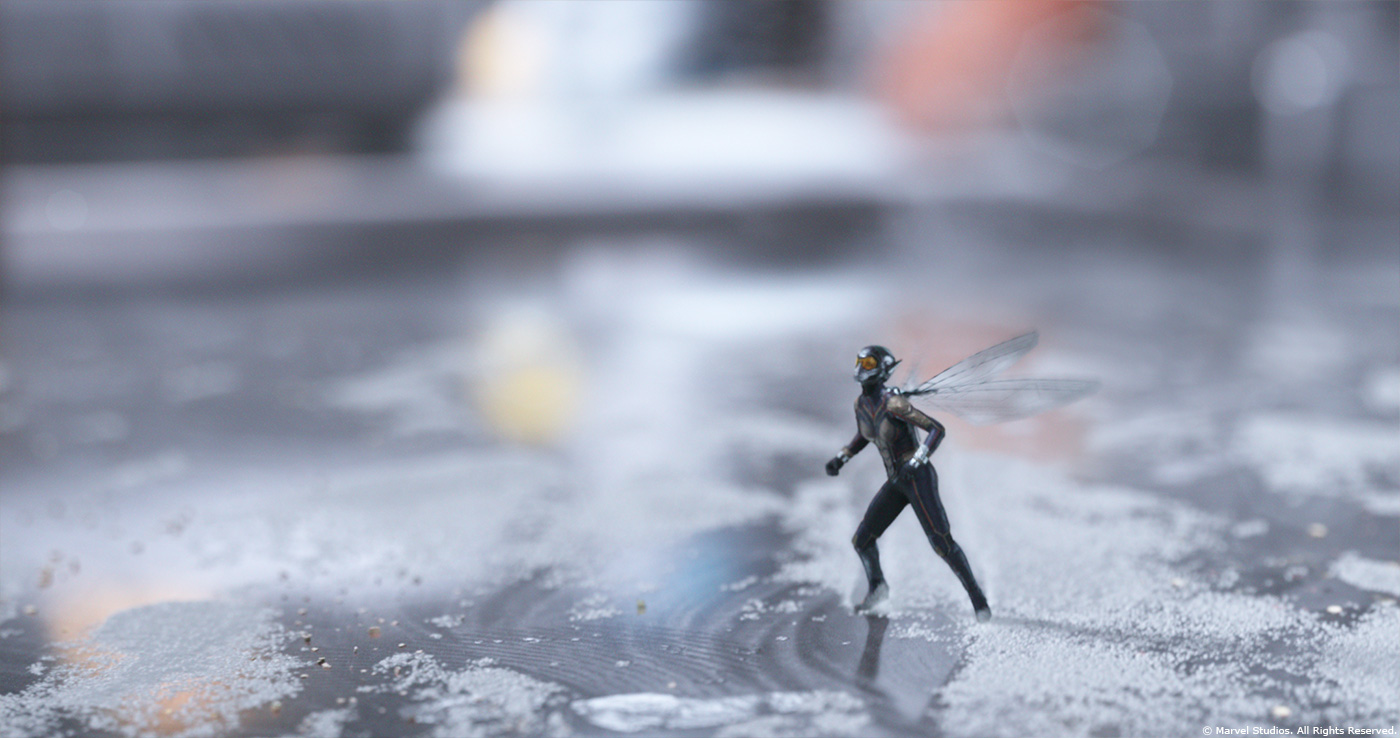
During the restaurant fight, The Wasp is constantly changing sizes. How did you manage this challenge?
We shot clean plates for every single shot in the movie. The shooting crews that work for Marvel are pretty well acquainted with the needs of VFX (be it sometimes with a little encouragement from Stef), that we don’t have to ask or remind them much. Having those clean plates allowed us to reconstruct the environment seen through the shot camera, without the actors in frame. Whenever we would do a digidouble takeover or a full digital performance replacement, we were able to swap out the actor for our digital character. Key here is that your lookdev and lighting has to be spot on, for these transitions to work. Especially mimicking cloth folds is tricky. Sometimes a combination of 2D blends and 3D matchmove was needed to make these transitions happen cleanly and invisibly. Obviously every time Wasp or Ant-Man shrinks, we switch to a digidouble, but there’s also been quite a few full replacements, where the character was CG during the entire shot.
There are also many slow-motion and macro shots. How did you approach and create these shots?
The macro shots bring an interesting new aspect to the work we had laid out in front of us. When you go as small as we had to, you essentially are in a completely new environment. Where for instance the kitchen, in regular size is one environment build, shrinking down to ant size, every grain of salt becomes the size of a fire hydrant and every bottle of vinegar becomes the size of a building. For these relatively simple assets to hold up in the macro world, a lot more attention to detail had to be spend by our layout and asset teams. We did sometimes benefit from the heavy Depth of Field effect a macro lens introduces to the elements not within the focal range, but anything in focus had to be built to a high level of detail. On set we had a macro unit shooting plates and reference photography, which helped us to a certain extend. Often we ended up rebuilding the shot fully in CG though to allow flexibility with our layout cameras and animation.
How does those two aspects affects your work?
Primarily from a planning and scheduling point of view, there are things to consider. Normally when we’d build a simple asset like a salt shaker or a bottle of vinegar, we would not allocate too much time to it. In this case we had to treat even the simplest of elements as the most hero assets on all levels. From modeling and texturing to shading and lighting. As far as slow-motion shots are concerned. The workflow isn’t affected much, other than that there are more frames to animate and render.
How did you design and create the phasing effect for The Ghost?
We did not design the phasing effect. DNEG led the charge on that, through a combination of alternate animation takes, and complex procedural Houdini distortions of the digi-double. We created a similar system and matched their look once it was approved by the studio.
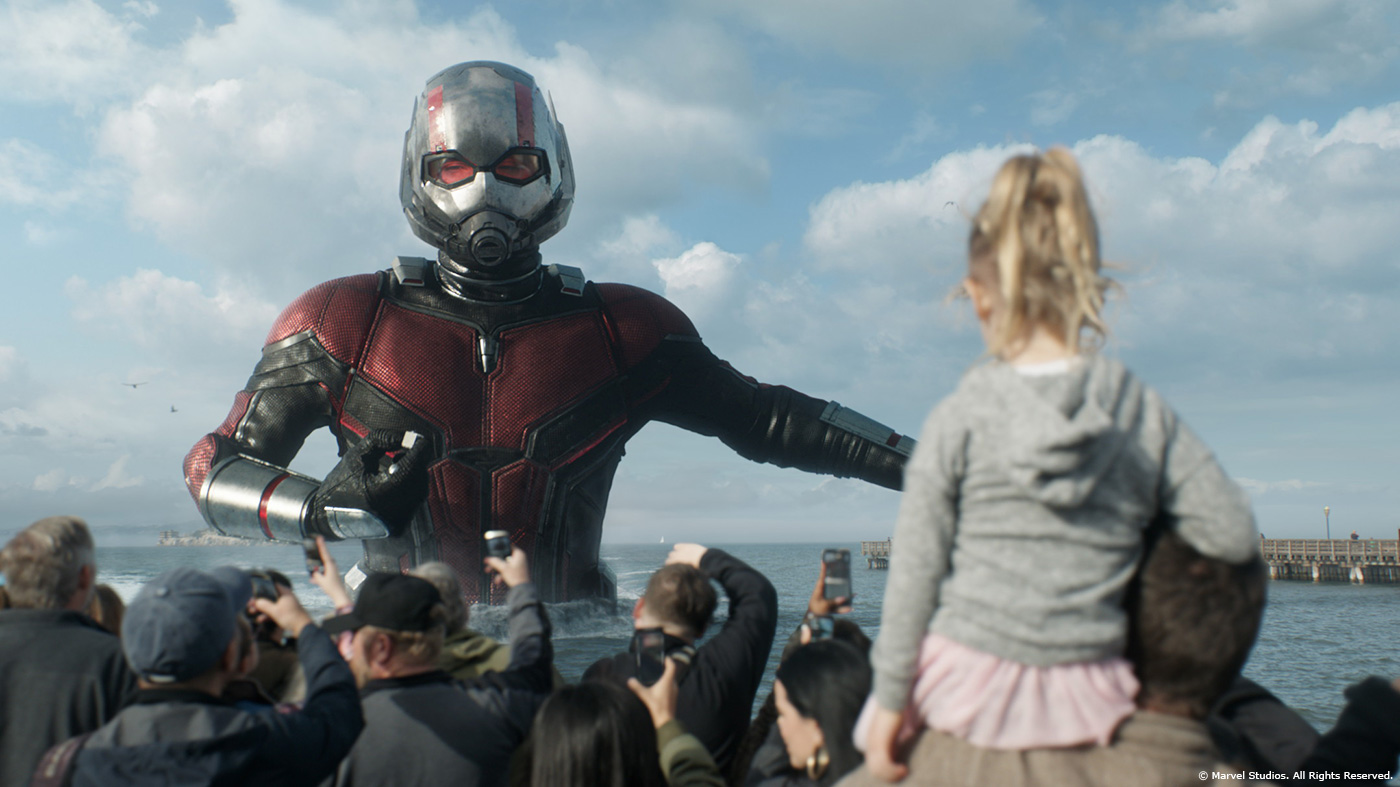
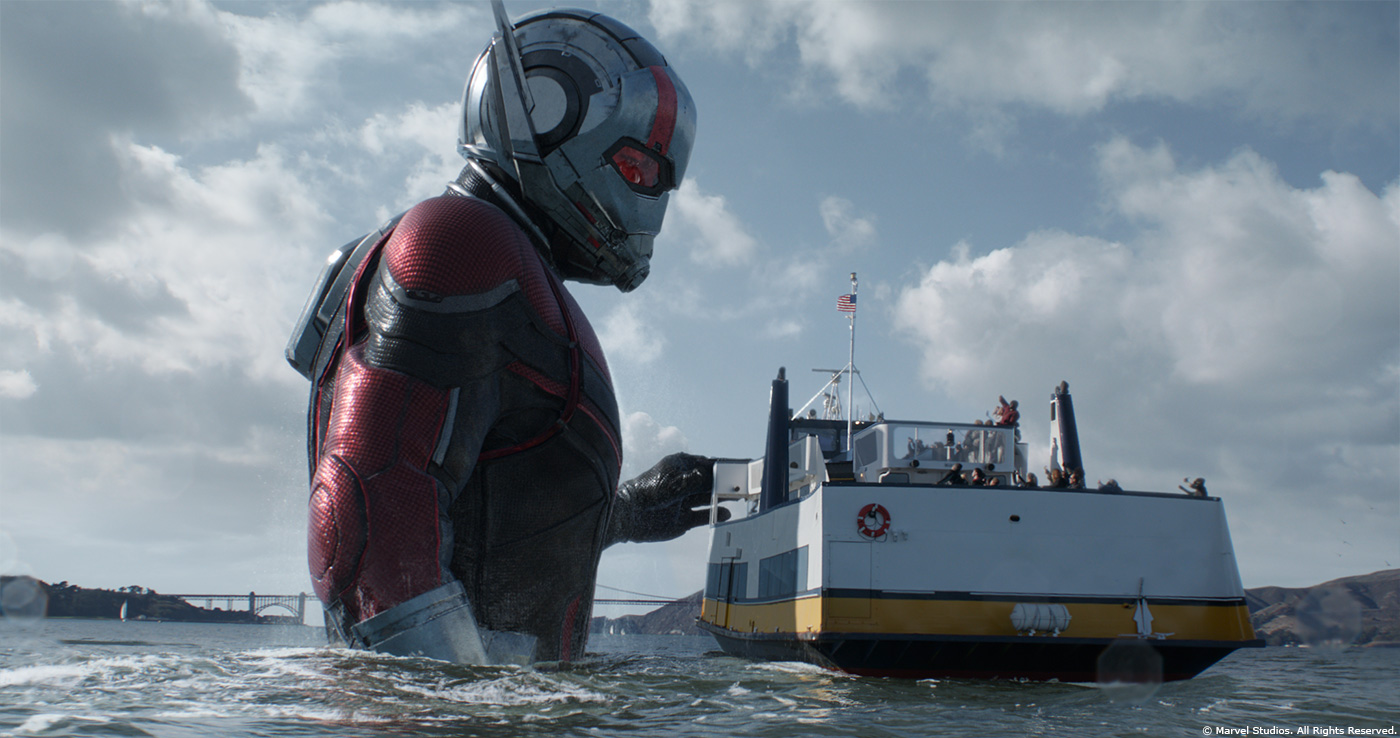
Can you explain in detail about the creation of Giant-Man?
Giant Man essentially is exactly the same asset as both life size and tiny Ant-Man. The issue you run into though is one of believability. Once you literally scale up a regular sized human model to now be 70 feet tall, there will be details missing you’d expect to see at that size. For Giant Man we had to introduce some additional small wear and tear and break up some edges that were simply too perfect and straight. Even when the idea is that Giant-Man is the exact same character scaled up, it just doesn’t feel right or believable when you approach the look in that way. Having that smaller breakup is necessary if you want the character to look believable at that size.
How does his massive size affects your texture and animation work?
Our textures weren’t the problem, and other than introducing the odd additional scuffs and scratches, held up fine. As far as the animation is concerned you have to be careful with the speed at which you animate the character. Especially when Giant-Man resurfaces from the water and returns to the pier he is enormous. Somewhere around 90 feet in some shots. A character of that size needs to have it’s movement slowed down substantially to come across believable. Slowing down is obviously subjective here, as the distance Giant Man covers when moving or waving his arms is still rather large, even though it feels much slower compared to the movement of the people in the shots.
Can you tell us more about the lighting work with this huge character?
The biggest challenge, not just with Giant-Man but with any shots featuring Ant-Man and the Wasp, is that the helmets they wear are essentially giant spherical chrome mirrors. Especially for the Giant man shots, you have an asset that is very hard to light, as it’s surfaces are so reflective. For these shots it was more about building the environment behind and around the camera, which would be reflected into his helmet, rather than positioning lights to bring out his form to integrate him into the plates. It’s not easy to predict where reflections will land on a spherical object. Sometimes hand placing the elements that would be reflected, such as clouds and buildings, was the only way for us to compliment the form of the asset and make it look good in shot.
How did you handle the various water simulations and interactions of Giant-Man and the ferry?
At Scanline there’s a deep history of doing complex water simulations for a wide variety of projects, long before I joined the company. I very much rely on and am constantly impressed by the artists that work with our proprietary simulation software Flowline, to calculate and render these simulations. From a creative standpoint I try to oversee the general look and direction the work needs to be going, but it’s the talents of the Flowline artists that make it all happen. For Giant-Man the trick was finding the right scale for the water. A single droplet won’t show up, but a larger stream of water can look too forced or hurt the scale. Continuity in terms of the behavior and look of the water on a sequence level was also something we had to keep in mind. We did not want to keep emitting water, but rather aim for a more toned back and realistic look, where Giant-Man ended up having perhaps a few areas where water stuck to his suit rather than having a continuous flow of water coming off of him.
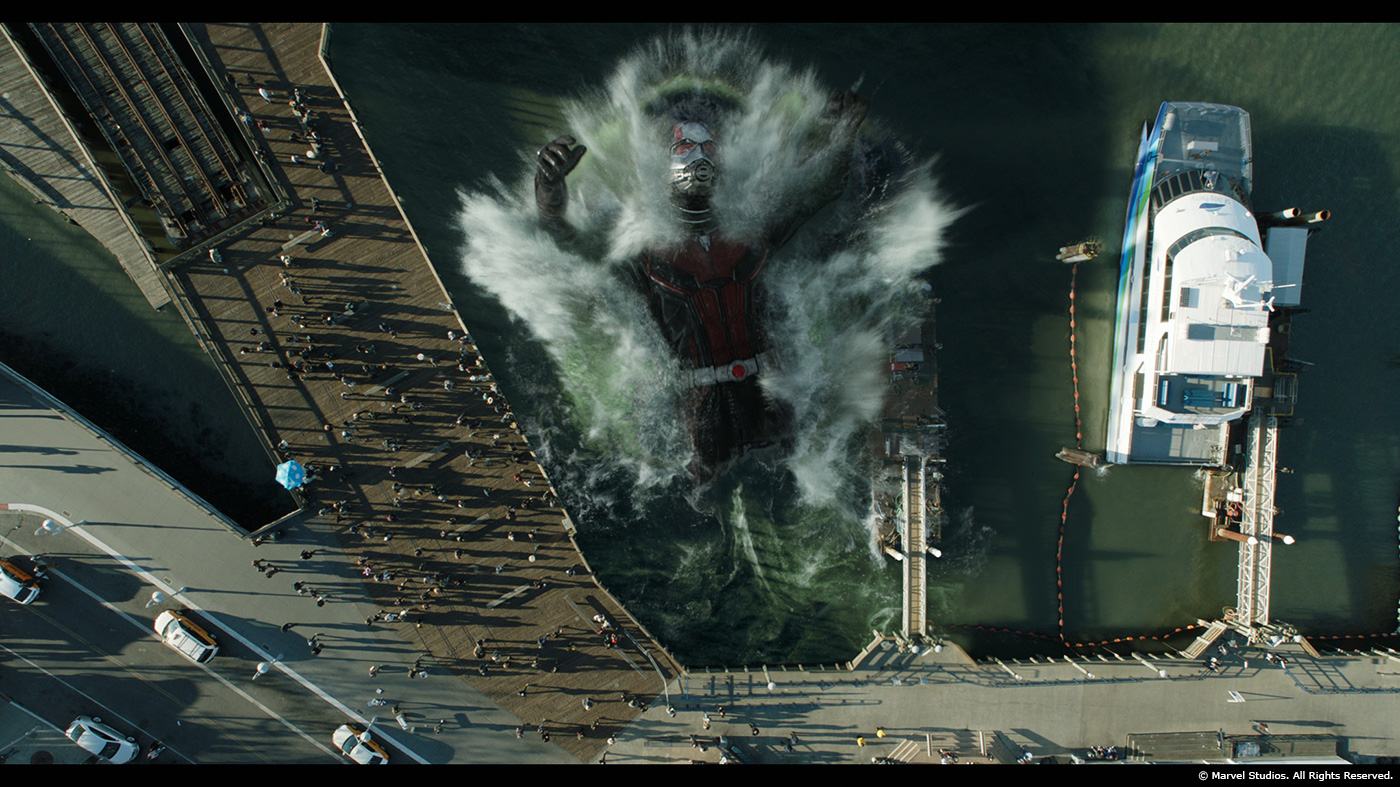
Can you explain in detail about the creation of San Francisco and its pier?
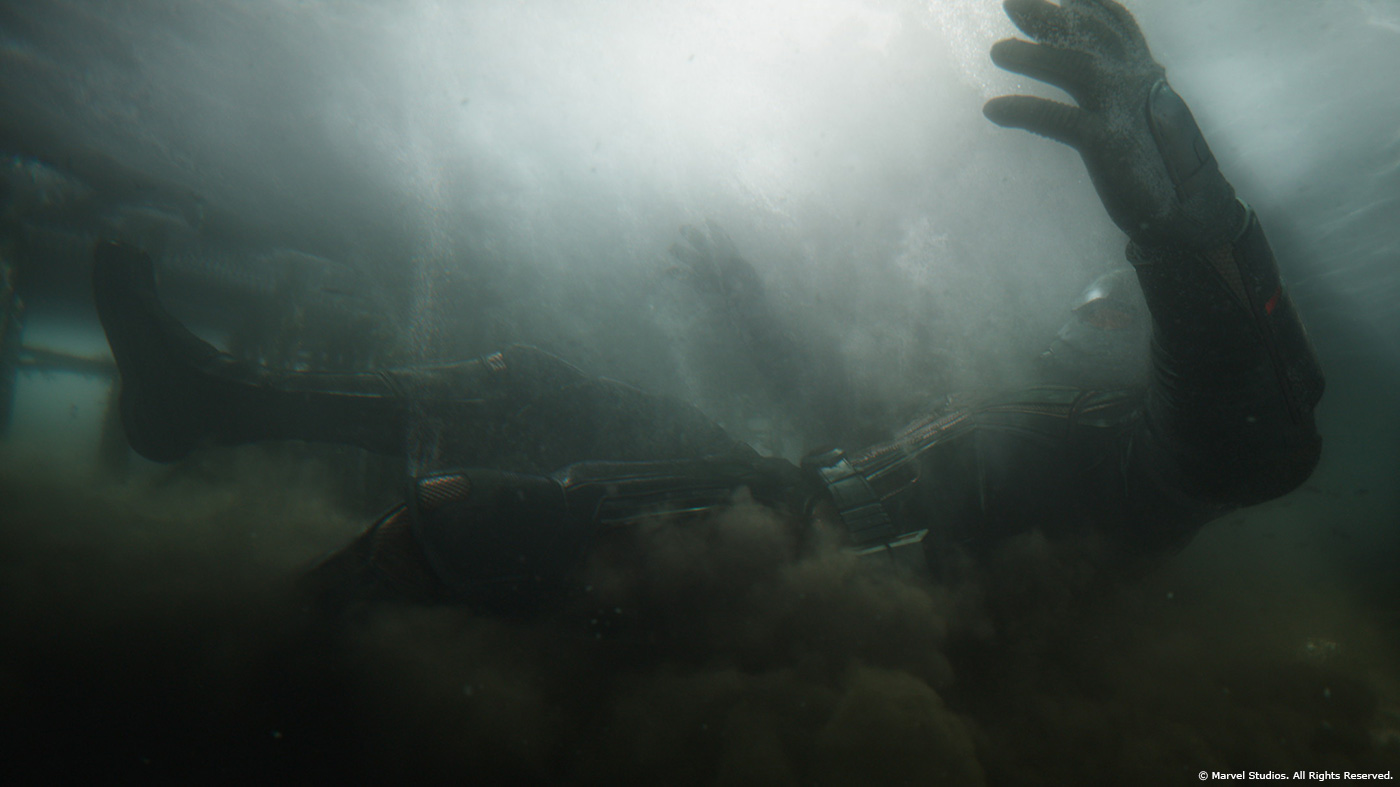
Most of San Francisco and the pier above the water was live photography in which we integrated our CG giant man, tiny ant man, the ants, and seagulls. Just as we did for the macro shots in the restaurant, we recreated a macro close up portion of the pier for a handful of shots. The seagulls were fully CG, keyframe animated and were rigged with a fully functional feather groom that included body and wing feather flutter features. The underwater portion of the pier sequence we see when Giant man falls into the water was a full CG environment we built. Those underwater shots are 99% CG, with the only exception being Wasp’s eyes, which we projected from footage captured with the facial capture camera array rig.
How did you populate the pier and the ferry?
For a few macro shots we ended up rotoscoping background extras from other plates, projected them on cards and inserted them into the shots to liven them up a little. And other than our CG seagulls it was all mostly captured in camera. The exception being that many of the shots had there skies altered to work in continuity with the rest of the sequence. This meant either adding or removing clouds on a shot per shot basis.
Can you explain in detail about the creation of the Quantum Realm?
The Quantum Realm ‘Tag’ sequence came to us pretty late in the day, in the last month of our production schedule. We had seen parts of the Quantum Realm before both in this movie as in the first instalment, but this was supposed to be a brand new area. Very colorful and full of energy. We had artists explore the look both in 3D as in 2D, to help find our color scheme and the general mood for the sequence. Claas Henke, who is both a compositor and visual effects art director, was especially instrumental. The final shots are a combination of mostly clever 2D trickery and carefully timed animated light sources. The tricky part here being the complexity and reflective qualities of Ant-Man’s suit. The look of the suit changes quite dramatically depending on the environment it’s in, so we had to tweak it slightly to make it all work.

Which sequence or shot was the most complicated to create and why?
Some of the most challenging shots for us were the shots of Giant Man interacting with the Burch and the people on the ferry. We filmed all shots for the pier and bay scenes in the same week in San Francisco and the weather changes we witnessed during that one week were quite extreme. What ended up happening was that we shot most of our pier shots on the first 2 days with clear blue skies and direct sunlight. We then moved on to do the shots of Burch on the ferry. By sheer misfortune, it so happened that that scene was shot on a completely grey overcast day. The task came to us and the colorists in the DI to figure out a way to blend these radically different looking shots together and make it feel like they were all shot within more or less the same hour in the day. Altering the lighting in a plate is some of the trickiest stuff to do right and is usually rather time consuming. Finding the right ‘in-between’ look for all shots and then massaging them into shape wasn’t easy. Because we working directly with the DI, this also meant we were turning around stuff quicker and more frequent than usual. In the end I think that the transformation these shots went through was very successful but would never show how much work really went into them.
Is there something specific that gives you some really short nights?
Not really, thankfully! The work I described in the previous question comes closest, but in the end we managed to never divert much from schedule, and therefor my sleep didn’t suffer.
What is your favorite shot or sequence?
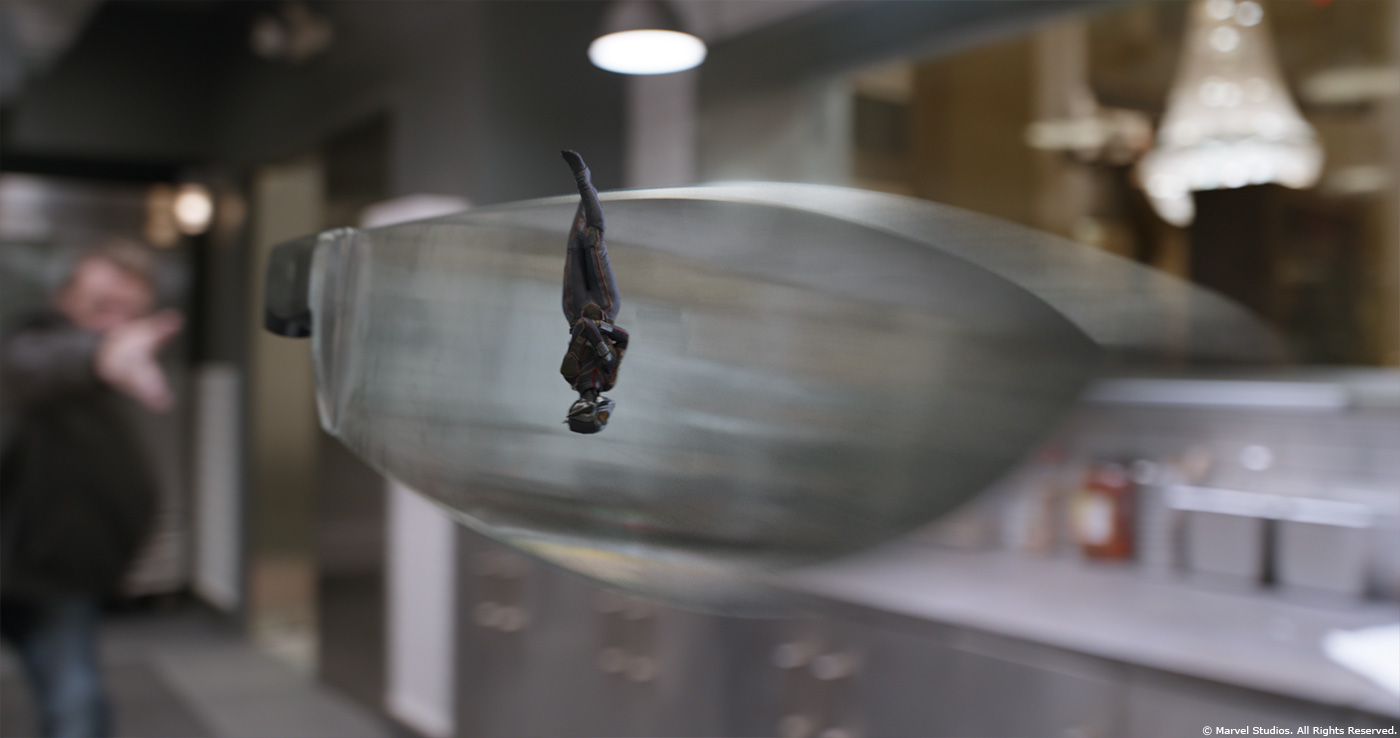
The work we did for the film has been so varied, I really can’t pin it down to a single shot, but I do have a few favorite shots. I really love how some of the closeups of Giant-Man on the ferry turned out. His initial resurfacing from the water, which ended up being featured in about every single piece of marketing the studio put out, is another one I think turned out well. I love the slow-motion shot of Wasp running on the knife in the kitchen fight, as it summarizes so much of the journey we went on with regards to finding her style of movement and making her wings work. And then there are a few underwater shots that I am rather fond of, mostly because of their mood and the lighting quality.
What is your best memory on this show?
I very much enjoyed the general atmosphere and level creativity on the show. This being a slightly more lighthearted comedy was especially fun. In the end, the relationship between a VFX house and the studio can really make or break the experience you have working on a film. Thankfully working with Stef and Susan was a blast, and I cherish the laughs we had and the result we ended up crafting together.
How long have you worked on this show?
Almost a year, 11 months or so. (July ’17 to June ’18)
What’s the VFX shots count?
During the entirety of production we worked on just over 400 shots, but with an edit ever in flux, I believe 320 was the number of shots we ultimately delivered.
What was the size of your on-set team?
Scanline had a small presence on set for this show. The ‘team’ being myself and on-set photographer Tim Donlevy. In house we had the help of about 250 people to get it all done.
What is your next project?
A bit too early to tell I’m afraid!
A big thanks for your time.
// WANT TO KNOW MORE?
Scanline VFX: Official website of Scanline VFX.
© Vincent Frei – The Art of VFX – 2018


