Nicolas Aithadi is back on The Art of VFX. After spoken of HARRY POTTER AND THE HALF-BLOOD PRINCE, he talks now about his work on X-MEN FIRST CLASS.
How did your collaboration with director Matthew Vaughn and VFX designer John Dykstra?
I had a great relationship with John; he’s someone who is very knowledgeable and extremely precise. It was a real pleasure to work with one of my idols.
How did MPC get involved on this film?
MPC had a relationship with the VFX Producer for Fox, Denise Davies from working on PERCY JACKSON. Denise and John Dykstra came to MPC to see talk to us about the project and off we went.
What are the sequences made by MPC?
MPC was tasked with the Beast transformation, the Yacht destruction by Erik (Magneto), Riptide tornados and Cerebro destruction.

Can you tell us about the Beast’s feet? How have you created them and what worn the actor on set?
For the transformation, Nicholas Hoult wasn’t wearing anything on his feet so for the shots we had to remove them and replace with CG feet. For the rest of the film, when Nicholas Hoult is Hank (before he transforms into the Beast) we had to replace his feet with CG simian feet. After the transformation besides the two shots where we replaced his face, Nicholas was wearing a full body Beast suit.
How did you create the transformation shots including the impressive first-person view?
When we started working on the film the sequence was quite different, we were talking about a full body transformation, but quickly Matthew Vaughn decided against it and John briefed us on a new setup. Matthew didn’t want to reveal the Beast to the audience before the hangar sequence when he’s introduced to the rest of the X-Men. We sent a couple of animators to Pinewood studios to work on a previs with John and they came up with the sequence as it is in the movie. Once the sequence was prevised we realised how close to camera the whole action was taking place and we quickly decided that we had to up the ante in term of detailing. Caroline Delen our lead modeling and texturing artist on this project was tasked in building three different model of foot. The simian foot, Hank’s feet before they transformed looking very much like monkey feet, the human foot which would be used during transformation when Hank thinks that his serum actually worked and the Beast foot. The human feet were modeled from pictures of Nicholas Hoult’s own feet, the Simian and beast foot were modeled from production designs provided to us by the production. They all had to have the same topology to be able to blend shape from one to the other. We spent a lot of time looking at photo reference of feet gathered everywhere we could to see how they would move and how the skin and tendons and the veins were moving around and reacting to each over. We really wanted to get as much details as we could. The most important were the human feet, we really needed them to look as convincing as they could be so we could sell the idea of the transformation more easily and they were also the ones that could be compared to reality, everybody knows how a foot looks like. We had more freedom with the simian foot and the Beast’s. In additions to the models, a large variety of displacement maps were created from fat fold to minute wrinkles. Also a network of veins was painted from big artery to medium size veins to tiny capillaries. Ben Jones our lead rigger was charged to create a rig that could trigger all these maps dynamically when the feet were animated. We kept adding detail all along, every time we were looking at it we were thinking of something that could be added.
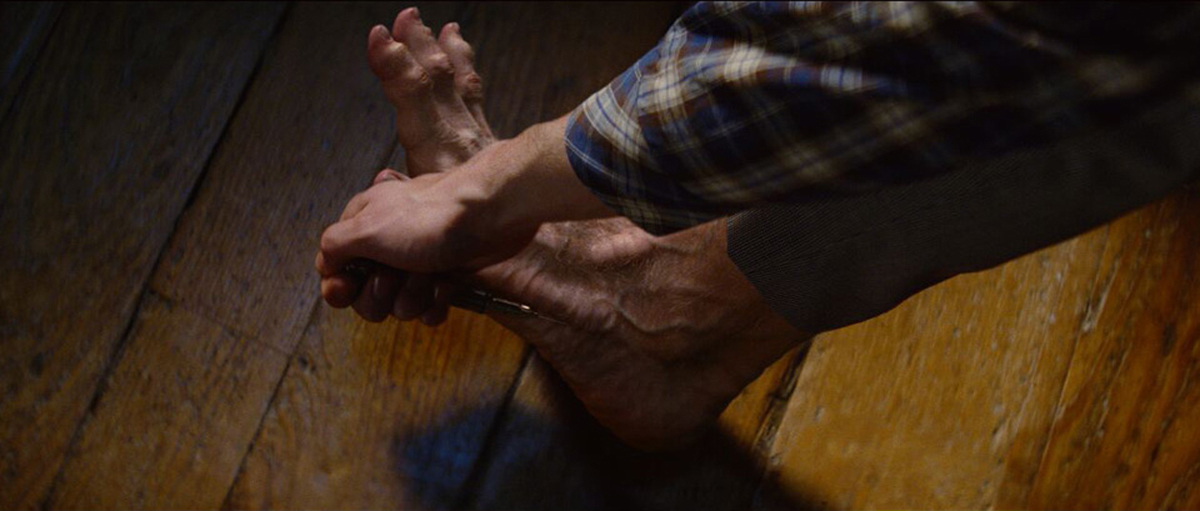
In the middle of the production, the decision was made that the original Hank’s feet had to be made even less human, so they were no mistake that they were a mutation. Caroline sculpted in Zbrush a fantastic new simian foot, which was approved by John and Matthew, so we integrated this new foot into our already started animation. Out of 4 shots of transformation the first two had only a CG foot comped in a live action plate, the last two had to be full CG. This brought another set of challenges, this time we had to do the whole leg and both arms and hands including CG cloth incredibly close to the camera. If it wasn’t hard enough the trousers had to split open during the transformation and at the same time blue fur had to grow through the splits. We used Furtility MPC’s proprietary hair grooming and and simulation software to control the growth of the fur. Occlusion maps were used to define where the hair could grow so to not intersect with the cloth simulation. For the colour change from skin tone to blue, the idea was that the serum was going through the veins changing their colour then the colour would sip out and propagate to the rest of the skin like bloating paper. This was done using a particle system, which generated a texture map that defined when the skin was changing colour. The skin shading was also a critical part of making these shot work, our lead lighting for this sequence Patrick Ledda did a great job trying to get as close as possible to real human skin.

Do you reuse techniques that you developed for THE WOLFMAN on The Beast?
We pretty much started from scratch, we wanted even more details in the way the skin, veins and tendons would react. We used a couple of things from THE WOLFMAN like using particles simulation to animate the colour change during the transformation, but it was pretty much a fresh start.
Can you tell us the creation of the anchor and the chain manipulated by Erik? How have you managed its great integration with the water?
We made the decision to replace the water with CG water, this made it easier to add splashes, spray and any interaction we would need.
Erik then uses the anchor to destroy Sebastian Shaw’s yacht. How did you create this sequence?
This was the hardest sequence we had to work on. The shear amount of work involved to accomplish that task was overwhelming. The first thing we had to do was to build the yacht. We shot this sequence in Georgia (USA) James Kelly our VFX photographer joined me on location and shot hundreds of photos of the boat, inside and out. Back at MPC Caroline and her team used those pictures and a Lidar scan that was provided by the production to model the yacht to the highest level of detail possible. We knew that it had to be extremely precise if it was going to stand up in close up. Everything was built meticulously right down to the door hinges. We had to make sure that we built it in a way it could be destroyed properly, planks and walls had to have the right structure, windows had to have a thickness… We also had to build a lower resolution interior so we could see through the window and see that there was something inside when we destroyed it. The same care was taken for the texturing, again inside and out.
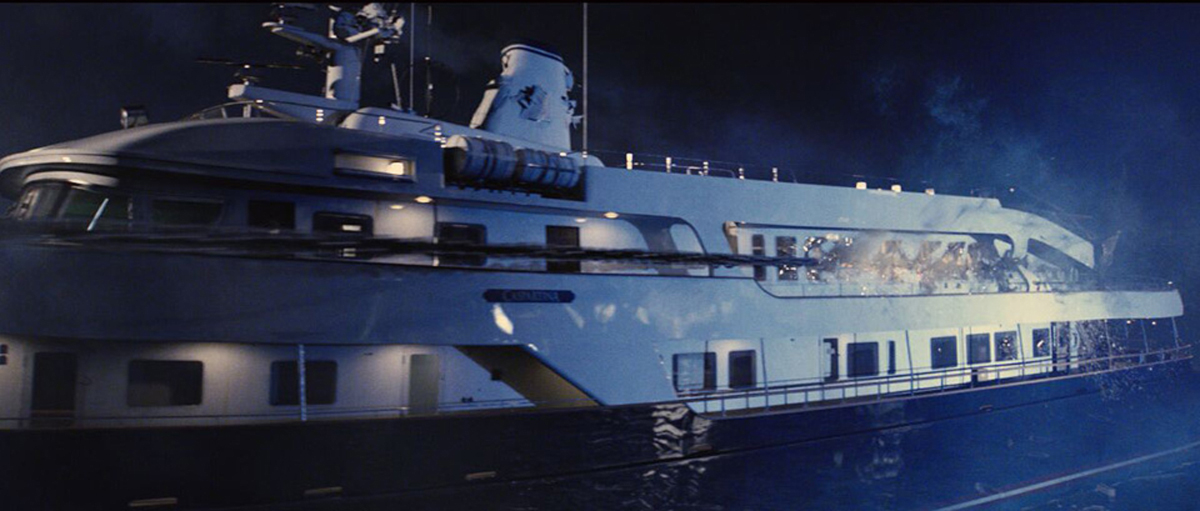
Once it was built, we had to destroy it. We used MPC’s proprietary destruction tool called KALI, which was started at MPC Vancouver to be used on SUCKER PUNCH’s Samurai sequence. Benoit Dubuc our animation supervisor and his team animated the anchor going around and slicing through the boat and the animation was then passed onto the FX department where Joan Panis our FX Lead for the sequence then destroyed the boat in sync with the animation of the anchor. Specific plates were shot on location in Georgia for the four shots of destruction, but we realized very early that those shots had to be full CG.
We used a combination of Flowline water simulation and a displacement maps to create the water around the boat. Every debris falling from it had to splash into the CG water. Again on this sequence our aim was to incorporate as much details as possible to sim and render, from the big destruction to the glass window breaking to the furniture on the deck to light bulbs exploding.
A great deal of time was spent on shading and lighting. The main challenge was the fact that absolutely everything in those shots was reflective. We had to find ways of optimizing the rendering times without scarifying quality. Daniele Bigi was the Lead Lighting TD, he and his team spent time refining the shading and lighting to the point where the yacht was very close to photorealistic. It was a very intense but very interesting sequence to work on.

Did you develop a specific software for this sequence?
The main development on this project had to do with KALI our in-house destruction tool. Even though it was started on SUCKER PUNCH we had a couple of improvement to make it work on our sequences. KALI is a fantastic tool allowing us to create amazingly organic and realistic destruction on a whole range of material. We used it on the yacht and on the Cerebro destruction scene.
How did you create the shot in which the bottom of the ship opens to reveal a submarine?
As for the rest of our work on this film, our emphasize was on precision and detail. We wanted to give a richness to the image. We gathered lots of submarine and underwater reference and divided the work into elements. The boat and the submarine were two different assets and we had to find ways of integrating them together so you would feel like they were part of the same structure. Caroline Delen and her team of modelers adjusted the hull of the boat to fit the submarine and a complete release system was devised, modeled and animated. It was a pretty cool shot to work on and the team did an amazing job.
What references have you received to build this submarine?
We received the model with the textures, and a couple of images to show us the way it looked. Our shot had the submarine very close to camera, so we had to upgrade the textures and displacement maps to accommodate our shot and break up some of the edges on the model. We created the shader from scratch, making sure that it was close to the original.
Can you explain in more detail the creation of Riptide tornadoes?
Riptide tornadoes was a creative challenge. Tornados are pretty much made of what they suck in, in a sandy environment it would be made of sand etc… But Riptide can create tornadoes out of thin air, so we had to find a visual way of representing them without the help of the usual cues. Oliver Winwood our FX lead on the tornados created a system in Maya where the particles were spinning around a curve, you could define the radius of the base or the top of the tornado, it’s speed and movements, then those particles were used to control a simulation in Maya Fluid which would give us a more organic feel, then these fluid sims, were used to control particles, which were then lit and rendered in various layers and passes and passed to compositing where most of the look was established.
In one sequence Riptide create a giant tornado that destroys the Cerebro. For this we first established the size and speed of the tornado then our destruction team, destroyed Cerebro using the tornado as a guide.
How were simulated the interactions of tornadoes on the set?
On set production were using fans to simulate the wind created by the tornados.
What was the biggest challenge on this project?
The biggest challenge was definitely the yacht destruction, the amount of details required to achieve this sequence was insane.
Has there been a shot or a sequence that prevented you from sleeping?
Again the yacht destruction, we finished it just in time.
How long have you worked on this film?
We worked 8 months on X-MEN FIRST CLASS.
How many shots have you made and what was the size of your team?
125 shots and a team of around 115
What do you keep from this experience?
It was a very challenging project with very difficult VFX. We’re all very proud of the resulting images.
What is your next project?
47 RONIN, But I can’t say anything about it, yet.
A big thanks for your time.
// WANT TO KNOW MORE?
– MPC: X-MEN FIRST CLASS page on MPC website.
// X-MEN FIRST CLASS – VFX BREAKDOWN – MPC
© Vincent Frei – The Art of VFX – 2011


A moins d’un plan par personne, sur 8 mois, on peut comprendre le coût et la qualité des fx.
En France c’est du genre trois mois a 15 personnes… 😉
Enhorabuena por tu ortografia. Un beso!