
Since his last interview here, Dan Schrecker worked on several projects such as THE SECRET LIFE OF WALTER MITTY and GODS BEHAVING BADLY. NOAH is the occasion to work again with director Darren Aronofsky since BLACK SWAN.
You have worked on all the movies of director Darren Aronofsky. How was this new collaboration?
Because we’ve worked with Darren for so long, our collaboration was much the same as it has been on previous projects: we were brought in early in pre-production and had lots of time to work with Darren on the look and feel of our sequences, because of our history we were familiar with his process and vision, that kind of thing. But this was the biggest film that Darren – and LOOK – had ever done. So there were differences. One was the fact that we weren’t the primary effects house on this film. That was ILM. So we collaborated with Darren and the production and with ILM.
What Look Effects have done on this show?
The work we did for the film includes thousands of photo-real birds; environments and set extensions; matte paintings; many, many stylized sky replacements; several water shots; lots of the Garden of Eden, including the tree of knowledge, the fruit of knowledge, the infamous snake and its miraculous skin.
We also created many less dramatic effects including breathing motion for practical creatures (“stuffies”), cg helmets, gore enhancement and a cg lizard’s tail.
What were the indications and references from Darren Aronofsky for the Garden of Eden?
Darren knew that he had to create a very special look for the Eden sequences. He wanted it to be apparent that we were not in the current reality of Noah’s time. So we worked with him to develop the look he wanted. One aspect of this was Adam and Eve. We all knew that how the first humans look in the film would be a sensitive issue. Working from concept art, we gave them a glowing look that was reminiscent of the “Tzohar” effect we developed for other scenes the film. This glow was a visual element that carried throughout the film, from Adam and Eve to the valuable golden rocks to the inner light of the Watchers.
Can you tell us in details about the creation of the Garden of Eden?
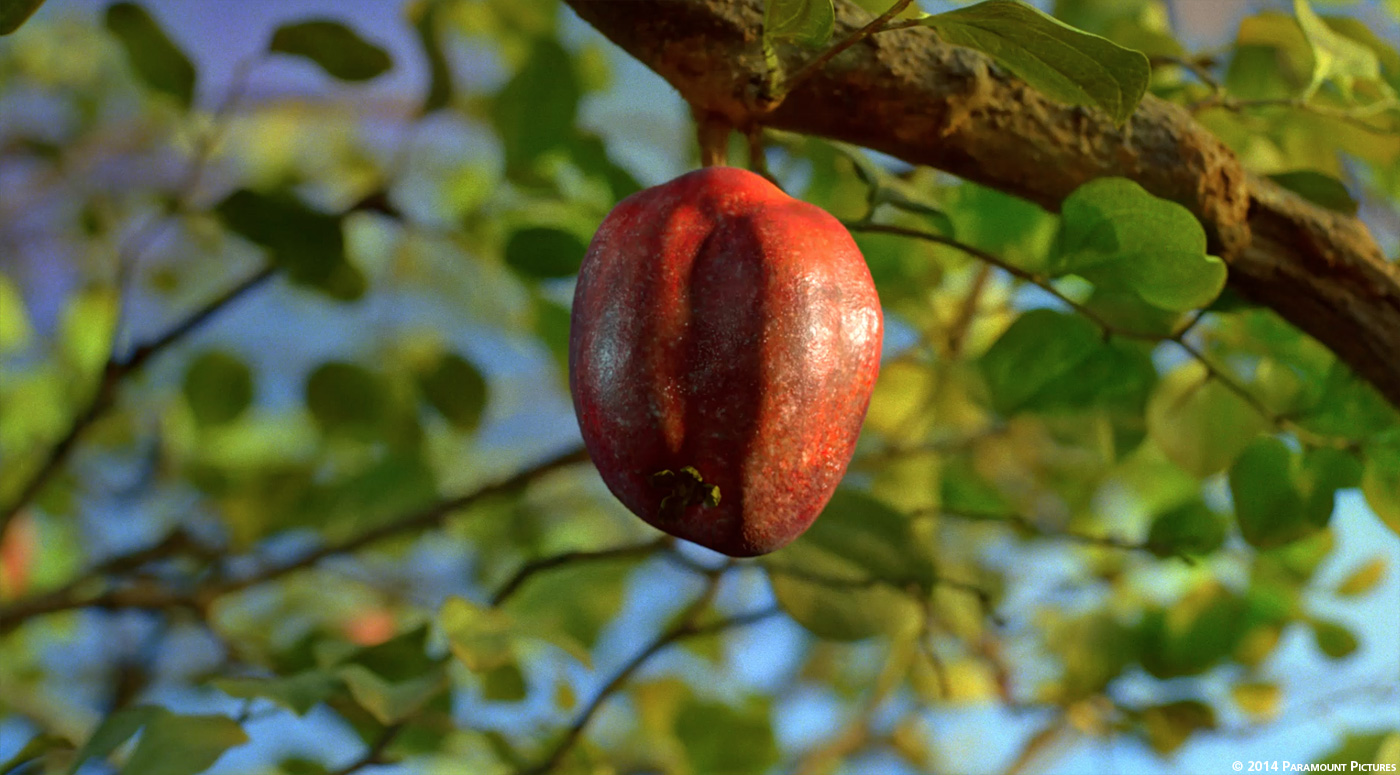
Our work for the Garden of Eden was comprised of a number of different things. First, we created the Tree of Knowledge, the Fruit of Knowledge, Adam and Eve, and the serpent that convinces them to partake of the Fruit.
We looked at reference of how a heart beats and alluded to it by breaking the fruit up into chambers and staggering the animation accordingly. In order for the actor to pluck the fruit, a practical fruit was hanging from the tree. We simply scaled our CG fruit up a tiny bit to cover the practical one.
How did you created the tree of knowledge and its fruit?
We did the Tree of Knowledge as a matte painting that we “broke” into different pieces to give some internal movement within the tree. The fruit itself was a fully CG “apple” that was designed to look like a beating heart. We looked at a lot of reference of how a heart beats and alluded to the four chambers of the heart and the resultant motion by breaking the fruit up into chambers and staggering the animation accordingly. In the live-action, there was practical fruit hanging from the tree that the actor plucked. Scaling up our CG fruit a tiny bit covered the practical one in the final comp.
Can you explain in details about the convincing snake and its skins?
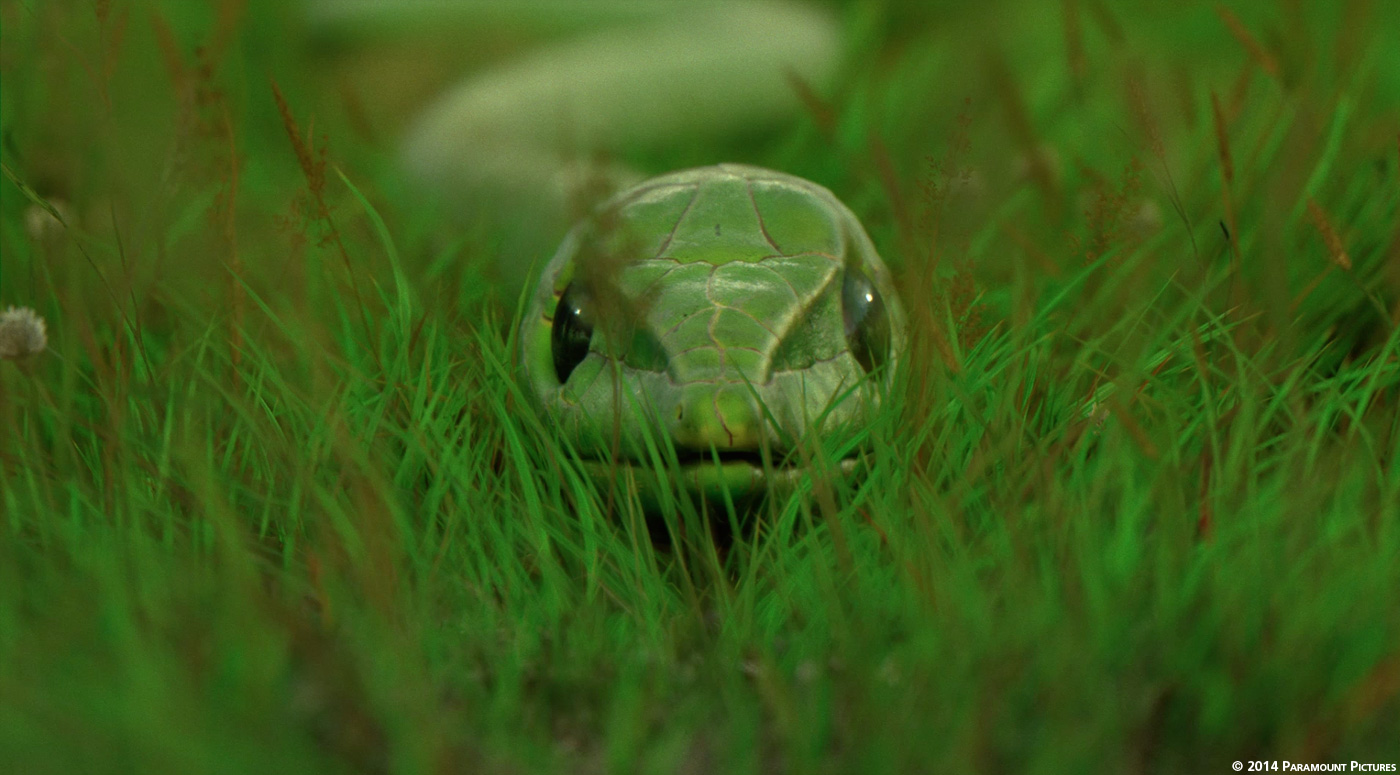
Our snake was a fully CG creature that incorporated two different designs: the green snake that we initially see and the four-eyed black snake that reveals itself when the green snake sheds its skin. The snake’s base geometry was modeled in Autodesk Maya and then we sculpted and textured in Mudbox. Getting the skin just right for all the ways it would be used in the film was a challenge. We used V-ray for Maya for the look development, using vector displacement for the snake scales and surface detail. We created a fast sub-surface scattering shade for the skin and used two-sided materials for the peeling skin. A combination of glossy, refractive shaders and additional sub-surface materials allowed us to achieve the black, inky eyes that Darren wanted.
The shedding itself was a combination of key-frame animation and a simulation that allowed us to control how it peeled off and collapsed as the black snake pulls away. A plug-in called L-Brush allowed us to sculpt the look of the simulation on specific frames. We also created a fully-CG environment, complete with rocks, macro-fragment soil (every bit of grain was placed using a particle scatter) and CG grass to interact with the snake as it slithers towards camera. We ran multiple dynamic simulations to make the interaction believable. Plates shot in Iceland provided HDR reference for us, but ultimately, we ended up making the shots 100% CG to get what Darren was looking for.
How did you approach the birds creation?
We created every bird in the film except for two practical doves and a raven. We had worked with Darren on BLACK SWAN, including the final sequence in which Nina sprouts wings and turns into a swan, so we were designated as the bird guys for NOAH. Needless to say, there is a vast difference between one pair of wings and doing multiple shots with thousands of birds.
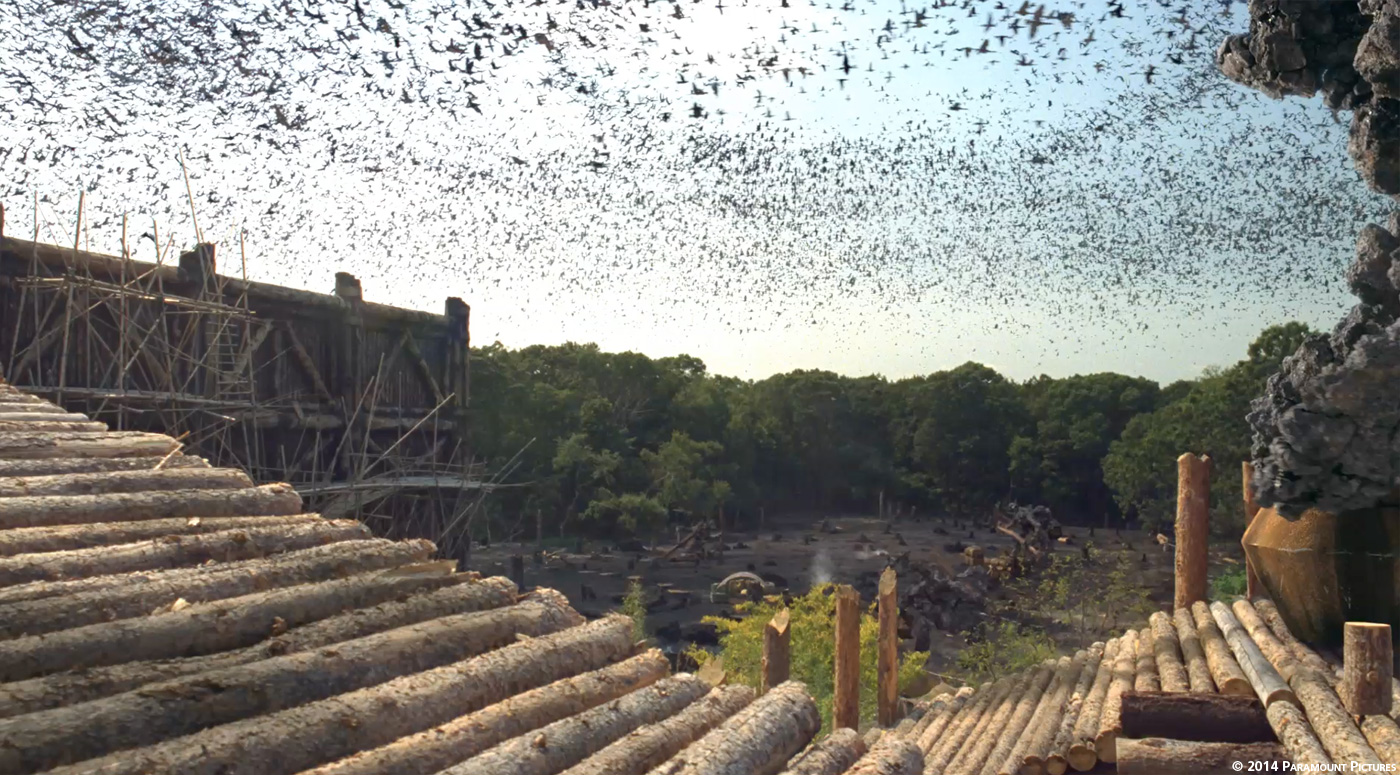
To get the job done we had to build two different systems from the ground up: a flocking system and a feather system. We also had to do a tremendous amount of work on into our infrastructure to be able to handle so much data. NOAH was, by far, the biggest show we had ever done and the work was far more complex and challenging than anything we had done before. So we had to take a fresh look at everything we had done prior.
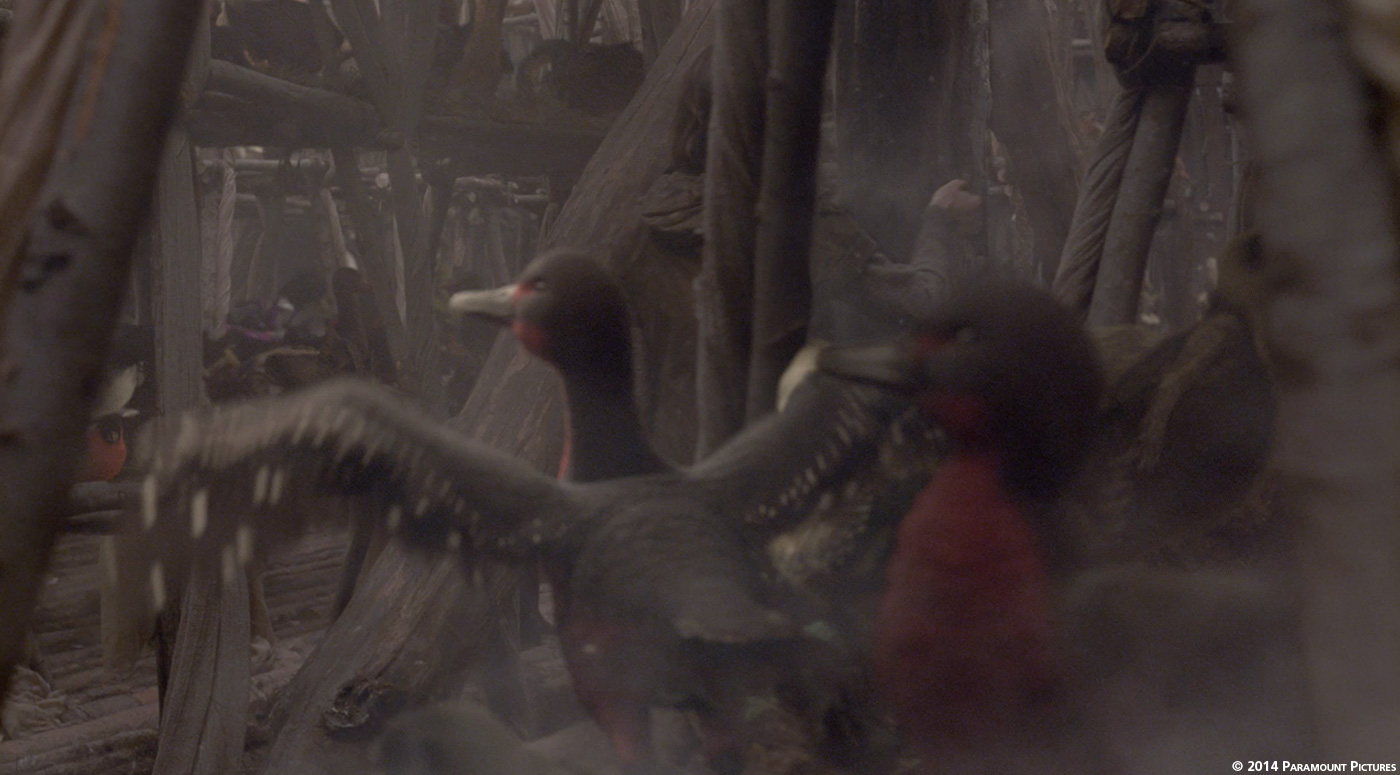
Beginning with the design of the birds, we had to figure how we could create the tremendous volume required to give the appearance that Noah has collected two of every bird on Earth. We got a number of hero birds from the Art Department that we used to build from. We ended up with fourteen different body types. From each of these we created a number of unique plumages, which we called grooms. By varying overall color and size we were able to give the impression of a tremendous amount of diversity from a relatively small number of base birds.
To make sure we had the right amount of authenticity, we did extensive research early on. We watched WINGED MIGRATION multiple time. We were also able to take a field trip to The Edna Lawrence Nature Lab at The Rhode Island School of Design. This access to real bird skeletons and feathers gave our team invaluable reference material for creating our bird reality. Ari Handel, the producer of the film, put us in touch with Ben Parslew, a Research Associate at The University of Manchester in the UK. Affectionately referred to as “the Bird Nerd”, Mr. Parslew was invaluable in helping us simulate flight animations for our hero doves that were scientifically accurate.
We had two approaches for our birds that we used, depending on the shot. In some cases, we combined the two.
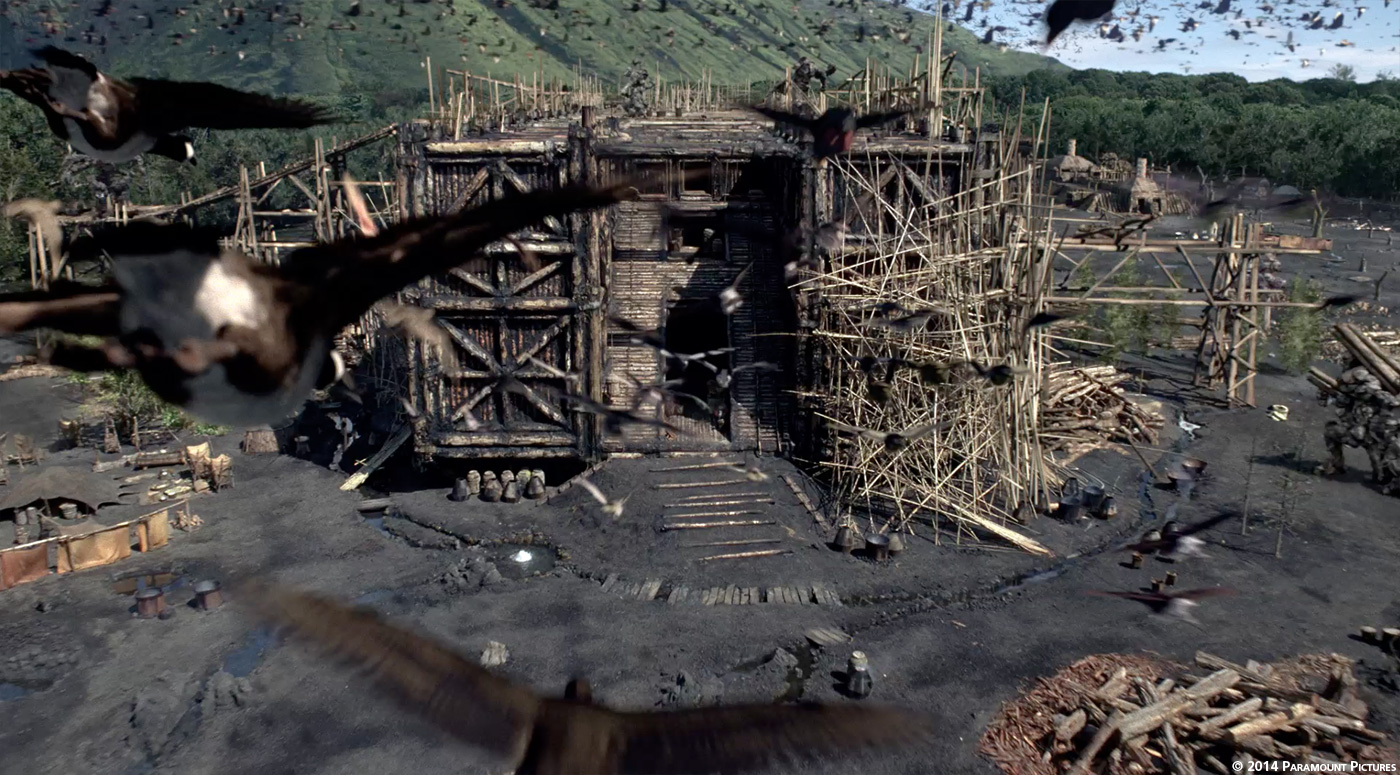
Our flocking system allowed us to populate up to two million birds, which we used for shots with more distant birds. For closer birds, we hand-animated “hero” birds. We also used these for tight spaces and when a finer level of detail was required in the birds’ performance. Our animators worked on over three thousand individual, hand-animated birds, starting with key ranges of motion that would be fed into the flocking system. These then served as a starting point for our hand-animated hero birds.
We also made extensive use of Deep Compositing. Deep Compositing allows compositors to work in 3D space in a way that provides added flexibility and functionality not available in a normal 2D compositing approach. Without Deep Compositing, we would not have been able to do this work. It was the basis of how we put together our most complex shots and was one of the first decisions we made. It made the bulk of our task easier, especially later in the process when changes that might have, otherwise, been major became possible to get done.
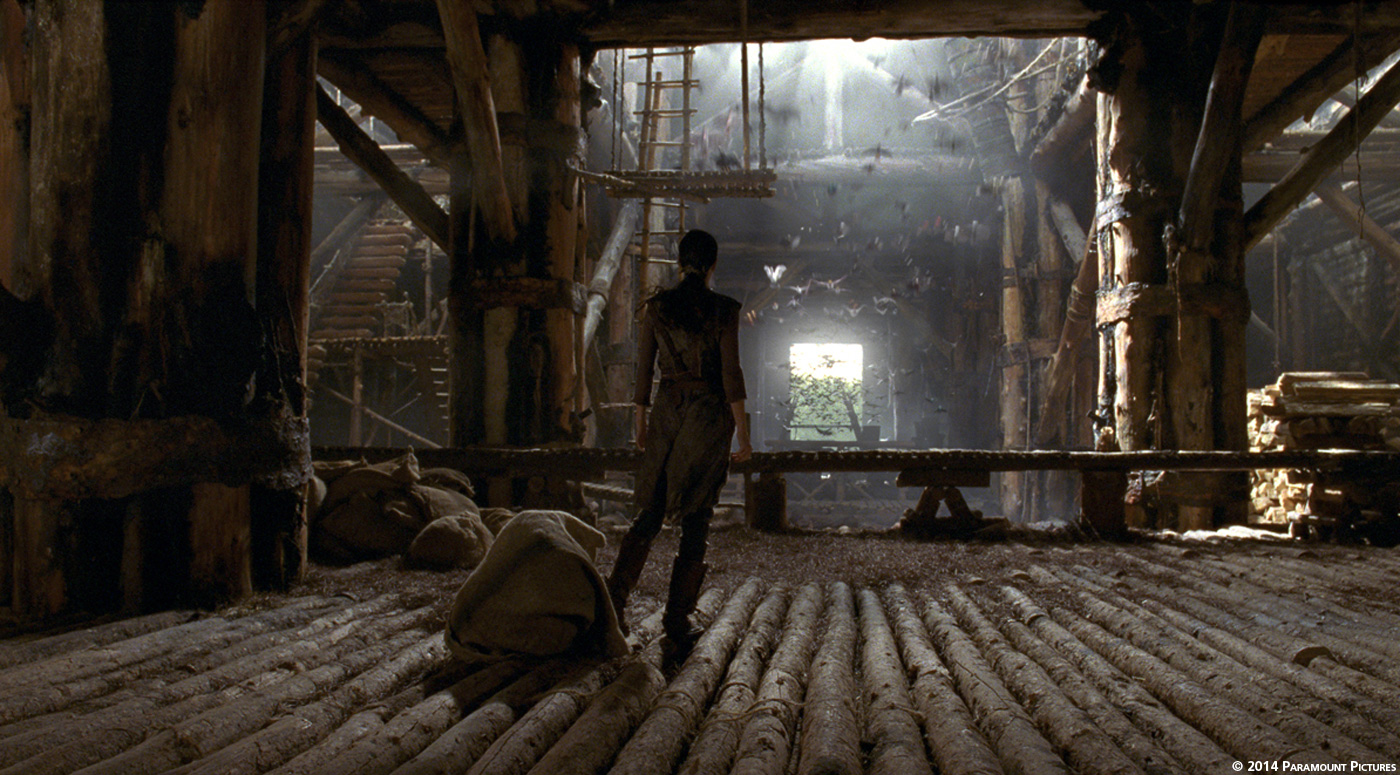
Our biggest shot in the film may not have been achievable without Deep Compositing: Noah and his family walk down the aisles of bird roosts, putting the flock to sleep with their magic smoke. We needed to find a way to pull together the overlapping the bird roosts and eighteen-hundred hand-animated hero birds, while maintaining flexibility throughout the process. How would we properly seat our digital birds into the complex practical set? Because they were essentially crisscrossing each other during the course of the shot, a single bird would appear in front of and behind other birds and the practical set. Standard holdouts were impossible. We relied on Deep techniques to combine the CG elements with the roto mattes that were required for the practical roosts. This allowed us to do things such as pulling individual birds out of the comp fairly late in the process, staying flexible with color and depth-of-field, without introducing edge issues, and also dealing with the semi-transparent curtains that were present in the practical set.
In addition, we rendered our elements with full Deep RGB and break out passes. Normally, the approach is to render Deep opacity and shadow maps because there is less data to manage and in most scenarios this is enough. But because of our volume of birds and the amount of flexibility we wanted, we took a more extensive approach. This led to huge amounts of data that we had to manage, but in the end, Deep enabled us to achieve what we needed to do.
Can you explain in details about the flocking and feather creation?
We built two major, proprietary pipelines to achieve our bird shots. One was our flocking system. As with everything we did, we looked for ways to maintain flexibility while keeping in mind the scale of the task-at-hand and how we could work most efficiently. We started with a series of loopable animation cycles and progressed to different ranges of motion, building a library to draw from.
Because we had a number of shots that required flocking, we created multiple ways to generate a flock itself. For shots outside the ark we were able to work more loosely, generally using curves to drive direction. Inside the ark we used a 3D volumetric approach using the geometry of the interior to confine the movement of the flocking birds. The system would then choose which animation cycle to use and when to transition, based on a bird’s motion in the world. In order to prevent collisions, each bird had a field of view of around 120 degrees. Anything outside of that range was ignored and, as birds moved around and past each other, they would constantly be updating and re-calculating their flight paths based on what they “saw” in front of them. This flocking AI was the backbone of our system.
Birds were then instanced to create the full count we needed for each shot. In addition, every bird would spawn a mate and these would stay in close proximity in order to fly two-by-two as required by the story.
Another key piece of the system was a method to give the appearance of feathers, without the added data of actually feathering all of the flocking birds. We were able to generate shaders based on each of our grooms and apply it to the flocking birds. This made them appear consistent with our hero birds but saved us a lot of processing that we didn’t have to do because of their distance from camera.
The feather system itself was made up of a number of parts, including a feather creation tool, a grooming tool and a deployer. For a variety of reasons, we decided not to use an off-the-shelf feather system and undertook the challenge of building our own. We needed something that would allow us to create a tremendous amount of variety and volume, while also working efficiently and with as much optimization as possible. Our system hit those marks and was a crucial piece of what we did on the film.
Early on, we realized that we couldn’t use a traditional hair or fur system because of the randomness with which points were distributed across a surface. Due to the fact that the layout of feathers across a bird is not completely random, as hair is, we looked for other ways to apply our feathers. We ultimately adopted a blue noise pattern as a basis for our distribution. In this system, every point on a surface has a scale that represents the scale of that feather and its distance to its surrounding neighbor feathers is based off of that scale. We wrote our own blue-noise-solver that would apply these points on a surface and then resolve any spacing issues. We used multiple techniques to then instance these feathers.
The feathers themselves were a series of cards that were created using a photo-real feather-creation tool that we built. This separate application allowed us to define shape, length and other attributes starting with a flat, oval-shaped, low-resolution feather. We were able to push points around until we were happy with the general shape of the envelope, at which point the tool would generate the rachis along the spine of the envelope and spawn hundreds of curves to represent the barbs. The artist had fine-grained control over splitting, curl, noise and all the other various attributes that define the look of a realistic feather. The end result was, then, rendered to a texture to speed up rendering, as we had too many birds to directly render the curves of every feather.
With our feathers built and our distribution model in place, we commenced grooming the birds. Artists interactively painted maps on birds which allowed us to control a wide range of feather attributes including scale, base color, tip color, lift (how much a feather lifts off of the body) and which feather types to use. Our groomers did not have to generate every single feather, instead relying on our grooming tool to instance and blend them together into the desired effect.
Another tool that proved useful was one that allowed artists to draw in areas of finer detail where we needed them. For instance, in the areas surrounding a bird’s eye we need a higher density of feathers and this tool allowed us to achieve that without increasing the resolution of the underlying geometry. A separate tool allowed us to control basic feather direction with a few pen strokes, instead of having to hand comb each feather.
A final piece of the puzzle was our deployer, a multi faceted tool responsible for distributing and applying grooms and feathers within each shot. On a macro flock level, the deployer decided which birds received which grooms.
With our volume of birds, we wanted a way to procedurally assign grooms to individual birds, so our system looked at what types of birds existed in a given shot and programmatically dispersed grooms, taking note of which birds were in proximity so we didn’t end up with two similar birds butting up against one another.
Digging deeper down to the feather level, our deployer took each groom, which were initially designed in a rest position, and applied them to our animated birds, recalculating feather positions frame-by-frame to maintain relative angles from one feather to the next. The idea here was that, because of the high volume of birds, we couldn’t solve for collisions between individual feathers. Looking at averages, the deployer detected outliers and brought those feathers into line with the others surrounding it. This was essentially a method of avoiding most collisions, when a true collision detection system was out of reach for the scale on which we were working. Other tasks handled by the deployer were caching of feather geometry, which was then instanced at render time, in communicating with Houdini to define exactly what needed rendering (i.e. avoiding feathers that weren’t visible to camera) and applying static and dynamic noise to feathers for ruffling and air resistance as they flew.
There is many water shots in this movie. Can you tell us more about your work on it?
ILM did the majority of the water in the film. But we did a handful of water shots. We built a few CG oceans, but they were mainly the calm seas. To do this, we used a variety of tools, ranging from full fluid simulations to simpler particle sims and even displaced geometry, depending on what was called for in the shot.
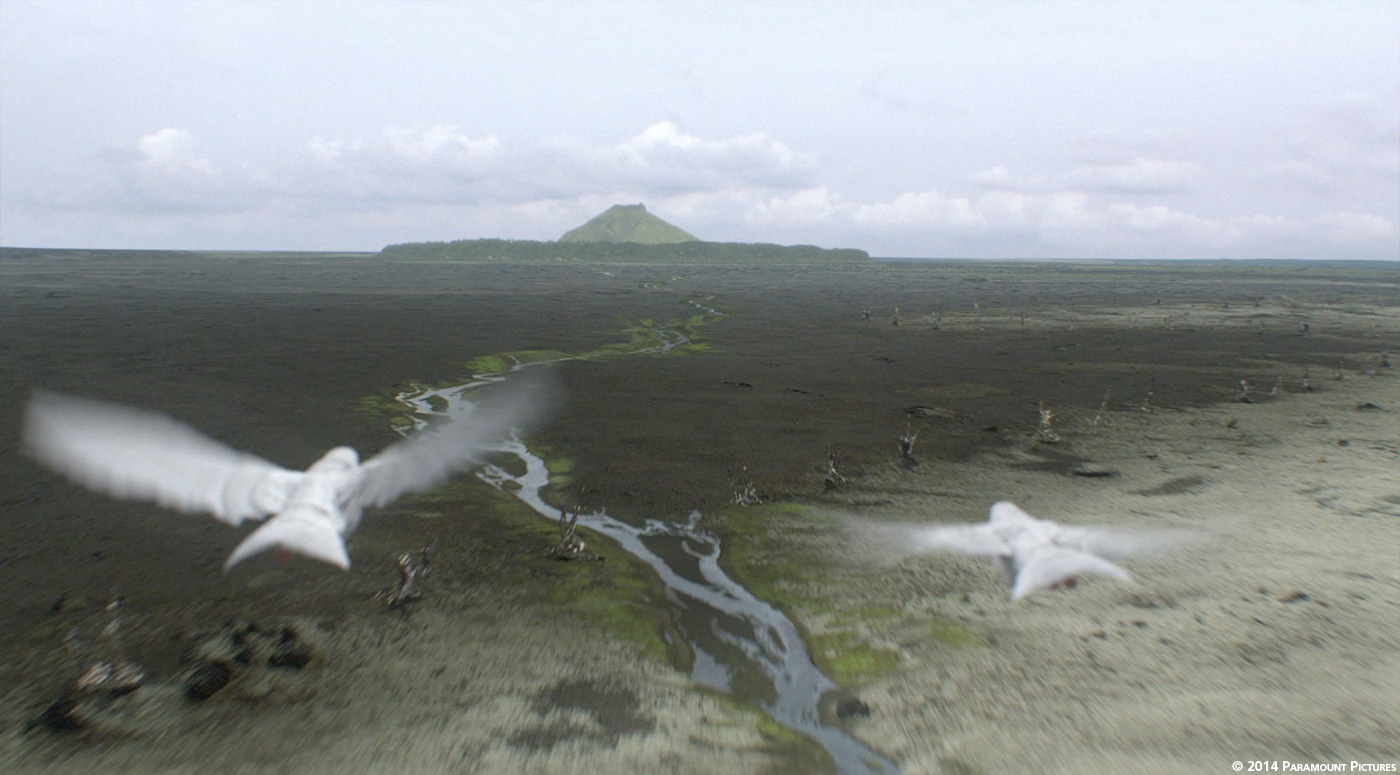
One sequence that is worth mentioning is the “Rivulet” sequence in which a magic stream emanates out from Noah’s camp and spreads out across the land, leading the animals to the ark. This proved to be a challenging sequence from a conceptual standpoint because we needed to sell a couple of ideas: that time was passing and that the rivulets were branching out from their origin point in the forest. We initially had time-lapse plates with which to work, but as the concept of the sequence changed we ended up creating a fully-digital environment. To show the passage of the time, we assembled a series of sunset images for the skies, flashing each one for two frames and animating different elements in each shot to further sell the idea. For instance, in one of the shots we see a series of buildings crumble before our eyes and piles of trash disappear as they are scavenged by humans who flash through the frame. The entire effect is one of time-lapse photography that portends the work that ILM did later in the film as Noah recounts the tale of Genesis to his family.
How did you created the various environments and set extensions?
We created a number of set extensions for the interior of the ark to give the impression of the vast size. The practical set was fairly large, but not big enough to actually hold two of every creature. To accomplish this, we used on-set reference, plate photography and LiDAR scans to build out the environment. This all came in very handy for us when we needed our birds to fly into the ark, upon their arrival.
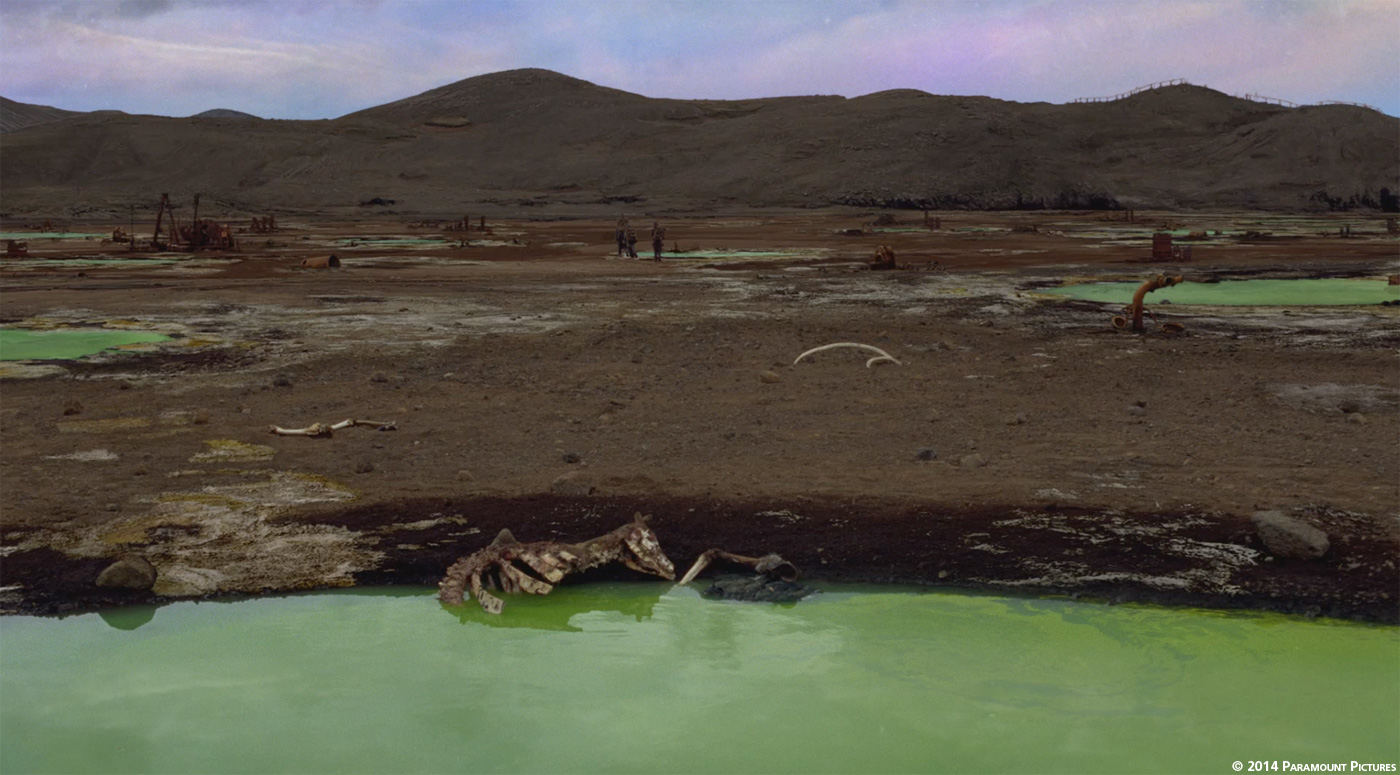
In addition we did a number of digital matte paintings showing how mankind had laid waste to their environment in the beginning of the world. We used plates shot in Iceland, then added burned out cities, toxic pools and other environmental damage to illustrate that humans had not taken care of all that the Creator had entrusted to them.
What was the biggest challenge on this project and how did you achieve it?
Hands down, the birds were the biggest challenge. We know the only way we would get done what needed to be done was to have the right team. We were very lucky to bring on some really great artists and supervisors. We had a small, but very dedicated and passionate group who worked extremely hard and took us farther than we had ever gone before the work we did on NOAH.
Have you split the work amongst the various Look Effects offices?
We didn’t. All the work was done in New York, which is one reason why we all had to work so hard.
What do you keep from this experience?
I think the primary things we learned are that you can accomplish just about anything with enough time and the right talent. AND the bigger the project, the more planning you need to do.
How long have you worked on this film?
From start to finish, we worked approximately 18 months from R&D through final comps.
How many shots have you done and what was the size of your team?
We did approximately 300 shots, with a team – over that year and a half – of about 50.
What is your next project?
We recently finished SABOTAGE, DRAFT DAY and BONES. We’re currently working on FURY, THE INTERVIEW, GAME OF THRONES and TURN along with a couple of other projects I can’t talk about yet.
A big thanks for your time.
// WANT TO KNOW MORE?
– Look Effects: Official website of Look Effects.
NOAH – SHOWREEL – LOOK EFFECTS

Click on the picture to watch the showreel.
© Vincent Frei – The Art of VFX – 2014


 & Elizabeth “Liz” Bernard (Animation Supervisor) – Digital Domain")