

Jay Redd started his career at Rhythm & Hues before joining Sony Pictures Imageworks in 1996 to work on CONTACT. As VFX supervisor, Jay took care of the effects of films like THE HAUNTED MANSION, MONSTER HOUSE or MEN IN BLACK 3.
What is your background?
I grew up in Salt Lake City, Utah, where I studied music and photography in High School, and then film and cinematography and astronomy in University. All along the way, computers were a part of my life, getting at Atari 800 in 1979. I tinkered with programming for many years, and then finally got a Commodore Amiga, and again found the color and graphics power to be incredible. I was becoming more and more fascinated by technology and art coming together. During my university years, I worked at night at a small graphics company doing typeface design, 2D logos, and digital photo retouching – this was way before Photoshop. Visual effects in movies were getting more and more complex, and I desperately wanted to get into 3D, so I convinced our company owners to invest in some 3D software so we could get into flying logos and what-not. We got AT&T Topas in 1992 and also a license for Autodesk 3D Studio. Everything changed for me that year – my mind was blown away. In 1993 JURASSIC PARK came out, and I knew I had to get to Los Angeles.
I spent a few months putting together a little demo-reel of my modeling and lighting – definitely focused on lighting and integration of 3D into photography – I have always been fascinated with light and shadow. I submitted my reel to a few studios in LA, and about 2 weeks before SIGGRAPH 1993, I got a call from Rhythm & Hues, to come and interview for a Lighting Technical Director position. I was thrilled and nervous! I got a severe case of the flu, 2 days before my interview, and I actually lost my hearing, while I was driving the 14 hours from Salt Lake City to Anaheim, California. When I got to Anaheim, I could not hear anything. My interview was later that day. I slept in my car in the parking lot, and somehow got a little bit of my hearing back just an hour before the interview. I did the interview and nervously sat at the head of a table surrounded by 8 people drilling me with questions about my technical knowledge and artistic style and what made we want to do VFX. I was 23. I was very nervous, and thought I would be out-paced by all the other people I saw at SIGGRAPH that year.
2 weeks and lots of anxiety later, I got a job offer from R&H! I couldn’t believe it! I was going to Hollywood! R&H was my first family in this industry, and I have the fondest memories of the people there. I learned so much, and got to work on some amazing projects, and got to work on a dozen shots for the film BABE, which won an Oscar® that year for Best Visual Effects. Because astronomy was such a love of mine, and Carl Sagan a hero of mine, in 1996 I made the VERY difficult decision to leave R&H and take a position at Sony Imageworks. Robert Zemeckis was going to direct CONTACT, and Ken Ralston was leaving ILM to come down and run the company and supervise that show. I had to take the chance. I was hired as a Sequence Supervisor, where I designed and animated the big 4 minute ‘Powers of Ten’ Opening Shot, with an incredible team of other artists. From then I’ve worked on other big VFX films, and worked my way up to becoming a Visual Effects Supervisor, which was a dream of mine from way back in the late 80’s. I’ve been very fortunate to be mentored by some amazing people like Ken Ralston, John Dykstra, Jerome Chen, and many others.


That’s the first big VFX feature film for director James Bobin. How did you help with him?
We met with James way back in the fall of 2013, and it was clear from my first meeting with him, that this was very passionate about the material, the world of Wonderland, and the unique tone that Lewis Carroll created. James is a fast, energetic talker, and his positivity for the work was really exciting to me. James and I are similar ages, and he plays a lot of video games, and knows a lot about how VFX is done, so there was already a certain understanding and shorthand there.
However, James knew and told us that he needed our help to realize these massive worlds, and he needed our help figuring out some of the very ‘high concept’ ideas in the script – and the script was still being written when we had our first meetings.
James trusted us when we told what was hard and what was easy. He put a lot into our hands to figure out. That’s a blessing and a curse when you’re working with a director. On the one hand, you want the director to make the decisions, and yet on the other hand, as an artist and someone who likes to create, I want opportunity to design and concept out new ideas. Since this movie was so huge, there was no shortage of collaboration with James.
What was his approach about the visual effects?
James comes from an interesting background of lower-budget television and sketch comedy, where the actors, the writing and the comedy are the core of the entertainment – the visuals are kind of ‘do it yourself’, which adds to the charm and laughs. He also directed the last 2 MUPPET films, which is a very ‘analog’, literally hand-made world – but that world also comes with lots of planning and preparation.
James wanted to build more sets and have more interaction this time around in Underland, but he also knew that some of the worlds we needed to create could only be created in digital form. He understood where a set could end, and the digital extension could pick up, James doesn’t think about ‘limits’ really, and that is a fun place to live and work in.
Can you describe one of your typical day during the pre-prod, on-set and then on post?
Each day was packed! That’s the first thing that comes to mind.
Pre-production is always an interesting time, because all the HOD’s (Heads of Departments) are getting to know each other, testing the waters, learning each other’s styles of communication, and how we’re all going to get this massive show done. Our Costume Designer was back from the first Alice, as well has make-up and hair, etc. But many many people were in the Alice world for the first time, and with a new director, there were many things to navigate through. Each HOD has a huge responsibility for not only their own craft, but for also figuring out how their work blends with the other departments. For example, stunts has to work with VFX to figure out when a stunt will stop and start, and when the digital double will be used. Stunts has to work with costume to figure out how the stunt rig will fit under the costume. Lighting and camera has to work with stunts to make sure their cabling doesn’t get in the way of the lighting. VFX has to work with pretty much every department to make sure we don’t end up with footage that has dozens of problems, versus just a hand-full of problems. Special Effects works with VFX to determine what will be practical and what will be digital.
Every day is a new meeting, a new conversation, a new idea. Some days, we all visit the different stages and discuss how things will be shot. Some days, we just work on breaking down new script pages. Some days, we have huge 30-person production meetings that last 6 hours, where we go scene-by-scene, shot by shot, and discuss, with every department, how we are doing to film that scene, that shot. Some days Ken and I are meeting with our team over video conferencing, talking about what we need to prepare for, and how we need to prepare. Lots of bidding happens during this pre-production period. Pre-production is all about collaborating and getting to an understanding of each person and departments responsibility and technique. It is the very foundation of the film.


How did you approach and created the opening sequence on the sea?
The pirate chase was actually the very last thing we shot on the film. We did it the last 2 weeks of filming, at Longcross Studios, in the cold night rain of November 2015. Neil Corbould’s team worked many many months before those 2 weeks, designing and building a massive 150-foot motion rig, with the top deck of the ship and the 3 masts intact. It was a HUGE rig, surrounded by rain machines, water towers for huge splashes onto the deck, and massive strobe lights for lighting and interactive blasts. It’s the biggest set I’ve ever shot on. You could see it from the motorway approaching Longcross.
Stacked railway cargo containers surrounded this huge rig. They were stacked high, blocking the wind and containing the massive amounts of water. We also covered these stacked walls with black matte fabric. We didn’t use blue, because this sequence was to take place at night, we knew we’d be able to use some shots as is from the shoot, without having to replace the background with the ocean. It’s a bit of gamble actually. Were we to have gone with bluescreen, it would have taken a massive amount of lighting to evenly light the whole thing, and it was raining, and then we’d end up with a ton of blue spill into all the water, we’d see the lighting rigs, etc. It was a bit of ‘6 of one, half-dozen of the other’ for this sequence.
Double Negative had a huge amount of work to do on these shots. There was a ton of roto work that had to be done to extract the ropes and blowing hair and strobe lights, just to be able to replace the backgrounds with the stormy oceans. D-Neg had to add fully digital sails, masts, and rope ladders in certain shots. Also, since we couldn’t have a bunch of stunt men up high on the masts, and also because the masts weren’t physically high enough, digital doubles were created and motion captured or animated.
D-Neg created huge simulations, water spray, fog, atmosphere, and extensive use of matte paintings for constantly moving skies. Each shot had special needs, in order to match the live-action plate lighting, and sometimes the plate lighting was altered to match the CG backgrounds. Each shot had to go through it’s own sculpting and composing phase. Once chunks of the sequence started to settle in editorial, the D-Neg team could pursue water and lighting continuity. The sequence took many many months to complete.
The movie is bringing back many known characters. How did you improved their CG models?
The first Alice movie was 5 years ago, and so our technology and our artistry has only improved. Arnold, our primary renderer has matured as well, and so we took a look at pretty much everything on every character – the model, the animation rigs, the textures, fur, clothing, shaders – everything. All the characters got a fresh update to increase detail, efficiency, and performance.
ALICE THROUGH THE LOOKING GLASS has a time-travel element, so we would be going back in time to see these characters as younger versions of themselves. We had to create 2 younger versions of the characters, a ‘teenage version’, and a ‘child’ version. This required new designs, model changes, new animation rigs, new textures, fur, and clothing. We did a lot of exploration, sometimes just as illustrations, in figuring out what makes our characters ‘cute’ as youngsters. We then took these drawings in to modeling and worked in 3D to get all the details right, since we’d be seeing them from every possible angle. From there, final coloring and fur and clothing stages were completed.
Can you explain in details about your work on the Twins?
Well, without giving away too many secrets, we did use some similar techniques from the first film, at least in basic projection of Matt Lucas’ performance. This time around though, we were using the new Sony F65 cameras, shooting everything at full 4K resolution, which gave an incredible amount of details. The 4K Sony sensor is amazing in its fidelity and color gradients.
We were able to shoot, on set, with Matt Lucas playing in his real location as either Tweedle Dee or Tweedle Dum. Matt is such a great actor, he could literally pretend to interact with himself as either character at any given time, for any given scene. He has an impeccable memory, and would often ad-lib jokes and sayings and facial expressions to completely match his previous performance as one or the other character.
It’s these amazing facial expressions that we wanted to preserve and exploit. That’s why, instead of just pure animation on the characters models, we used the actual footage, tracked his face in 3D, and then developed a method to unwrap those faces per frame, and re-project back on to the Tweedle model, preserving his performance. We were even able to harness the on-set lighting, and our 2D team worked to seamlessly blend the live-action footage of Matt’s face into the 3D textured model, utilizing paint, roto-mattes, and detailed tracking and warping. When animation needed to step in, we were very careful to preserve what Matt had done.
There were a number of shots of the Tweedles that were added, many months after we were done with filming. Because we built such a detailed model, and had an extensive library of Matt’s performances, Troy Saliba, our Animation Supervisor, and his animation team were able to key-frame animate shots that were essentially indistinguishable from previous shots using the projection method.
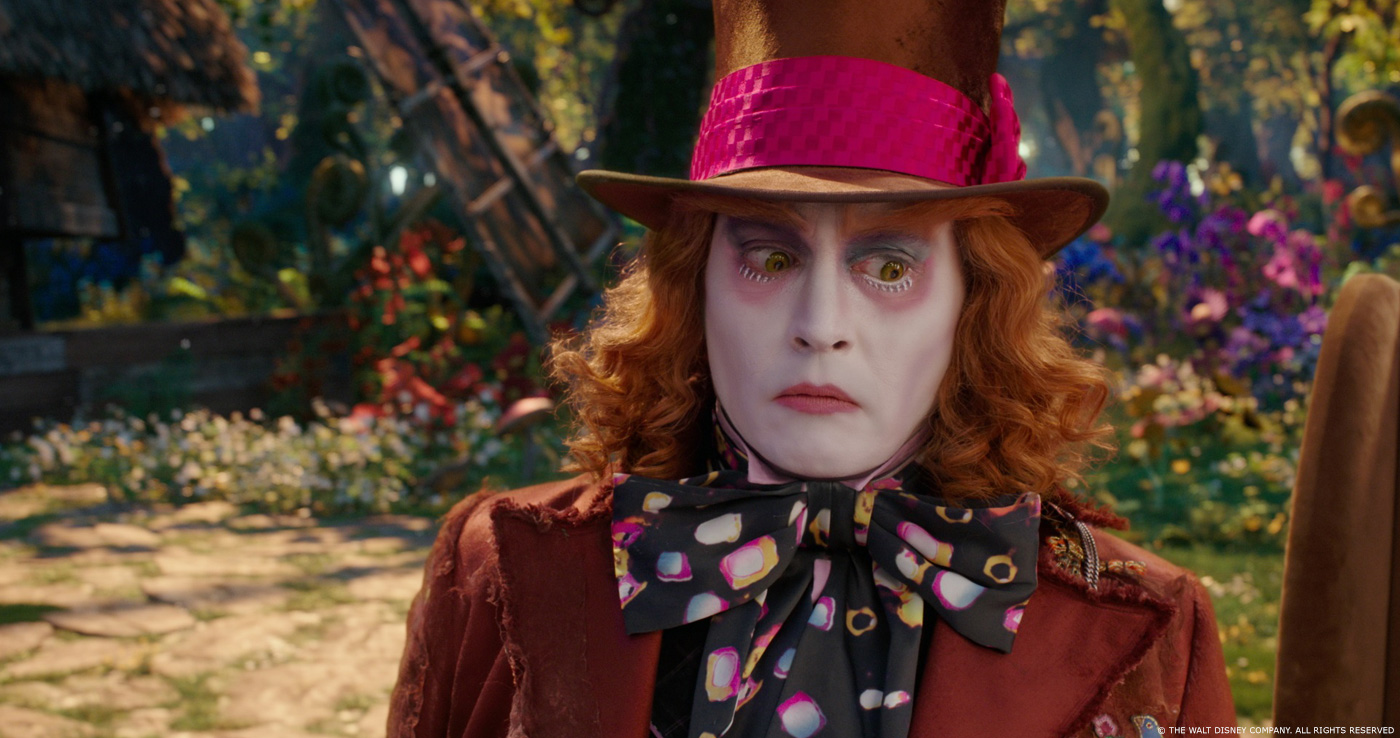
Can you tell us more about the eye of the Hatter and the head of the Red Queen?
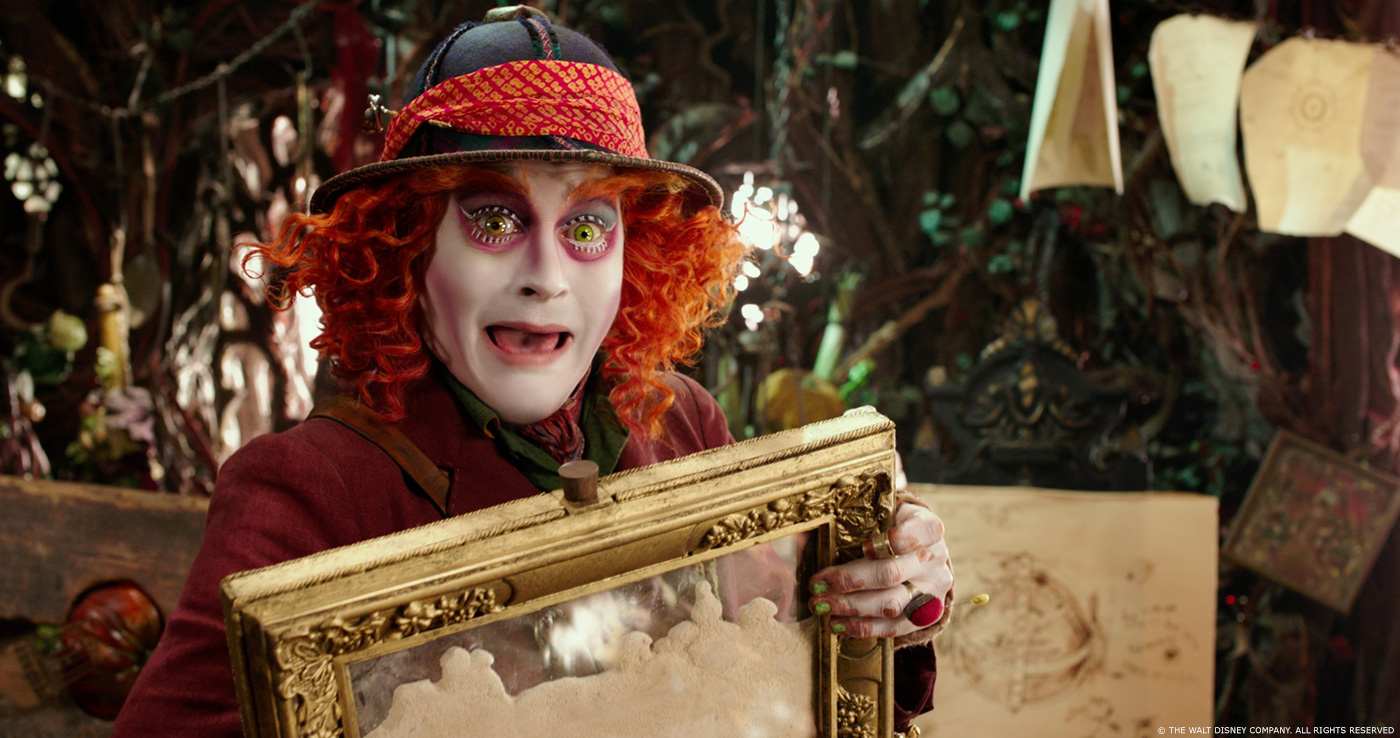
Hatters eyes were established from the first Alice, as being larger than normal eyes would be. The technique was essentially unchanged on the second film. Detailed tracking and warping were employed to make sure nothing was slipping and sliding. We had to treat each shot with care though, as just shooting with different lenses could have an overall effect on the perceived size of the eyes. Shooting on a wider angle lens, say a 24mm might dictate to us that we want to enlarge his eyes by 15-20%, instead of shooting on a long lens with Hatter small in frame, yielding maybe a 5% increase. There was a lot of relativity between Hatters size on screen, angle of his head, lens choice, etc. There was never just ‘set one dial and go’. Our compositors got really good at looking at a shot and quickly determining the best first pass.
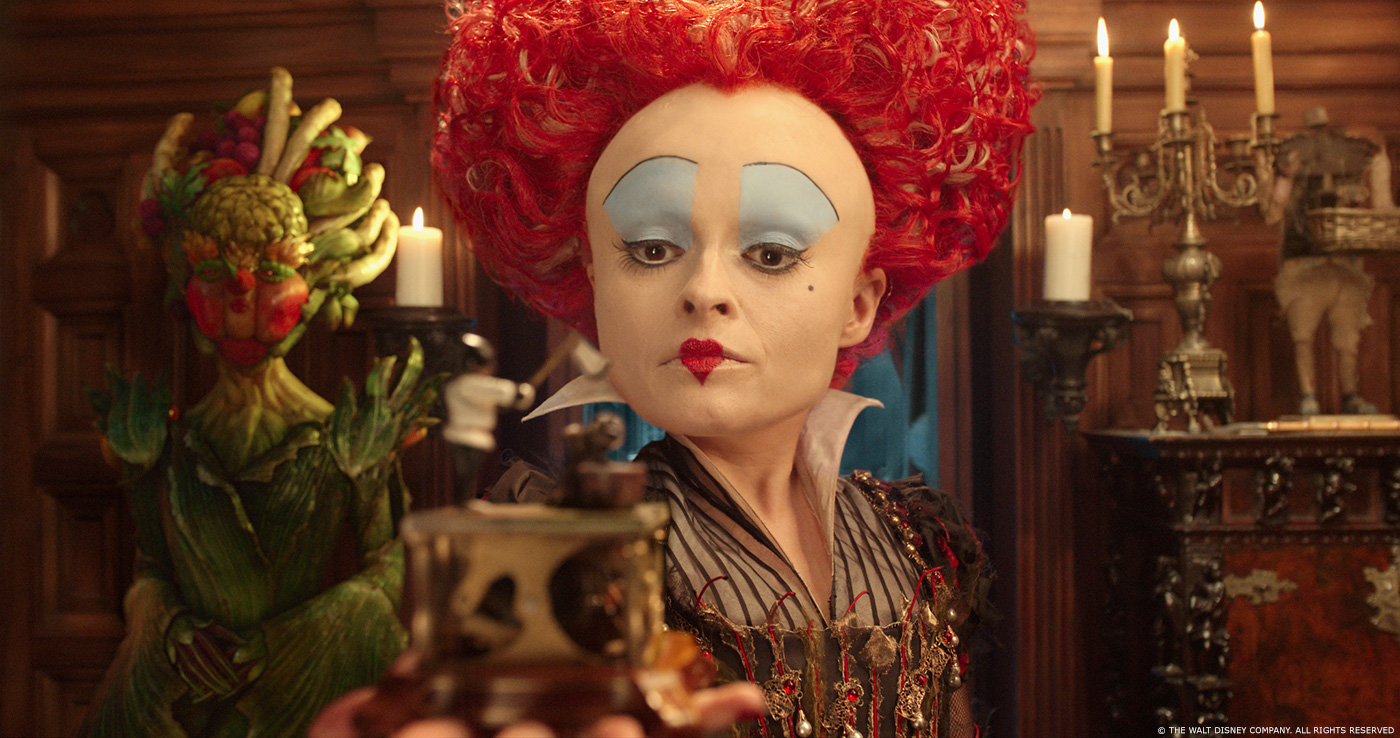
The Red Queen head-scaling is a beast! Every single shot is a one-off. The overall technique was similar from the first film, but again, because we were shooting with brand new 4K Sony F65 cameras, we got an immense amount of detail – and we needed it! We would be scaling the Red Queens head anywhere from 40% to 65% larger than her actual head, in any given shot.
Shooting against bluescreen made the head work a bit easier, because we could keys against her hair line, and then all the work would be in the neck, collar, jawline, etc.
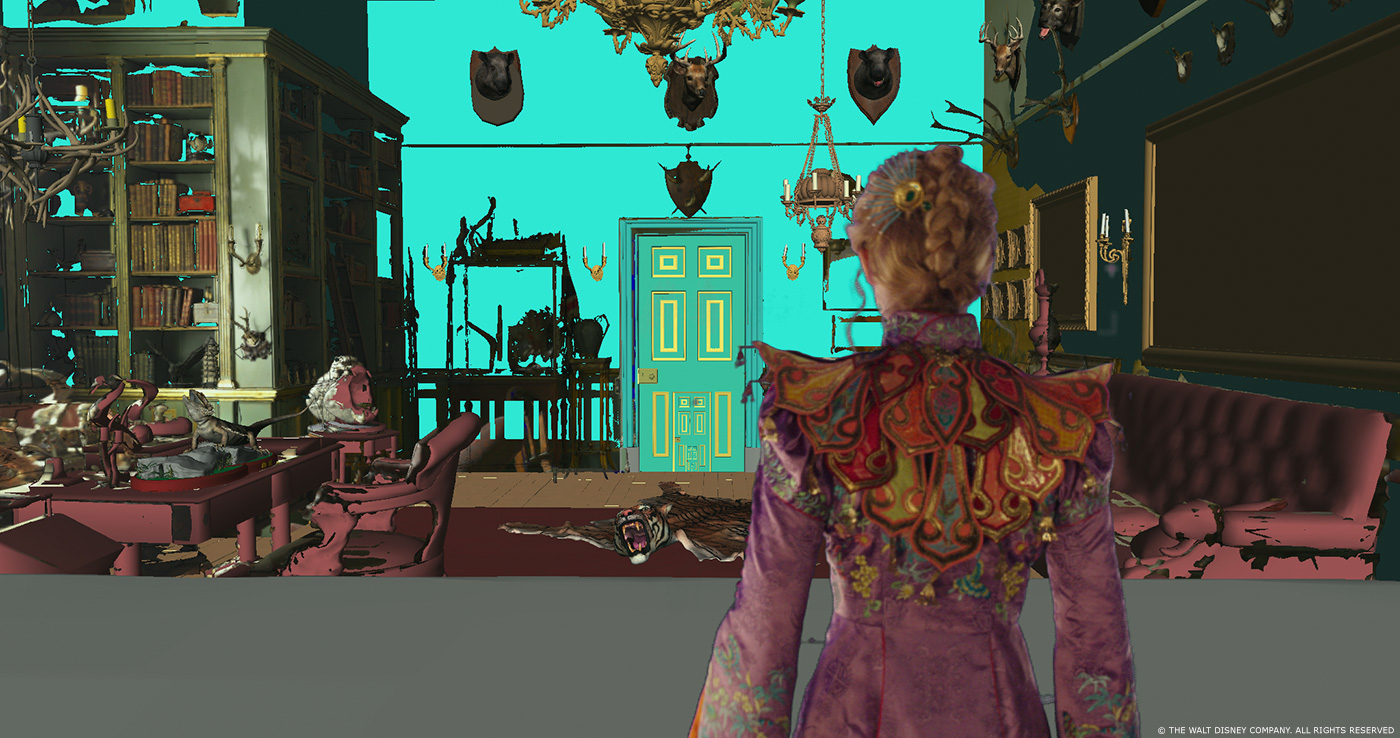
However, since we were shooting many of these scenes in full sets on stage, these head extractions had to go through incredibly detailed and laborious extraction processes by our team. Extensive paint work, roto-mated mattes, and textures were employed to make the enlarged head blend seamlessly in the neck and collar area. Colleen Atwood worked with us to give us a hard-edged collar the could help in blending regions, but when we saw the costume the first time, she had picked a fabric that was semi-transparent! We could have said ‘no’ to this, but ultimately it looked so great on her character, we decided to just make it work. Again I have to credit our dedicated 2D team on making these shots seamless. Many shots had very specific needs, such as her hand going front of her face, eye line sometimes needing to be corrected as her head was enlarged, etc. Lots of tricks and lots of little details in every shot!
How did you enhanced the fur work on the various characters?
New undercoats and textures and grooms were created for our characters for this sequel. Since some of our characters had new animation rigs and muscle rigs created, this allowed for brand new physical and procedural fur simulations to be applied.
The Bandersnatcch is the most obvious example of this. When he runs or shakes, you can see his muscles and fat layers move under his skin, and therefor the fur follows this inertia. Add wind resistance or directional breezes on top of that, and the fur looks terrific.


Can you tell us more about the animation challenges?
Wonderland is full of whimsical characters of every style. There are talking frogs, and walking fish, overly large Dodo birds, a White Rabbit, a March Hare, a talking mouse, flocks of Borogroves, Times’ Seconds, a massive clock, a castle made of clockworks and complexities, spherical Twins, talking chess pieces, Humpty-Dumpty, tiger rugs, taxidermy animals – the list is long.
I’ve had the honor of working with Troy Saliba, our Animation Supervisor of a few films, HAUNTED MANSION, MONSTER HOUSE, and now ALICE. Troy has a huge range of experience, and he’s not just an animation director – he’s a character designer, a sculptor, and a storyboard artist. Taking on a film like this, requires many disciplines, so he was perfect for the role.
One of the biggest challenges on a film like this, because we are mixing live-action and fantasy, is finding that balance of cartoon-line whimsy and believable physics. In a world like Wonderland, we actually EXPECT things to be just a little ‘off’. James was really keen on getting funny, over-the-top performances, without breaking the illusion of integrated reality. Troy had the big challenge of blending all these ideas together into an ensemble that was coherent – not an easy task. Each character has limitations – for example, the Tweedles are essentially big spheres with short arms and legs – their range was rather limited – this was made up for in Matt Lucas’s performance and dialogue. On the opposite end is Thackery, who is essentially insane, so his range of motion could be much more over the top and comedic. His anatomy and design is on the cartoon and fantasy side of things, so the animators could push everything – facial expressions, body silhouettes, even physics and mass.
Inside Time’s Castle, were the ‘Seconds’ – his helpers. During one scene, made up of dozens of shots, these individual Seconds, piled on top of each other and joined together to form ‘Minutes’, and then these ‘Minutes’ joined and formed and even larger creature called ‘The Hour’. The Minutes were made up of 10-30 Seconds (I know the math is off, but it was all about design) The Hour was made up of hundreds of Seconds, or dozens of Minutes.
All of these complex ideas had to be first designed, and then the tools to build the very complex rigs had to be built, and then ultimately the animators had to get in there and make things work – sometimes by brute force. Again, so many shots become one-offs. Our rigging team had a big challenge on this film in accommodating so many differing requirements and characters.


Can you tell us more about the design and the creation about Time?
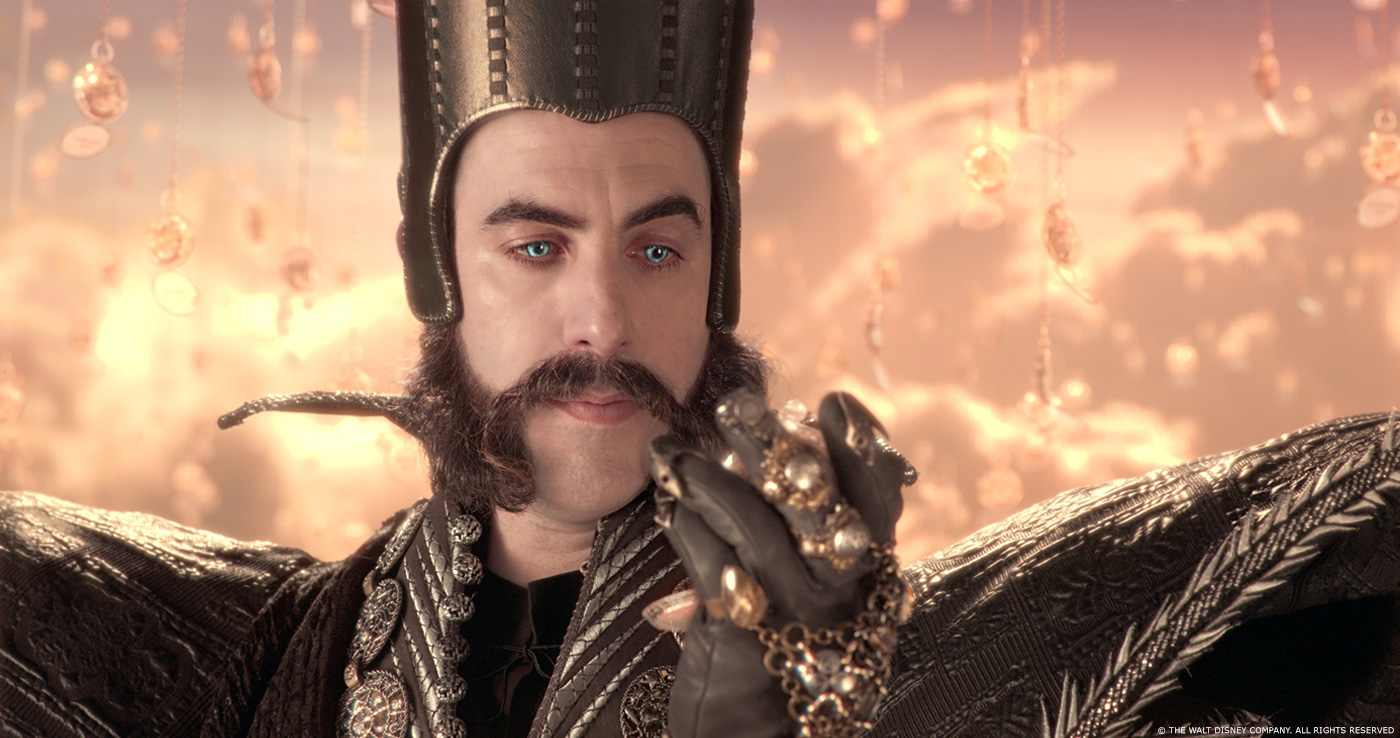
The character of Time is portrayed by Sacha Baron Cohen, he is the keeper of all time, and is also completely tied with the Grand Clock of All Time – “he is it, and it is he”. His character was heavily influenced by Sacha himself. He worked with Colleen Atwood in coming up with costume details and silhouettes.
Early on, discussions were had on how we could make him feel not totally human. How could we add ‘mechanical’ quirks to his movement and overall visage. Sacha was going to bring certain types of these things to life through his own acting and performance choices, but what could we do digitally to give him the extra whimsical mechanical quirks and eccentricities that would make him peculiar and surprising.
We played with compositing tricks to make his skin look a little less real, a little more smooth, almost like silicon, treating skin blemishes and wrinkles with a smoothing effect, removing contrast in selective places. We treated his irises to feel like they were backlit with blinking blue lights. We tied these blinks and twinkles to his emotional state – when he gets mad or excited his irises might blink or strobe a little bit or become unsettled and unsteady.
The biggest piece of Times character is the back of his head. When revealed, it shows that in fact he is made up of clockworks and gear complexities. Our modeling and rigging department worked from designs that came from both production and one our internal Imageworks concept artists, Chris Zammit. Our texture, shading, and lighting teams created different types of metals, alloys, and internal lighting to show that Time, though a machine, was incredibly complex – made of thousands of pieces all working concert.
During the course of the film, as Alice travels back in time, causing it to become more and more unsteady and solid, Time the character also becomes more broken down and unsettled. Instead of on-set make-up, and having to track continuity and consistency there, we pursued facial make-up digitally. The initial ‘smooth’ skin treatment we started out with, slowly eroded away as we actually started to enhance blemishes and wrinkles and contrast, giving him a more weathered and unhealthy look. Our compositing team, led by Craig Wentworth, devised methods to control different levels of contouring, color, and saturation, in different parts of his face, depending upon the level of breakdown. This was achieved through sequential roto-mattes, gradient controls, and specific blending regions. All this control, though laborious, gave us a great creative advantage in being able to achieve make-up adjustments, as the edit changed, maintaining continuity and consistency.
Add to this make-up control, actual glitches in his movement and performance. Regional skip-frame and warpings were applied to give Time a mechanical impression, as if gears were skipping or failing periodically. Sparks, smoke, and blue strobes and flashes were also added to emphasize his breaking down, coinciding with his emotional state.
Time castle have many impressive rooms. Can you tell us more about them and especially the one with all the watches?
Times Castle itself is a huge environment and model. We wanted to make it feel bigger on the inside than it did on the outside. Dan Hennah and his team designed the look of the castle to be a mixture of Gothic and Art Nouveau, which happen to be two of my favorite design styles, so we had a lot of fun creating this castle. We only had a few pieces of key art to go on, so we asked our modeling department to essentially ‘go nuts’ with endless spires, staircases, balconies, arches, towers, windows, triads, hallways, turrets – every possible Gothic architectural piece they could use. From there, Art Nouveau flourishes like organic floral curves and filigree and latticework were added where they could fit.
Massive gears, pendulums, chains, weights, pistons, pullies were meticulously pieced together by our modeling and rigging teams to make it feel like everything was connected and worked together throughout the castle. The goal was to make it feel absolutely cavernous, endless, and eternal. We wanted to make it feel like it never really had an end or a beginning, much like time itself.
Another of these ‘endless’ rooms, were the Underlandians Living and Underlandians Deceased rooms. Each life in Underland is represented in the film, by a pocket watch. Your time is up, and you pass. Time himself, determines when that is.
Again, Dan Hennah and his team concepted the idea of two rooms, really two ‘environments’ that were opposite each other in space and look and feel, very complimentary.
The Underlandians Living space, was again larger than any room could ever be – it was endless and eternal in fact. The initial illustration showed a world made of beautiful golden sunlight and endless clouds. Thousands and thousands of watches, or lives, hung from the sky by a thin chain. The watches themselves weren’t metal, but in fact they were made of crystal – something we’d never really seen before. This made them refract and sparkle more than a metal watch might do. A few base models of pocket watches were made, with the internal gear works and complexities showing through, and then a system for mixing 6 different watch face, chain styles, and clasps, was devised, in order to make it feel like every watch, every life, was individual. Also, each watch had the name of the life it represented, engraved onto it. While we weren’t able to see every name at once on camera, we did have to develop a system that allowed a huge number of pre-selected names, to be applied randomly to dozens of visible watches.
To create the environment, volumetric clouds, matte paintings, atmosphere, depth-cueing, and lots of compositing tricks were utilized to make the world feel vast and eternal.
For the Underlandians Deceased room, the whole color scheme changed to dark and blue, much like night. The sky faded from clouds into the starry universe, and the horizon was still reflective water as far as the eye could see. All the same techniques were used as in the Living room, but in this room, this is where Time stores the watches of those passed. All the watches were aligned and organized in linear fashion, much like a cemetery is. Modeling and rigging made tools to create a seemingly endless array of aligned watches. These array was moved and placed from shot to shot, to accommodate different compositional needs.
I really enjoyed creating these environments with our team, and they were a nice serene break from all the wild dynamic shots surrounding these scenes that take place there.


How did you created the Time’s minions?
Initial designs were first created by Michael Kuche, and then after the first round of approvals with James, Troy Saliba made some additions, along with our modelers, and the main group of 6 six ‘Seconds’ were created. Our texture and lighting team then created a few different sets of metals and patinas to be able to create mix-and-match versions of each Second, as later in the film, we would literally need hundred of Seconds to form The Hour. Even though I’m explaining this in a simple way, it in fact took many months of work from many talented teams to get the final results.
Which locations was the most complicated to created and why?
This is a tough one, as there were MANY difficult environments on this film, but I think my team would agree with me: The Oceans of Time (with the ‘Rust’ effects being a close 2nd place)
In the script for ALICE THROUGH THE LOOKING GLASS, there was a line that read, “Alice travels across the Oceans of Time” – and that’s pretty much all we got in the beginning!
So, of course, we sat and talked with James about what he imagined, what we imagined, and all the different ideas could we throw out there. We all agreed on one thing from the very beginning – ‘let’s do something different’. Time Travel has so many familiar ideas – hyperdrive streaking stars, time tunnels, magic portals, time-lapses, disappearing/re-appearing, blips and flashes, etc. Those are all good, and they still work, and they tell the story, but this is WONDERLAND! We just had to do something different – something new, something exciting and narratively strong but still fantasy – something you couldn’t possibly see or experience in the real world.
James had the initial idea of the massive Oceans of Time to contain all of Wonderlands events, and Alice’s memories. Everything needed to feel organic and not technical or with any type machined mechanics. It was a ‘big idea’ with seemingly endless possibilities. We did a lot of basic pre-vis style exploration, simple models in Maya, animating camera, playing with lenses and simple textures. Our lighting and effects and shading teams started playing with some volumetrics, and huge image and texture bombing onto organic models – lots of different ideas were being explored.
After many months of playing, illustrations, pre-vis, paintings, effects tests – clouds, tunnels, webs, what-have-you, we began to settle on actual Ocean motifs – huge cresting waves, water spray, foam, lightning strikes and stormy waters – everything needed to huge and epic. This somewhat impressionistic but familiar Ocean motif just felt right, especially considering Alice has recently been a captain of her own ship.
To make the Ocean of Time even more epic and fantasy, we didn’t just put the Ocean on the floor, and sky above – we put an Ocean on top of the screen as well – making a very surreal, gravity defying feeling. That also gave us a whole other complex surface in which to embed al the memories and events from Wonderlands and Alice’s history.
Since these memories and events would be represented by images, we digitized the entire first film so we could use those moving sequences, and then we even re-created some those moments from different perspectives. We didn’t want these images and memories to just float on the waves, rather, we wanted to make these moments feel fully dimensional and deep in the water – almost like holographic, moving sculptures. Our 2D teams did a ton of image processing before any renders were done in 3D. Optical flow techniques were utilized to create directional maps for the effects team to simulate and integrate the images’ motion into the actual simulation of the waves themselves.
Specific animation tools were built so that animators could visualize and control complex wave shapes and timing. This was all done in a rough form so that we could quickly put shots together in sequences, and get those to editorial to cut in with the live action shots. Every few days, we’d then gather to review the shots in context of the edit, discussing timing, composition, digital blends with live-action elements, etc.
Alice steals the ‘Chronosphere’ – the device the keeps all time in sync, but also allows one to travel through time. When this billiard-ball sized device is thrown on the ground, it expands into a small-car sized spherical vehicle – allowing the passenger, or passengers, to reach a speed to enter the Oceans of Time, and travel back to the past. Production Designer Dan Hennah, and his team provided the initial design for the Chronosphere, based on ideas from astronomical instruments, nautical ship controls, compasses, navigational devices, etc.
On set, we worked with Special Effects HOD, Neil Courbould and his crew to create a 6-axis motion base, essentially puppeteered with a waldo-system. This allowed us freedom to create different styles of movement for the Chronosphere. A partial full-size Chronosphere was built and put atop this motion base. We shot most of the shots with a extendable motorized cranes, and coupled with the motion base, we could achieve an exciting and dynamic sense of movement, that would later be tracked in 3D for the big Oceans of Time environments. Big wind machines and lighting rigs were employed to give us all the necessary effects of the environment, onto the actors themselves.
The Oceans of Time was one of the most challenging environments for us – from a creative and technical perspective. We worked over a year to get our first shots delivered, from concept to final, and it took many many artists and technicians to get create the toolset to make such an epic world, art-directable and renderable!


How did you collaborated with the team of Double Negative?
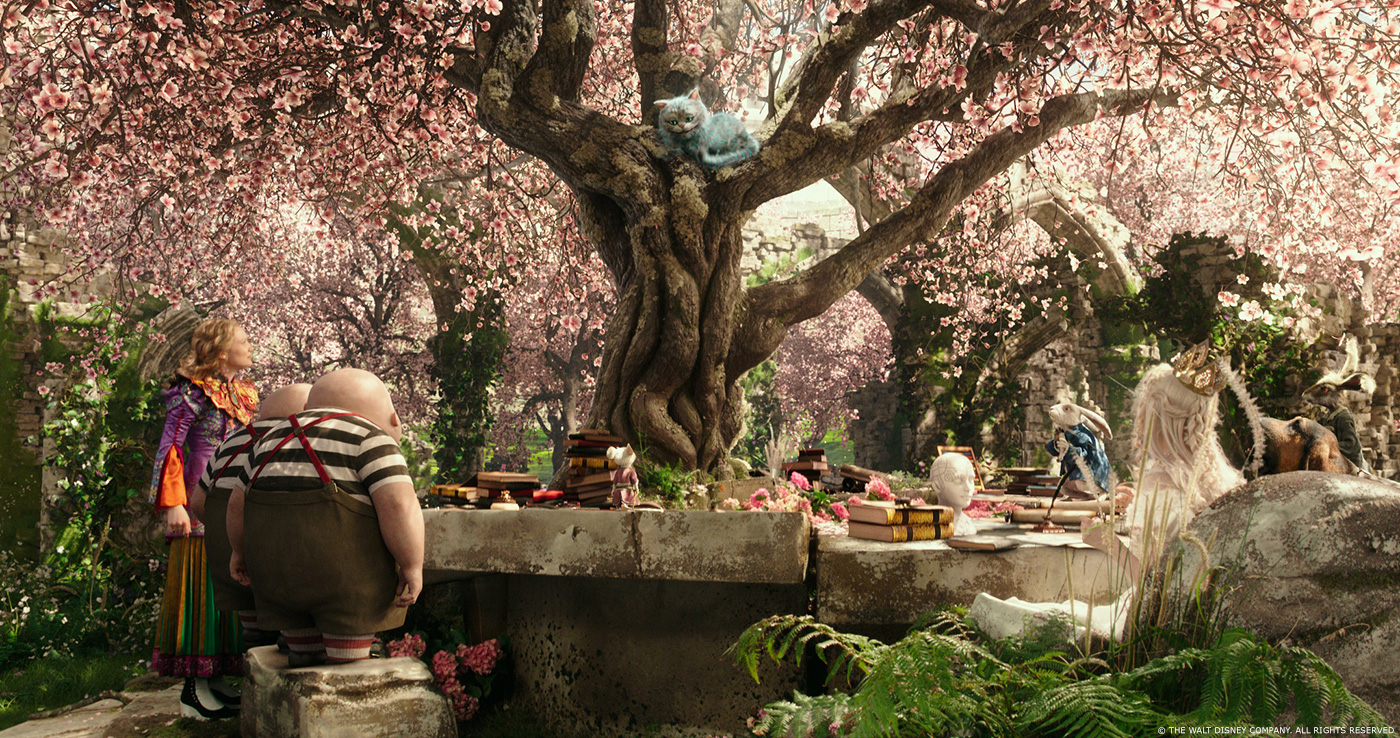
Early on in the pre-production phase, we wanted to make things as clean and easy as possible for everyone. Even with all the current ‘standards’ in file and software, sharing shots and elements STILL takes work, and isn’t seamless. We identified a few sequences that made sense to just divide cleanly, to give Double Negative to do – the opening Pirate Chase Sequence, the Meets Hatter sequence, Witzend wide shots and matte paintings, numerous sky replacements, and walk and talk sequence in the forest that leads up to the Tea Party sequence, etc.
We did share assets, such as a few animated characters from Imageworks that populate the town of Witzend, like the frog, fish, etc. Ken and I worked with Ollie Rankin and the team at Double Negative, to determine the overall look of the night ocean battle in the opening sequence, for example. As Imageworks built the surrounding forest for the Tea Party scene, we would give D-Neg our assets, and sample frames, and we’d have reviews to go over look-and-feel, etc. Imageworks’ Theo Bialek and Brian Steiner worked closely with the team at D-Neg to make sure layout and camera and environment looks were staying up to date as changes were made.
We would then do group reviews with James and us – and we’d be all over the place – Vancouver, Culver City, Burbank, and London! Our sync review tools were used so that we were all looking at the same thing, as much as possible.
What do you keep from this experience?
Every movie is a different adventure. I make life-long friends on every film I do, because you work so hard together, and for so long, they become almost like your second family. I love London and it’s diversity, and when I’m there it almost feels like a second home. Being of Scottish descent, the gray rainy and wet weather there is perfect for a red-head like me. Filming and living in England for 8 months was not without difficulty – it’s always hard being away from family and loved-ones. Homesickness is a real thing, despite being so busy on the film. Luckily I was able to have my husband join me for a few weeks. At least he got to visit all the museums that I couldn’t, due to filming schedules!
This experience was extreme in all ways for me personally – as an artist it challenged me in many new ways, creating worlds that were at once total fantasy, but that also felt real and tangible. It challenged me as a VFX Supervisor, as it demanded a constant ‘big picture’ view, as the film changed and matured from its original script. It challenged me by sending me half a world away, into a different time-zone, where it becomes even more difficult to stay connected to my family and friends. But mostly, I come away with feeling proud of what my team has accomplished together. Creating something from nothing, and a scope this big, is always an exhilarating experience, especially when everyone comes together to reach that same goal.
Was there a shot or a sequence to prevent you from sleep?
That’s a great question! I think during the course of the show, I had many sleepless nights, but that’s so much about worrying, but more about working through ideas and solutions and designs to make things work. We did have many late nights during the shoot, and I know many of the artists working on the show did some long hours and late nights to make the work look amazing.
How long have you worked on this show?
I started with the first meetings in the fall of 2013, and approved the final Imax 3D version of the film on May 3rd, so about 2 1/2 years!
How many shots have you done?
Imageworks did more than 1,700 individual shots for the film – the biggest to ever go through our studio. Double Negative also did about 400 shots, namely the opening pirate chase sequence, and dozens of digital make-up shots, along with a ‘walk and talk’ sequence in the forest, between Alice and Hatter.
What was the size of your team?
We had over 350 people working the show over the course of 2 1/2 years – artists, animators, engineers, systems staff, technicians, production staff, management, coordinators, etc. It’s takes an enormous amount of talented and skilled people to make something like the world of Wonderland come to life.
What are the four movies that gave you the passion for cinema?
– RASHOMON – Akira Kurosawa
– STAR WARS – George Lucas
– BLADE RUNNER – Ridley Scott
– AMADEUS – Milos Forman
A big thanks for your time.
// WANT TO KNOW MORE?
– Sony Pictures Imageworks: Dedicated page about ALICE THROUGH THE LOOKING GLASS on Sony Pictures Imageworks website.
© Vincent Frei – The Art of VFX – 2016

, Rob Price (Zoic VFX Supervisor) & Danica Tsang (Zoic VFX Producer)")
 & Lynzi Grant (Production VFX Producer)")

 and Phillip Leonhardt – (Sequence VFX Supervisors) – Weta FX")