
Jesper Kjolsrud began his career on the film THE BORROWERS. After working 10 years in London with MPC and Double Negative on films such as PITCH BLACK, STALINGRAD, THE CHRONICLES OF RIDDICK or 10,000 BC. In 2009, Jesper joined teams Image Engine in Vancouver. He will work on the films DISTRICT 9, GREEN ZONE or THE LOSERS.
What is your background?
I got in to computer graphics through a university course in the north of Sweden. It was unique for using industry standard hardware and software, something that was very hard to get experience with at the time unless you already worked in a facility. That led to an animation job in Gothenburg and after a few months a position at MPC in London through one of the guest lectures from the course, Paul Franklin. One of the first jobs I worked on was THE BORROWERS, which was supervised by Peter Chiang and when he a year and a half later approached some of us to set up a new facility to do his latest job PITCH BLACK I moved on to what became Double Negative. I stayed there for over 10 years until my family and I felt like a break from London, which ultimately led me to Image Engine in Vancouver.
How did Image Engine get involved on this show?
We got a call from the director, Matthijs (Van Heijningen), and the VFX producer Petra (Holtorf) towards the end of 2009. They had seen and liked our work on DISTRICT 9 and thought we’d be a good fit for the job.
What was the Director’s approach to visual effects?
Matthijs is a very experienced commercials director who’s done big projects with complicated VFX so having that knowledge we tried to fit the job around him. In commercials you tend to work with artists directly so we tried to do the same without bothering Matthijs with the processes and pipelines of a project of this scale.

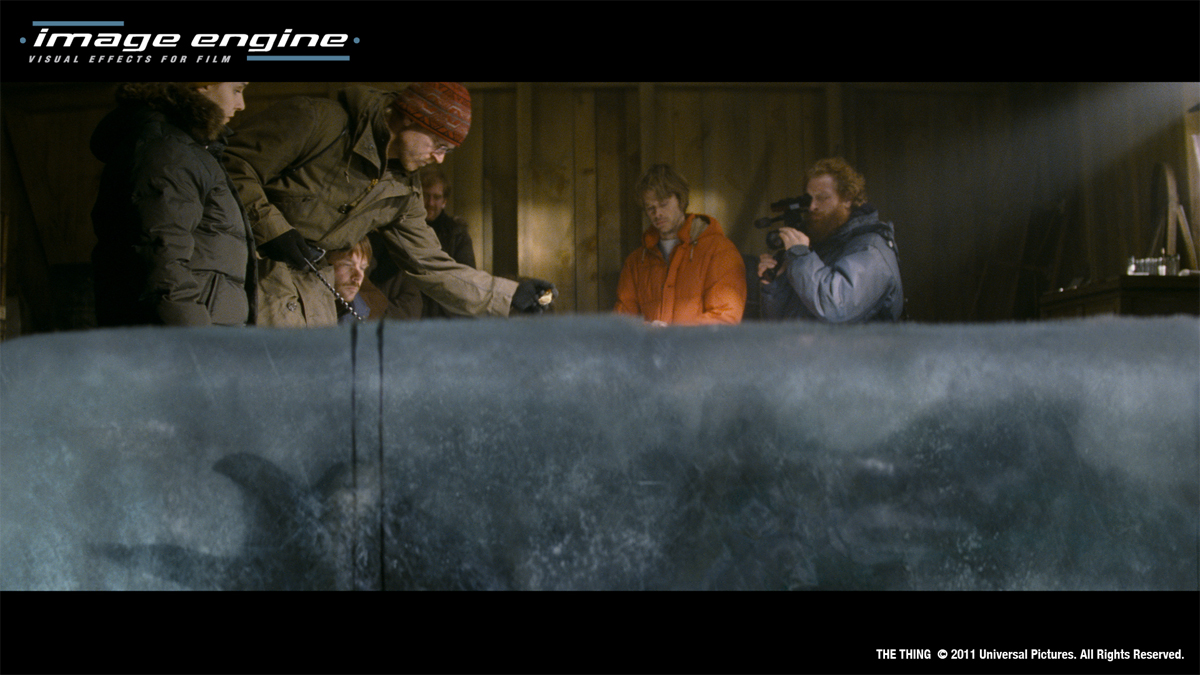
What was the real size of the exterior set of the base?
The base itself was built as a 1:1 scale set based on the production design with only certain areas like the back of the building missing as it was never featured. It was built in a quarry in Toronto against a slope that would fit in to the geometry of the mountain location in BC.
What was your feeling to give your contribution to the great and scary creatures that Rob Bottin and John Carpenter have created?
One of my favorite parts in Carpenter’s version is when the severed head grows legs. I for one wanted to see more of that. And the gruesome double-headed monster the Americans find. The way it was lit and filmed worked great but it was dead. I would have loved to have seen it move. With the techniques of the early 80’s that was extremely difficult to pull off but that’s something we can do quite well today.
Was there a shot or a sequence that prevented you from sleep?
If there’s one thing I’ve learned so far, you can’t let work interfere with sleep. Sleep is far too nice for that.
What do you keep from this experience?
Although the project was a huge challenge I’m very pleased how well it turned out. There are always curve balls being thrown at you. All shows have their challenges but now I’m more confident than ever that we can handle it.
How long have you worked on this film?
I started prepping just before Christmas 2009 and we finished the show at the end of May this year so about a year and a half.
How many shots have you done?
We ended up doing around 550 shots.
What was the size of your team?
I think we peaked at around 100 people.
What is your next project?
I’m currently working on another Universal project called R.I.P.D. It’s another creature show so in a sense we’re carrying on with what we were doing on ‘The Thing’.
// Neil Eskuri – Digital Effects Supervisor
How was the collaboration with director Matthijs van Heijningen Jr.?
Collaboration with the Director was pretty good. Matthijs had a lot of great ideas and disgusting images that he would send us for the look of the different creatures. Their maw, or mouth, what he thought the feet and toe nails might be. The gruesome inside tentacles from swarming snakes and worms. He sent close-up shots of insect feet and bird feet along with nature footage of Cuttlefish and squid hunting their prey. He often said he wanted the creatures to be ‘horrifically beautiful’.
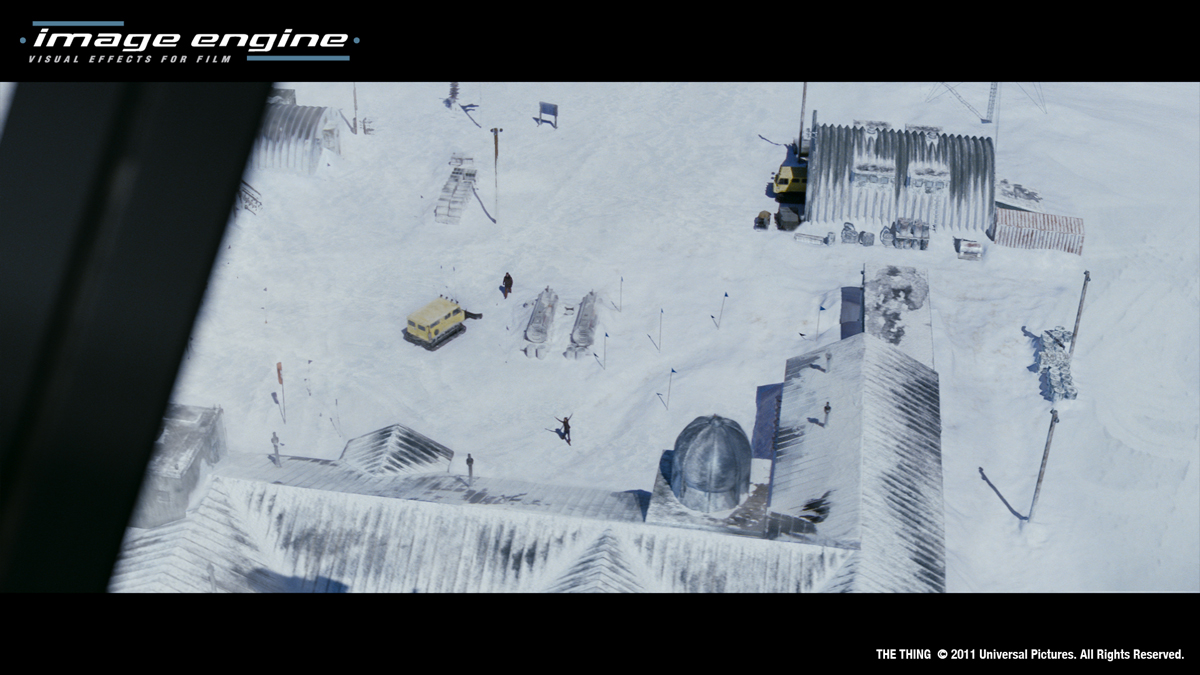
How did you recreate the helicopter?
There was a ‘shell’ of a helicopter on set so we had good reference images from those shots. The only time we used the actual set copter was when it was on the ground and the interiors shots. Whenever it was flying, it was our model.
By photographing the actual model, we used those images to build and texture the CG model. Then the lighting was generated from HDRI images taken on set.
The look of the rotors went through several variations. Because of the rotational speed of the rotors and the shutter speed of the camera, the look can be different. Finding that right mix with motion blur took a lot of trial and error.
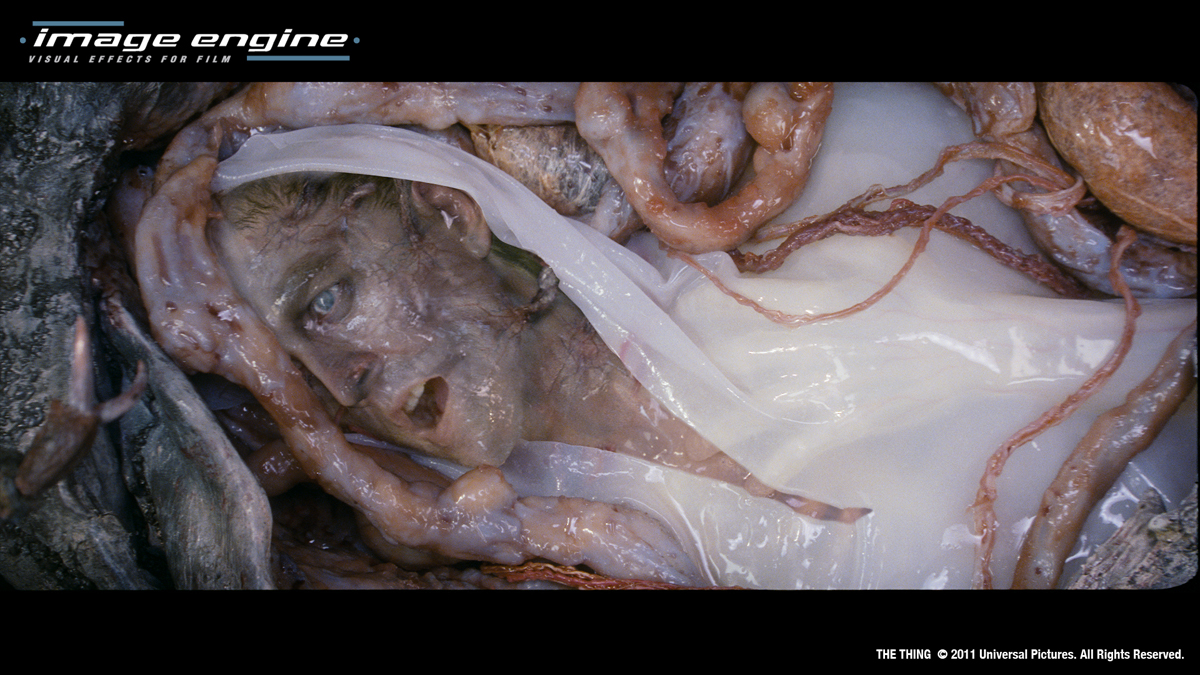
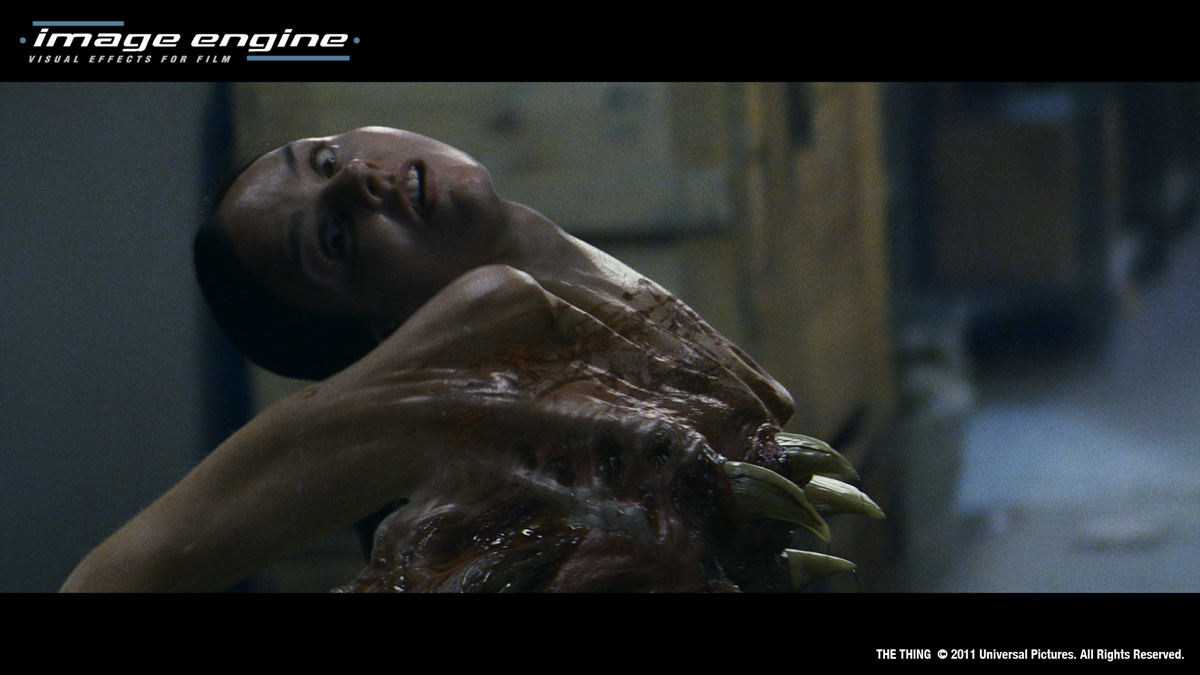
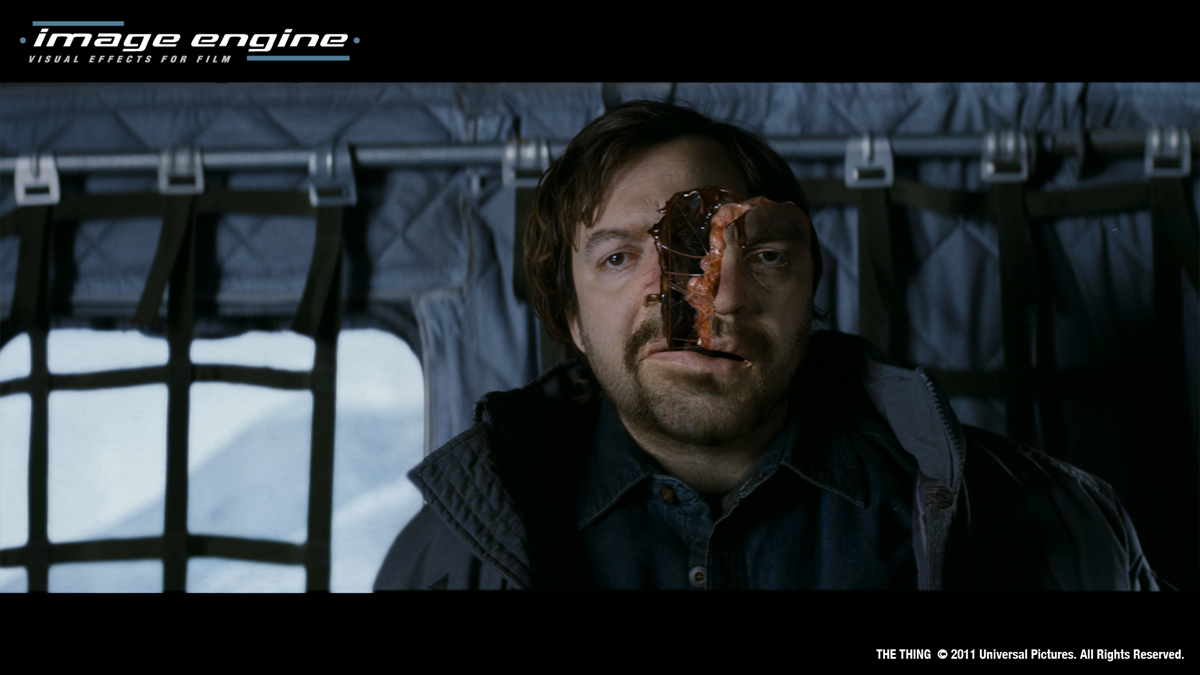
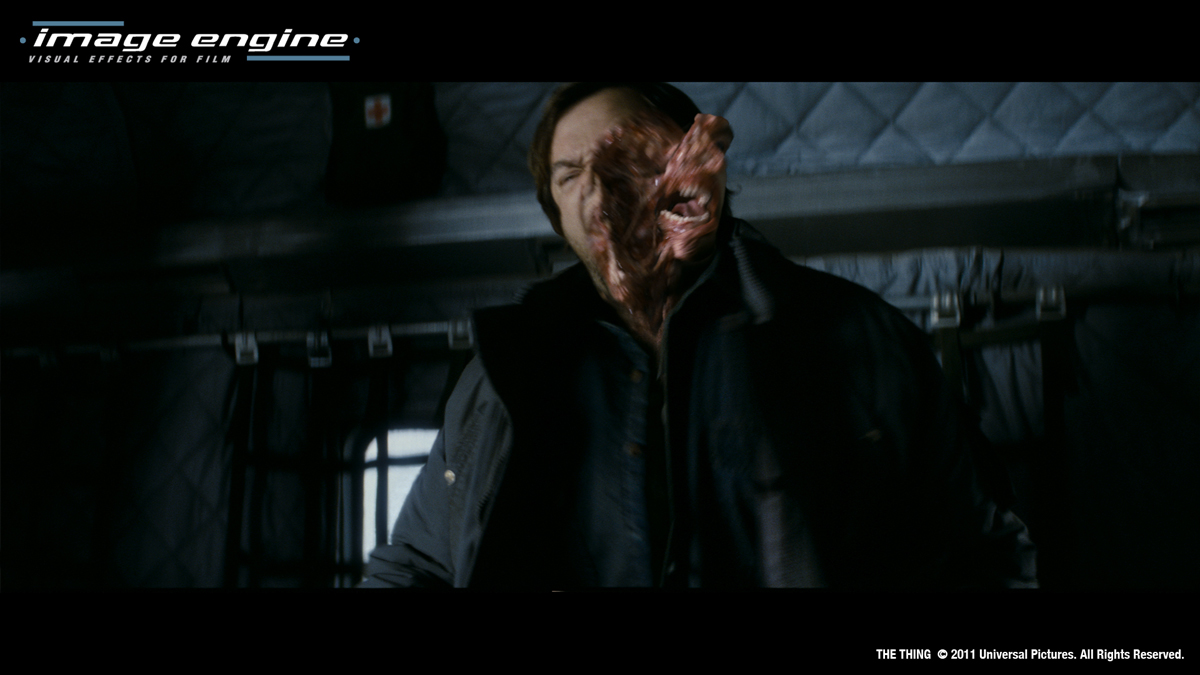
Can you tell us more about the impressive transformations shots and especially the one with the woman?
Juliette’s transformation was always a question mark because, although we knew what she was going to look like once she was fully transformed, how she got there was unknown. We had our concept artist, Juliana Kolakis, go through several different ideas and stages of how her chest would change. Matthijs constantly asked what we would see, how much of her human-ness remained? How much alien is pushing through the skin?
A ‘beat sheet’ was created based on the cut, which would explain what would be seen in each shot. This changed as the cut changed. Matthijs then suggested that the alien should already be pushing through the chest before her sweater falls off.
Since tentacles are a big part of the alien look, this gave us the idea of ball of snakes trying to push through the skin, which is what you see in the first shot. Then as the teeth of the alien mouth rip the skin, we see the inside tentacles push through while Juliette’s head is forced towards her back. Her proportions constantly made it difficult for animation since we now had this huge mouth and claw on her thin legs, how was she going to move and look powerful? Like most things, a lot of trial and error and versions were made to bring her to life.
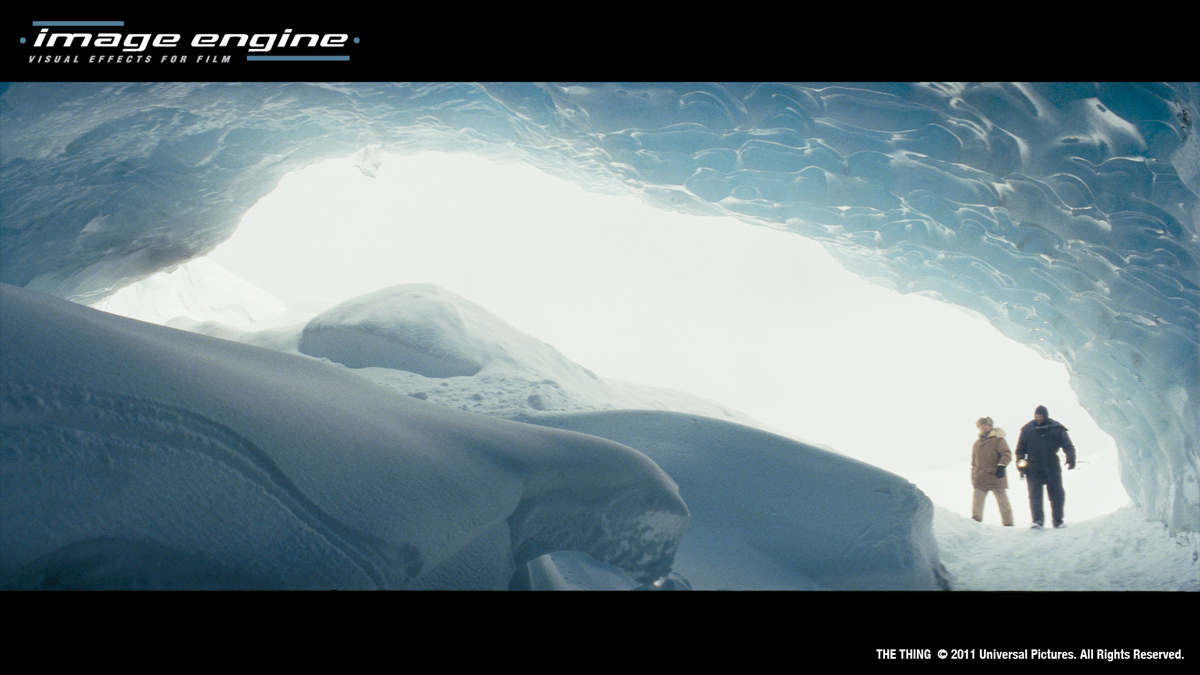
Can you tell us more about the huge ice cavern and the spaceship?
The Spaceship was to be 1000 ft. in diameter and over 60 ft. high. A good portion was buried and covered in ice and snow so you wouldn’t see it all, but still have an idea of how huge it was. After we got the original model, certain design elements had to change once shots were being laid out to convey the vast size of the ship and the cave and still keep the framing Matthijs wanted for the shots.
Since the actors were shot on small mock-ups of the ship, when the designs began to change we quickly knew that very little, if any, of the set pieces could be utilized in the shots. We only kept the very edge of the ship and the hatch from the original photography.
Like most elements, the Ice Cave went through a lot of different versions. There were several meetings to discuss how long the cave had been there, the evolution of the cave over the centuries, if ice columns had been created from the ceiling to the ship, and a schematic was created to show the types of ice and snow in different areas of the cave. Again, armed with hundreds of images of different types of ice caverns, several concept art pieces were created to give the sense of a vast expansive ice cave and sub-caves housing the alien spaceship. It was probably the most difficult look to achieve.
Was there a shot or a sequence that prevented you from sleep?
They all kept me awake at night. Often, I’d wake up at 2 in the morning with some part of the project on my mind. Each had their own trials and tribulations, but the louvre sequence to blowing up the alien was the part that kept me awake the most.
Those sequences came at the end of production with very few weeks left. We still didn’t have the final designs for the ice cave or the spaceship and the Sanders alien was going through a complete overhaul. We knew it was going to be a tough finish, but with the talent of the crew and the flexibility of the Image Engine pipeline, we were able to deliver.
// Fred Chapman – Lead Character Technical Director
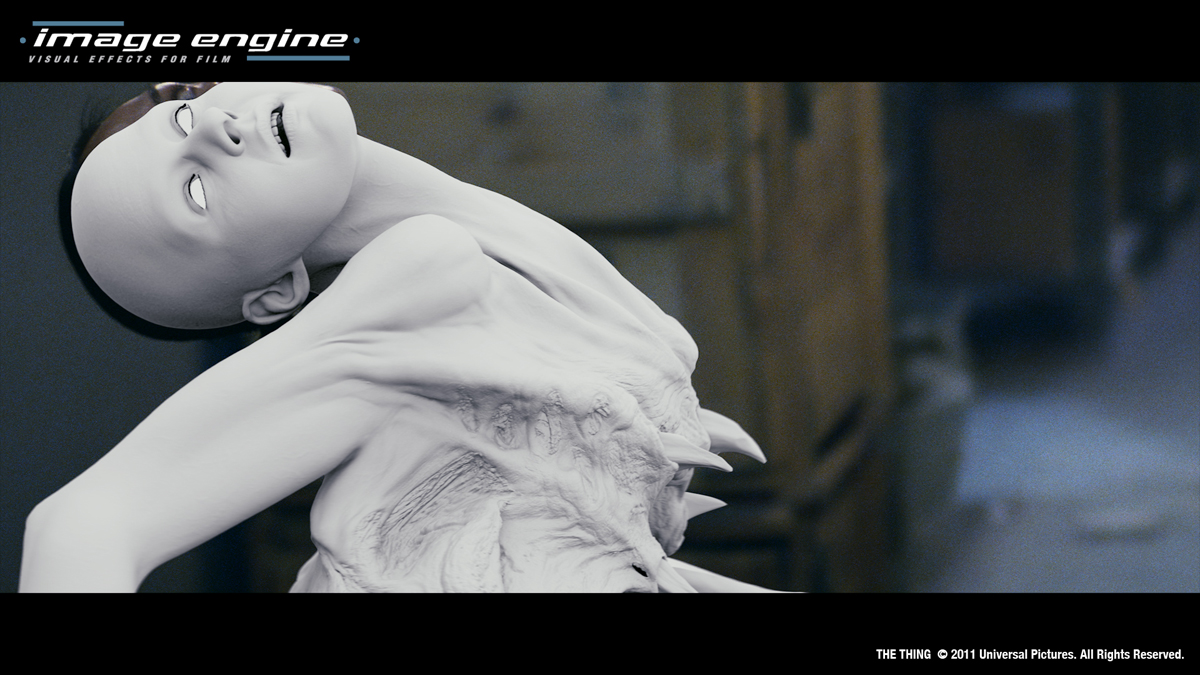
Can you tell us more about the design of the creatures?
The initial creature designs were provided to us from production. These designs go through several stages of approval before they reach us but it is still possible for us to suggest tweaks.
Most creature designers work mainly on aesthetics, they want to design something that looks cool and original, however what works for a static design won’t always work when it starts moving. We need to imagine what’s going on under the skin, where are the muscles, bones, tendons, how are the joints structured to give the range of motion required and also convey sufficient strength. In order to convey a sense of realism in a creature it needs to appear to interact with real world forces so each body part needs to appear to be able to withstand the stresses it would be under were it really moving in that environment. For example we requested bulkier muscles in the front limbs and stronger looking shoulder joints for the Edvard-Adam Thing so it would more able to support the mass of the torso, trying to keep the essence of the design and add just enough reality to make it work in the scene.
Once we’ve modeled, rigged and animated a creatures then the clients will get to see it move for the first time, that’s when the next round of design tweak requests start, these requested changes can sometimes go right through to the week of final delivery. At least one of the creatures was totally unrecognizable by the end of the show compared to what they had in mind on the day they shot the sequence.
What was your feeling to give your contribution to the great and scary creatures that Rob Bottin and John Carpenter have created?
The creature effects in the 1982 film were amazing for their time; I’ve always been a huge fan. It’s such a great honor and challenge to be involved in creating the modern equivalent and I’m really proud of what we achieved. Audiences are much less forgiving now than they were in the 80s so the approach used then would simply not have worked this time around. That said, we were very conscious of remaining faithful to the style and character of the creatures in John Carpenters film so I really hope that shows in our work.
Clients no longer have to accept that whatever they get in camera on the day of the shoot is the final version they’re forced to use in the film. They now have the option to come to us afterwards and describe what they really want or how they’d like to take it further. As long as the time and resources are available we can keep working on it until we achieve the result they’re happy with. That’s why in the final release of the film there are almost no practical creatures visible. I take it as a back-handed complement when I read reviews saying the CG creatures were not as good as the practical ones because I know the ones they thought were practical were ours too.
Can you tell us more about their creation and the challenges you have to achieve with them?
There are a number of huge challenges we faced on this show. The visceral, organic nature of the creatures is always a difficult look to re-create. From a rigging point of view we work from the inside out, even though you never see it the viewer has to get the sense that there is a complex internal anatomy to the creature. We don’t have the time or resources to try and recreate all of that underlying anatomy so much of what we do is about understanding the complexity and trying to mimic it as efficiently and simply as we can.
The rigging for those creatures should have been difficult. Can you tell us more about it?
For me the trick to rigging for VFX is about keeping the node graph as clean as possible. However good your initial planning, things will always change so you need to keep the rigs adaptable right through the show. There are 3 main ways we achieved this, by making use of custom nodes to keep the number of nodes and connections low, using a modular rigging system for consistency across each asset and not requiring too much from any single rig.
Most things we need to do in rigging can be achieved using existing nodes and a bit of ingenuity in how to use them. To create complex behavior often requires the layering up of one bit of rigging on top of another to create the final solution. This is both inefficient computationally and messy when you need to debug something not working right or make requested changes. In these cases I like to think about the data flow, what are the inputs an animator needs to have control over and what are the final outcomes that the rig needs to achieve. Then I work out the most efficient calculation to get from A to B and we create a single node to process this calculation.
Our modular rigging system, named “riglets” allows us to position pivots and controls in a template and connect up a rig from its component parts, a torso, clavicle, arm, hand, etc. As soon as we have a stable solution for how we want a body part to behave, we make it a riglet and the riggers should never have to think about that again, freeing them up to spend more time on making the deformations look better. It also allows us to mix and match body parts, so we can put a tentacle coming out of a chest or an alien foot on the end of an arm, etc.
A general rule I like to work to is to build rigs which are capable of doing around 70-80% of what the asset needs to do. It’s very common when you start building a rig to think about the extremes of what will be required and to try and to factor everything into a single solution. This can result in an overly complex and slow rig. I prefer to look at what are the core things a rig has to do in ever shot and build the rig to do that. If in a single shot it needs to do something different then we treat that as a special case and may build a custom rig asset or just fix it in the shot.
The most critical thing about any rig is how the animator feels about using it. Ultimately rigs are just tools for the animators which puts the rigger in the role of servicing the requirements of the animators. We need to strike the right balance between speed and detail, sometimes having different levels of detail of the same rig for use at different stages in the shot development. Its a constant challenge to stay one step ahead of what they may require and ensure that they are able to achieve what they need to as smoothly and efficiently as we can.
Can you tell us more about the impressive transformations shots and especially the one with the woman?
There is no set process to achieving the transformations, each one was handled as a one-off and in most cases required a number of different effects to be layered up to create the final shot. It was also an iterative process in narrowing down what the clients wanted. Initially we’re given quite a vague concept like “these two heads merge together” or “the skin on her chest rips open to reveal a giant mouth”. Exactly how we achieve that depends on the very specific details. Does it happen fast or slow? Does it start at the top and work down, or in the middle and work out? What happens to the extra skin? Does it shrink back, fall off, dissolve away? Until we’ve answered all these questions we don’t know for certain which parts we’ll do in rigging, animation, cloth, fx or comp. These transformation shots are often the most collaborative between the different disciplines, each having to adapt to what works best for the others.
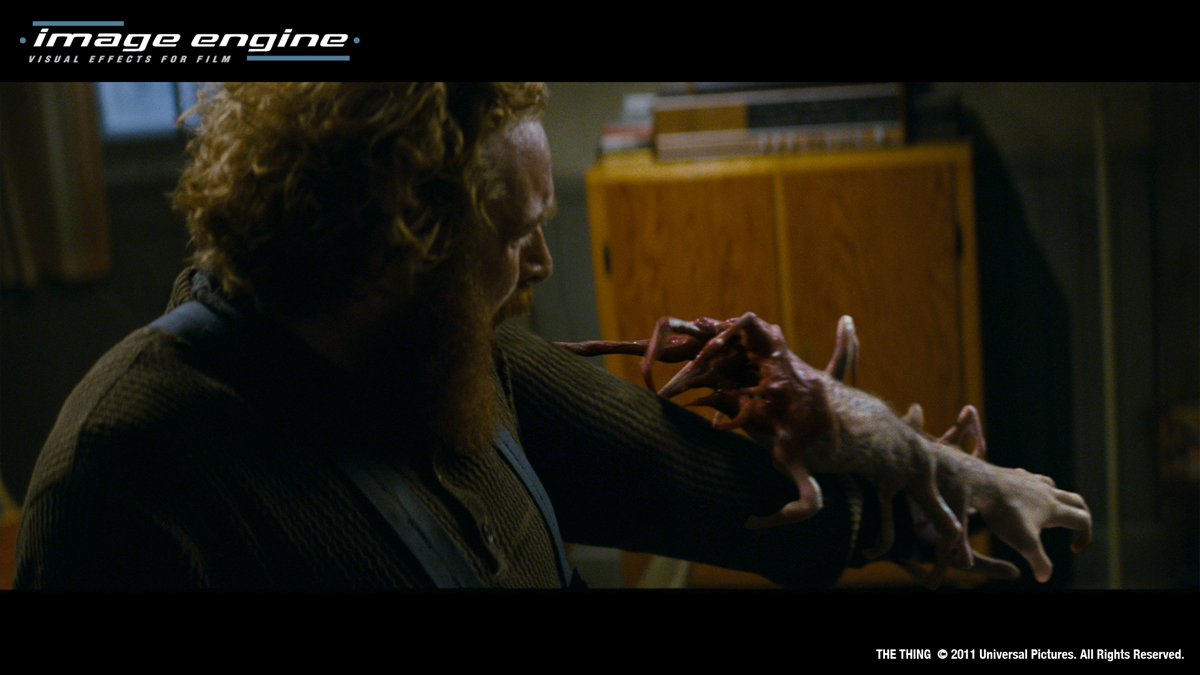
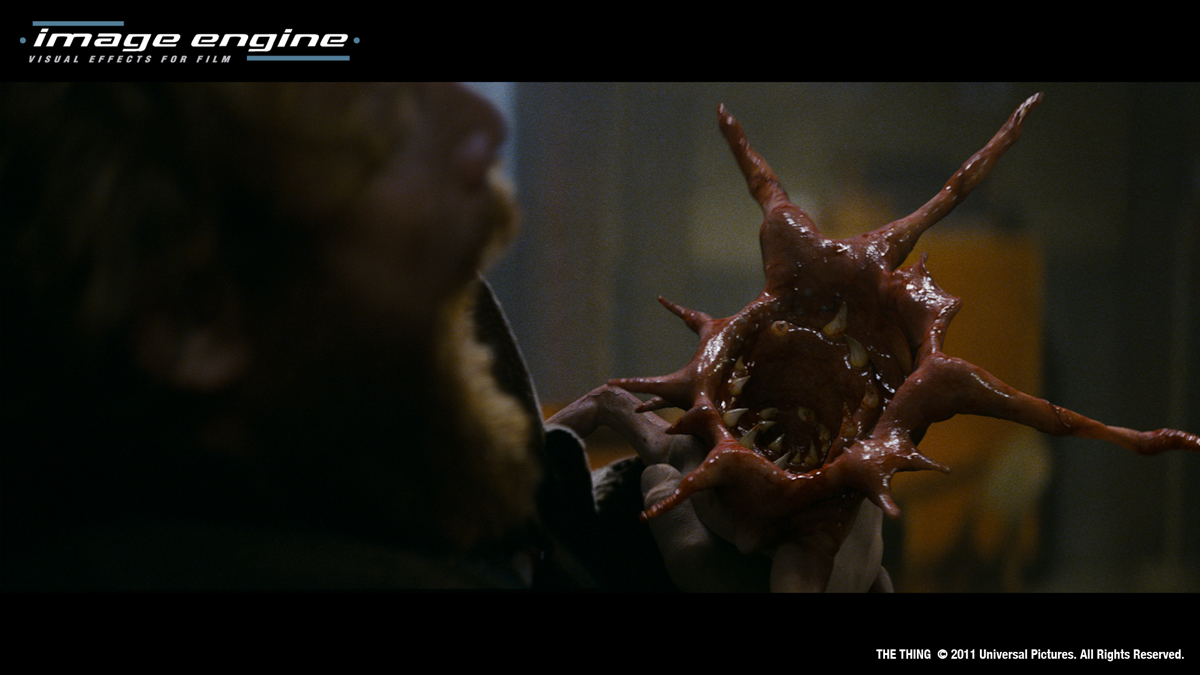
How did you create the terrifying arm that attack one of the character?
The arm creatures were actually some of the easiest rigs to build and maintain. They’re good examples of why a modular rigging system was a good approach for this show. Through the show the redesigns meant the number of legs changed, human fingers were merged together and the mouth areas changed significantly. Each time we could easily go back to our modular template, make some adjustments and rebuild. One of the reasons these rigs were so simple was due to the proprietary multi-bone ik and spline ik nodes we created. Compared to standard out-of-the-box solutions these nodes have so many more features for controlling the exact behavior of each bone and shaping of the leg. For example in a segmented 5-bone leg the animators can control the weighting of each bone to adjust how much automatic movement goes into each bone with additional animated override. It also took care of IK/FK blending. All of the control values feed into a single node which outputs transform values directly into a single joint chain. This single proprietary node gives complete control and flexibility with the absolute minimum number of nodes and connections. The same is true for our IK spline tool, which gives us a huge amount of extra control over twisting, aiming and scaling of joints along the chain. We had a multi-bone setup for each leg and the claws around the mouth and our ik splines for the spine, mouth sphincters and muscles. That’s pretty much the whole rig.
What are your software and pipeline at Image Engine?
For rigging we use Maya as our main package with a significant amount of proprietary software on top. That’s everything from our cross-platform asset management tool to our custom constraint node.
What do you keep from this experience?
That I’m so lucky to be working on awesome films, for an awesome company, with some awesome colleagues. Image Engine is small enough that we can really be responsive to a client’s needs, we can make bold decisions and be really creative and efficient. At the same time we’re big enough that we have some world-class talent, especially in the RnD team who work closely with the artists to create tools and pipelines that enable us to create top quality work.
We developed some great tools and techniques on THE THING that we will definitely be using again but we’re not complacent, there’s always plenty of room for improvement.
A big thanks for your time.
// WANT TO KNOW MORE?
– Image Engine: Dedicated page about THE THING on Image Engine website.
© Vincent Frei – The Art of VFX – 2011


This is a great interview, absolutely invaluable infomation in here.