In 2017, Dominik Zimmerle explained the work of Trixter on SPIDER-MAN: HOMECOMING. He then worked on LOST IN SPACE before returning to the MCU with CAPTAIN MARVEL.
How did you and Trixter get involved on this show?
We got involved on the show in fall 2017, when Marvel wanted to start developing two of the primary powers of Captain Marvel: the « Photon Blast » and the « Binary effect ». We started with the creation of both effects quite some time before the shooting began, primarily because it was safe to assume that these two signature features of « Captain Marvel » would take some time to develop, and secondly because our work was an important consideration for how to film the shots in which one of the effects appeared. We previously worked together with Christopher Townsend on similar tasks in the past and so Trixter was a good fit to do this once again.
How was the collaboration with directors Anna Boden, Ryan Fleck and VFX Supervisor Christopher Townsend?
We only worked with Christopher Townsend as our creative contact on the side of Marvel. As always, it was a great collaboration. Chris has an incredible talent of setting up and communicating certain corner stones of a visual development. He gives us a lot of creative freedom while still directing it into a way that fits the context of a movie. He really appreciates visual input from our side and filters out the best bits and pieces to create a successful effect, shot or asset. Chris has a great eye and always spots the things that are wrong with a shot and points out things that would just make it better. We couldn’t have been happier.
What was their expectations and approach about the visual effects?
In general, the direction was to make all the fantastical effects and shots look as real and photographic as possible. Where other Marvel movies were celebrating their Comic Book origin, CAPTAIN MARVEL was supposed to be more grounded and real. We often discussed how the exposure relations between various elements would appear if a real camera had filmed this, we were fully relying on the set illumination when setting up our lighting, carefully recreating the right exposures, and didn’t push things into visibility just for the sake of pointing them out, all in order to make things more photographic and real. In terms of FX, Chris always pointed out when things were getting too graphical and un-photographic, which usually happened when parts of an effect were too sharp, or the edges were over emphasized as well as when the exposure was off.
How did you organize the work with your VFX Producer?
I worked with Christine Neumann on quite a few shows and we know each other really well. While I was responsible for setting up the artistic and technical approaches for the shots together with our Supervisors and Leads, having CineSyncs with Chris Townsend, communicating feedback to the artists and leading the team from an artistic point of view, Christine was responsible for all the financial, organizational and schedule related aspects of the project together with her team and was the direct contact of Damien Carr, the Marvel VFX Producer. We discussed all the bidding, agreed how we staffed the show and, together with Production Manager Karolina Simos-Dziewonska, we defined the schedule. Last but not least, I really appreciate Christine’s visual input – she is very honest.
What are the sequences made by Trixter?
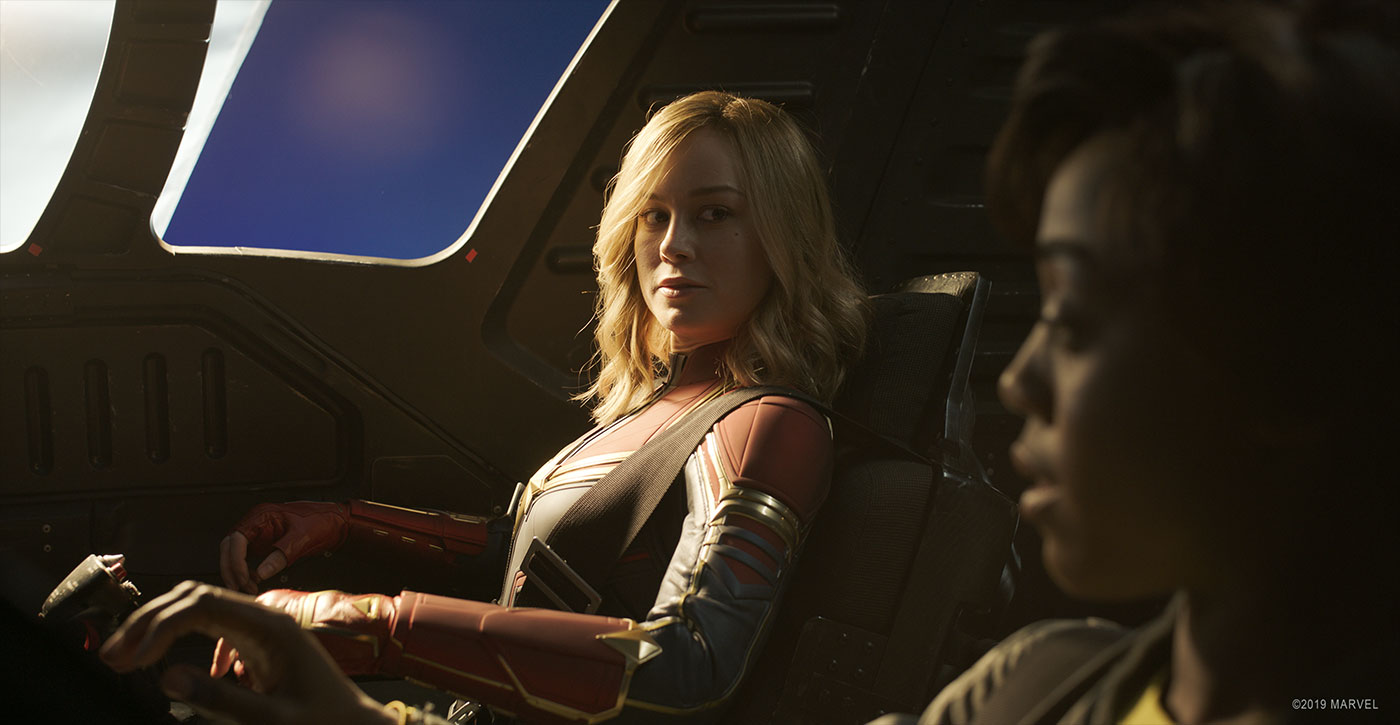
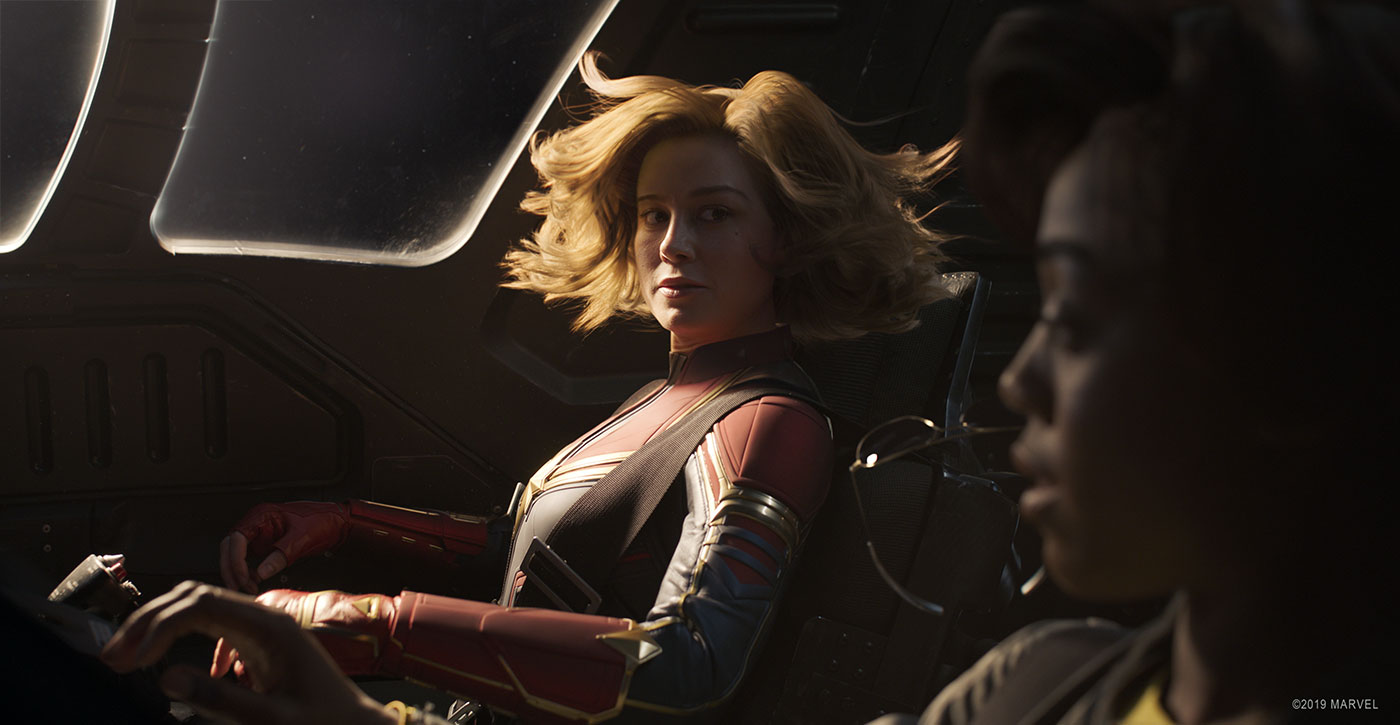
We had two main sequences, the first playing inside the Battleship after Vers was captured by the Skrulls and the following escape, the second when the protagonists around Captain Marvel fly with the Quad Jet to search for Mar-Vell’s ship. Additionally, we were doing almost all of the CG cat shots throughout the movie, spread over several sequences, save for the ones in which the cat is « special » – you will know once you see it – which were done by ILM. A few of the cat sequences were shared with other vendors, which meant that we provided the cat, including all retouch and comp work and another company was doing, for example, the backgrounds – this allowed us to keep our focus on Goose (the cat) and was much more efficient when the cat was only appearing in a handful of shots in a sequence. Furthermore, we worked on the sequence in which Vers does combat training against Yonn-Rogg and on various other Photon Blast and Hand Glow shots scattered throughout the movie.
How did you work with the art department to design the Photon blast, the Binary effect and the hand glow?
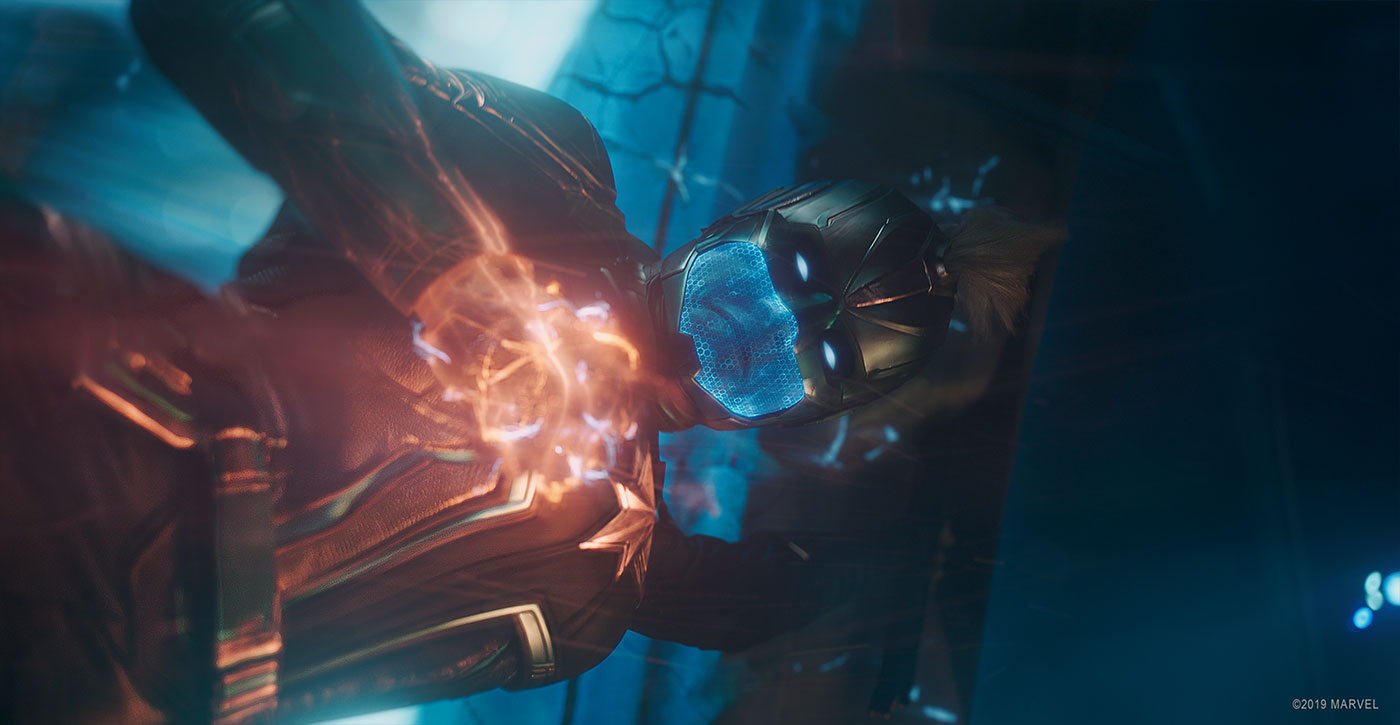
Whenever we start the visual development of anything, the Art Department is usually the first to work on it; the Photon Blast and the Binary effects were no different. Marvel provided a few inspirations of what they felt would yield an interesting and unique look. We received a few comic book examples of both effects as well as some Marvel in-house concepts. With this in mind we set our concept team to work to show on static images how these inspirations could come together and create a unique look for both effects. The goal in this first step usually is to cover as many looks as possible to have a visual discussion base with our client – to conform and outline what everybody had in mind in a visual form. This is incredibly important, as there are probably tens of thousands of possibilities of how something like the Photon Blast could look. Once Marvel let us know their general preference, we moved quite quickly to FX, as a static image can only be a starting point on a dynamic effect like this. The hand glow only came later during the show, when the movie was already shot. It was supposed to be in anticipation of the Photon Blast – like a threatening glow, that shows that things are about to get serious. It was developed in context of the fight- training sequence between Yon- Rogg and Vers. The hand glow should illustrate, how the energy comes from within Vers’ body and gathers in the fist – anytime ready to burst out in a devastating Photon Blast. Based on previous inspirations and the development work we did for the Blast and the Binary, we created concepts in the same style languages we established for them and provided again many alternative versions including wedges to show different intensities and color variations.
Can you explain in detail about the creation of the FX elements?
The FX elements for the different effects were created with different goals. While we were responsible to design and create the production FX assets of the Photon Blast and the Hand Glow, we only went for visuals on the Binary – the feature asset was created by ILM based on our initial development. The difference was, that while our Houdini setups for Photon Blast and Hand Glow needed to result in shareable tools for other vendors to use in their sequences, we could stay a tiny bit more « creative » in our approach for the Binary – Marvel was mainly interested in having several comped proposals for a Binary Effect. We needed to create good looking comps, that showed the massive power of the Binary and we shared the Houdini files, too, but ILM did the production work. If you’re wondering about the reasons for this: when we were staring the work on the Photon Blast, ILM were too busy with other things and so it made sense to have the two related assets being developed together. As we were not doing any of the Binary shots, it made sense that they were creating their custom production FX setup.
For the Photon Blast, our FX team took the concept art and moving references as an intial guideline. We had a test shot, in which Brie Larson was acting firing a Photon Blast in three directions: threequarter to the front, to the side and three quarter to the back. We chose the side direction as our hero angle to establish the look as we could eliminate inconvenient factors like perspective foreshortening – the other two angles should follow, once the effect was working successfully from the side. The next step was to break down the selected concept art and the additional references into individual elements to find a good approach for every aspect: spirals, photons (bolts of light), all needed to be created in a different way. The compositing department played a strong role in the overall process. One of our two comp Supervisors, Alexey Kuchinsky (who also oversaw the huge interior Skrull ship escape sequence) was working very closely with the FX department, evaluating all newly created elements and combining them in creative ways and giving feedback on the layers in terms of what he needed to achieve the look we were aiming for. Once the blast was approved from the side view, we progressed to the two other directions. While the blast to the front was not causing too many problems, as the perspective here effectively emphasized its power, the three-quarter back blast turned out to be very complicated. The perspective foreshortening was not helping at all, killing all the speed and dynamic that we saw in the other two directions. Additionally, the perspective turned our nice biceps shapes into balls. This resulted in the need to update our template with controls to change speed, length and frequency of all elements in order to cheat whenever Captain Marvel was shooting into an inconvenient direction. It sounds strange, but sometimes a cheat makes things more believable and realistic compared to how things would look like when they are « correct » – especially with effects where the audience is already questioning if things are real. Once we had figured out all directions of the Photon Blast and had approval from Marvel, we consolidated our setup and created a template out of it in Houdini to share with other vendors.
For the Binary effect, the approach was similar, yet completely different. It was not really possible to understand the dynamics and feeling of the Binary in a pure concept art stage, so we actually needed to do a lot of conceptual work in Houdini, even though we knew we weren’t going to be doing the final shots. We asked several FX artists and several compositing artists to work in parallel on the assets, creating interesting systems – inspired by concept and references – and combining them in creative ways. It took a long time until it felt right in terms of exposure, speed, colors and overall providing the feeling that this mighty power was bursting out of her. In the end we had 8 versions, that were considered successful and we shipped comp scripts and setups to ILM. I think they did an amazing job in creating this immense feeling power. I really like it very much.
For the hand glow, the effect was more about subtlety. Yes, the effect should look powerful, but it should still be somewhat controlled, and look elegant and dynamic. We started off with swirling dynamics around the fist – inspired by the spirals we see in the Photon Blast, but at one point we noticed, that the swirling felt always disconnected due to the movement of her fist – when we were parenting it to the hand it didn’t look dynamic, when we let it react to the movement of the fist in a natural way it was quickly looking like flames (something to avoid at all costs) and created too long trails, while a quicker dissipation was killing the spiraling look, especially when Vers was moving her hand very quickly. Additionally, it was pulling a lot of attention – something you really don’t want in shots in which the hand glow is not the most important story point, which it usually is not. To get away from this we went in a direction of solar arcs, which are smoothly emanating from her hand, reminding of the blast colors modulating from orange to blue. As this is a hand glow, we needed to also find approaches to make the hand, well, glow. This was quite a balancing act – we needed to have some anatomical features in the hand, as it is supporting the look of a hand illuminated from within and if you avoid these it looks quite unnatural. On the other side this looks quite quickly brutal and too anatomical. The final effect was a combination of a rendered representation of the CG hand with bones and veins illuminated from the inside, together with 3D noises generated in comp, the FX elements and a lot of compositing love.
How did you manage their simulations?
Once the simulations were set up, managing them was quite easy. All of the three setups had quite fast simulations times and we only simulated what was really necessary – for time efficiency and controllability reasons.
Can you tell us more about the light interaction work?
The light interaction is usually a combination of techniques. It was really great that Chris had already considered this while shooting on set. For example, the practical hand-cuffs had LED arrays and could illuminate Brie Larson and the environment. Depending on the shot they also used additional light set-ups that were creating timed interactive light, for example, when a photon blast was fired off. In some shots it was enough to emphasize and modulate this available light to successfully integrate a blast or a hand glow into the scene. For many of the shots, however, especially when Captain Marvel is doing more massive blasting action, we did full rotomation of Brie Larson to create a complete lighting pass of her and the environment. To get also the dynamics of the Photons travelling through space, the FX department exported locators for the lighting artists to parent light sources to, which supported the feeling of an integrated and dynamic lighting.
How did you work with the other studios to share these FX assets?
After we had done the initial development of the Photon Blast, we consolidated our setup into a template that could be shared. We recreated all necessary elements for our test shot from this template to cross check it and delivered this as an example to all other vendors including the comp script, that was used to create it.

Can you tell us more about your work on the escape sequence that starts in space and ends in a store?
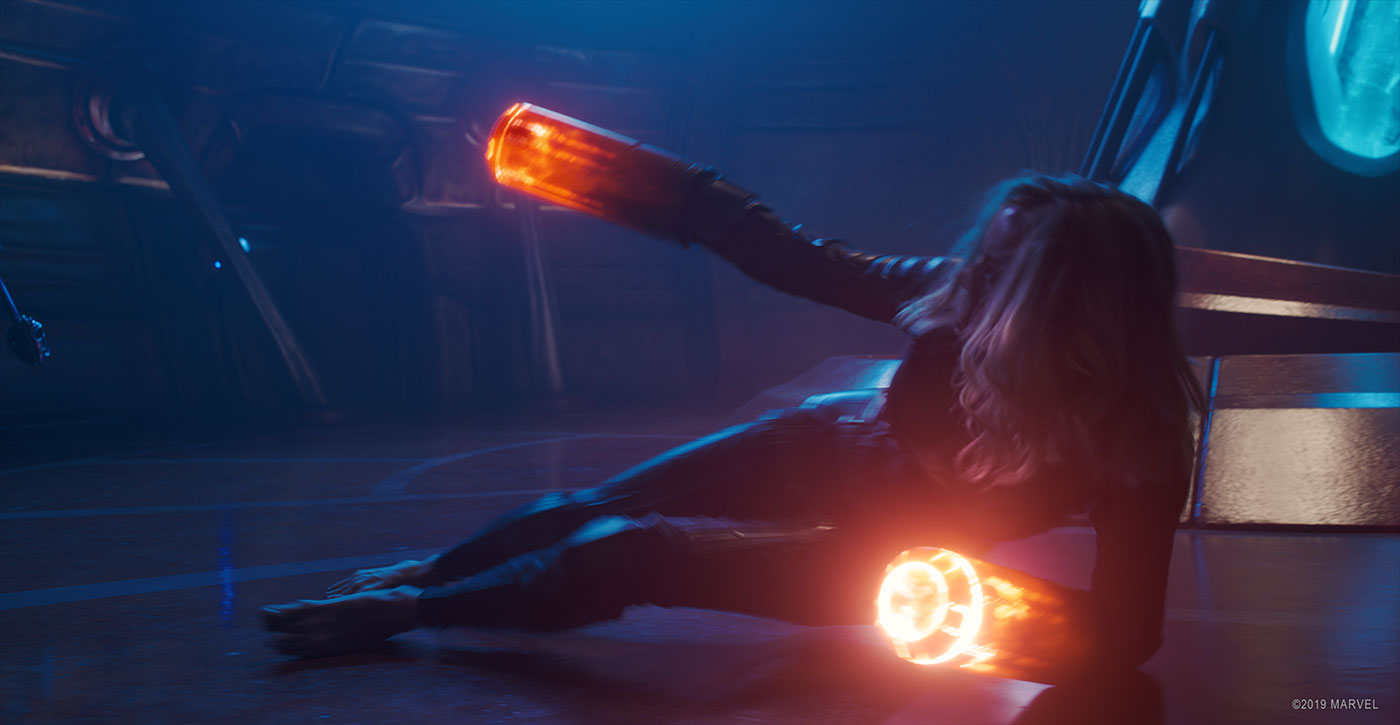
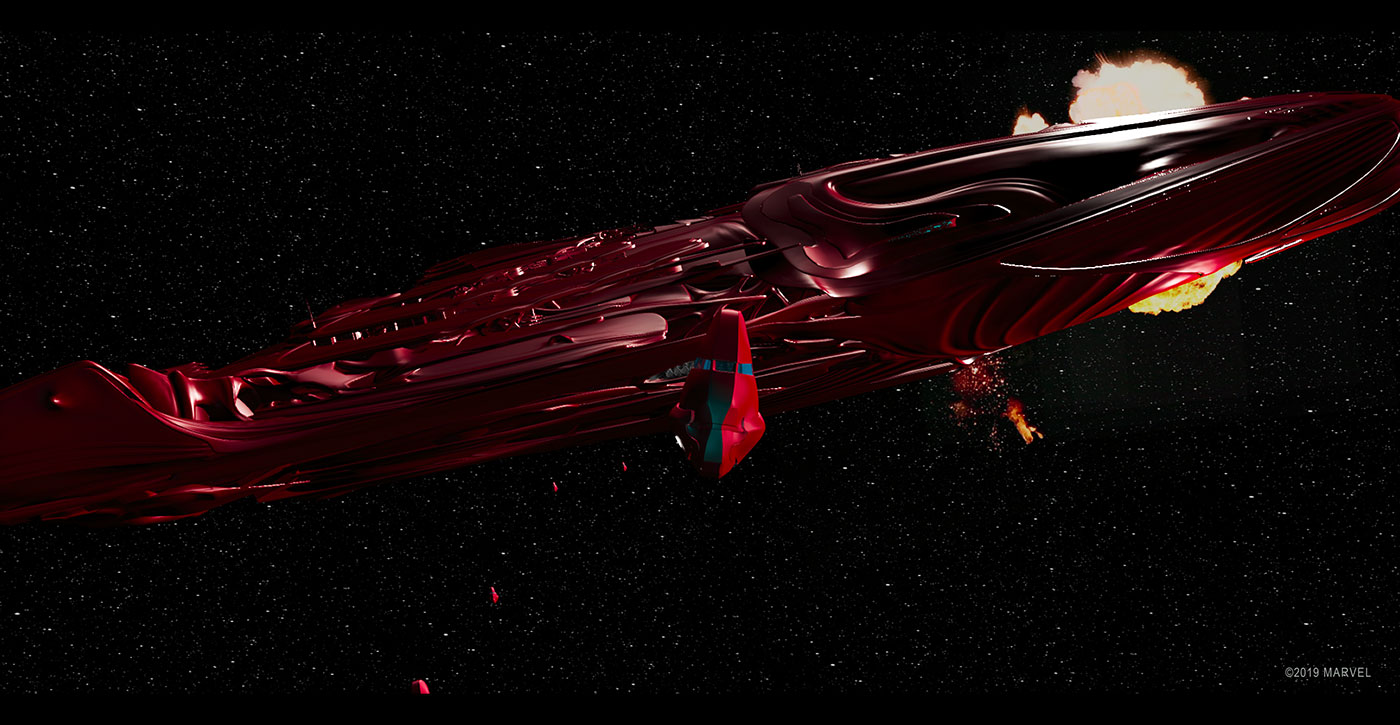
This was our main sequence in terms of shot count. To have a better understanding about TRIXTER’s work I think I need to outline the story. If you haven’t see the movie yet: there are spoilers! The sequence starts out when Vers is awaking upside down and slowly understands that something is happening to her, she sees Skrulls, hears their voices and is surrounded by strange looking displays. Her hands are locked in cylindrical cuffs and her Blast is trapped within. There is energy flowing from her temples to an odd machine and the situation doesn’t look too great for her. She manages however to heat up the cuffs with the contained Photon Blast to destabilize the structure of the machine she is attached to, just enough to get her arms free, smashes the machine holding her and fights off the attacking Skrulls. She runs through a maze of corridors and finally reaches a room with a pillar-like energy core. Here she faces a few really tough Skrulls, and she is on the verge of losing this fight. She desperately tries to photonblast her enemies, but there is only energy backfiring out of the back of the cuffs. Expecting to be overwhelmed by her persecutors, however, she puts everything into the blast again and finally – in an explosive event – the hand cuffs give in and the mighty Blast smacks the attacking Skrulls against the ceiling. This comes with the small caveat, that the blast destabilizes the hull of the ship, which leads to a rupture in the hull, which results in an immediate drop in air pressure. Vers manages to grab a handle near the core of the ship, and while threatened by all the flying mayhem around her, she uses her Blast as a rocket booster and propels herself into relative safety. She runs to the Escape Bay, acquires a Pod, that receives unfortunately some damage during the course of the events, but she manages to leave the exploding ship. She still gets quite well through the atmosphere entry, but right after the ship starts falling apart. Air resistance, damage from the re-entry, etc. cause the pod to break into pieces. She grabs one bigger chunk and uses it as a protection when she smacks through the roof of the Blockbuster Video building.
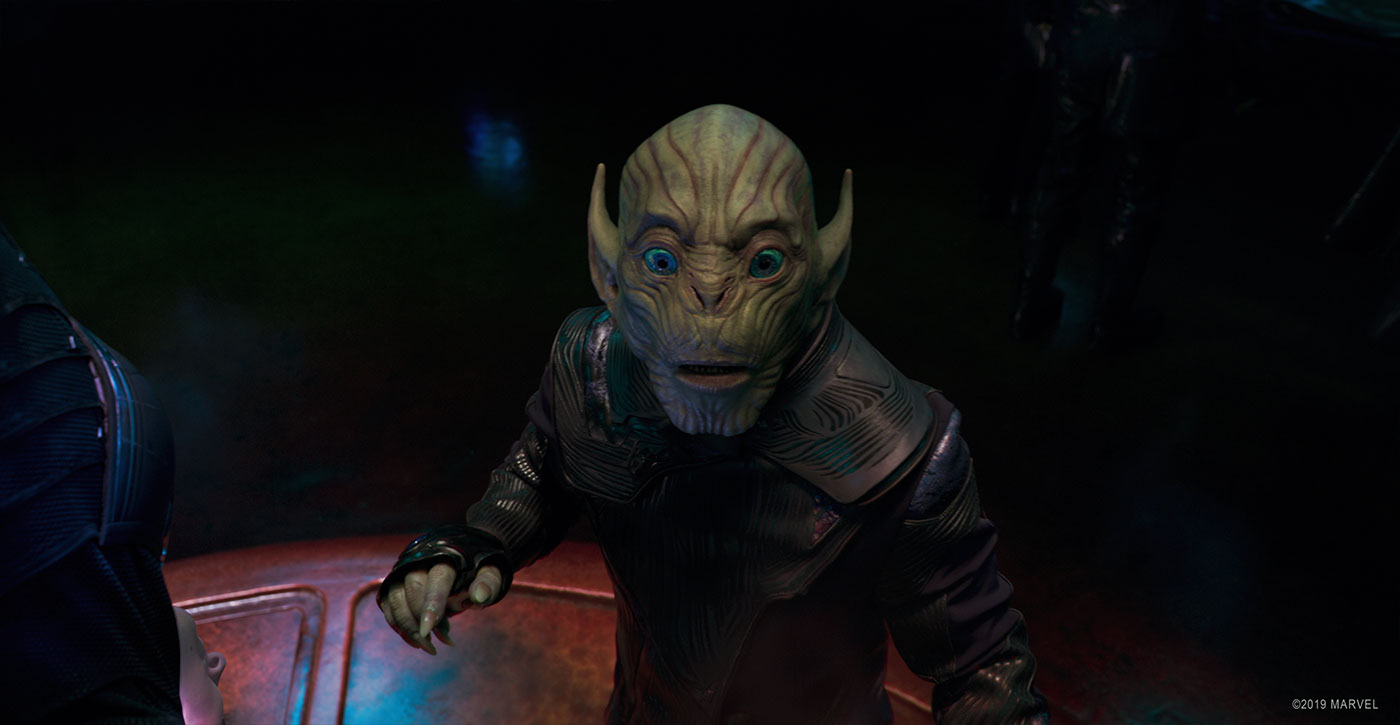
As you see, there is a lot of things happening in this sequence (in terms of production organization these were actually two sequences) and the number of tasks were corresponding to that. In the first part of the sequence we mostly had to fill the environment with details and life. Another task was to replace the staring practical eyes of the Skrull technicians – or in some shots the entire head. The screen inserts, that we see in the « Mindfrack Crystals » (the Skrulls’ screens) were supposed to show what was « fracked » from Vers’ mind – it should look like it was three dimensional in the extruded crystals, weirdly displaced, subordinated to a color code, yet still readable so the audience can connect to what is seen on the panels. This was entirely done in Nuke, with a complex setup of stacked cards, deformations, and color corrections. The screens are driven by the so called « Dough Controls », which are Skrull input devices that look a bit like Tech-Jell-O, they are also found in the controls of the Escape Pod. Technically they consist of various layers filled with motion graphics provided by Cantina Creative. The Skrull technicians are kneading the dough in order to drive the devices. This was set up by providing rendered elements of each layer and refracted UV Maps to provide comp with the capability to flexibly map the required motion graphic inserts onto and into the dough controls. The mindfrack machine and ceiling of the room were extended as regular assets. A bit more of a development work was the Mindfrack Memory Effect. We started again with concept art and after approval created some additional progression steps on the preferred version for the FX artists to have a better reference. As we worked on it however, all the nice details, varying patterns, plasmatic energy streams etc, were creating a far too mellow feeling. So bit by bit we peeled off layers, that were not clear or too smooth until we found a spot where the mindfrack had the right feeling of really drilling into Vers’ brain. Another item that was designed in this first part of the sequence were the glowing hand-cuffs: this was an important story beat , as it was not only supporting her to break out of the machine, but also helped in the course of the sequence to give the audience hints about her emotions – like boosting up, when she feels angry, going down when she feels insecure – or wanting to even the field and beat the Skrulls up nonetheless. Especially when Vers breaks the Mindfrack Machine, getting the look of the material right was not very easy – all the Skrull material is supposed to be porcelain like, brittle and not at all metallic. This however looked very quickly like rocks – so we tried to add technical detail and organized patterns inside the breaking machine to reduce this feeling as well as playing with shard sizes and shapes to give it a unique look. When she is fighting the Skrulls, first in the mindfrack memory chamber and then in the corridors, this was mostly paint and comp work. The soldiers who were punched and pushed around were partially live action Skrulls suspended on rigs and partially CG doubles. We additionally developed the Shock stick weapons which the Skrulls use to attack Vers – however vain their attempts are. In the second part of the sequence, once Vers tries for the first time to shoot at the Skrulls with her Photon blast and it backfires through the gaps at the back of the cuffs, our FX department was getting very busy. For the backfiring we needed to avoid anything that looked like fire or electricity, without too much smoke, but instead develop something that looked energetic, powerful and reminiscent of the Photon Blast. Additionally, there was a dynamic problem: if you shoot something out in one direction, the object flies into the other – but this would actually have looked very strange, so instead it reacted with a recoil. The dynamics of our effect had to support this as much as possible. The backfiring Photon blast not only comes into action in the last part of the corridors, but also in the core room when Vers is lying on the ground, close to being defeated. It transitions into a flowing energy once she focuses all her powers into the blast, streaming out from the gaps on the lower side of the hand cuffs – which was another FX setup. The explosion of the hand cuffs, the massive blast evolving from that and the energy bursting out were only one part of the workload we had to do in the following shots. Besides this we needed to do a CG takeover to have more control over the Skrulls being blasted against the CG ceiling, after which the CG Skrulls were falling down amongst a huge amount of CG debris, smoke and flames. The FX department around our FX Lead, Ciaran Moloney, really liked this amount of destruction! One of the most challenging FX assets in the sequence however comes after that: the breaking of the ship hull. It was demanding not only because of its general nature – a complexly breaking object, but because conceptually we had some kind of goopy lava flowing out of the cracks, which was fluidly sucked out of the room alongside the debris, air, and Skrulls. The wall consisted of breaking and melting parts. Bit by bit, however, these liquid parts made the entire simulation feel slow and smooth, so we needed to accelerate everything and make it more explosive. The good thing about the entire development of the lava parts was that it was still part of the explosion and so added a beautiful visual complexity to it – even though it is not really a hero feature anymore.

The following mini sequence, in which Vers is trapped in the core room was equally fun for FX as it was for comp. The shots were filmed in front of a broken set piece of the wall and the intact energy core. So it was up to us to make something special for the scene. As a starting point, we presented a basic version of the shots to Chris – ceiling and BG extension, energy core and a first pass of the airflow – and he immediately reacted, that everything was too chilled and calm. No danger. No problem. So, we started to do a little storyboard to lay out, what could happen where and when to underline the imminent danger. The most important aspect was that we needed to demonstrate to the audience, what would happen if the flying debris were to hit Vers, so we needed to actually hit something with them. We staged a few impacts into the core structure next to Vers, so that the audience understood: oh, this could end badly. Additionally, we added cracks to the core. The idea was that she grabbed a handle of the core, which was not supposed to hold this kind of force – just like you should not jump on a couch once you’re grown up! Combined with the strong force created by the air flow, this causes the cracks, and they conveniently were a great way of showing a progression of the destruction taking place – which adds to the feeling of bad things turning into something worse. The airflow was another very important, if not the most important feature: it shows that all the air is sucked out, the oxygen is lost. To make it more dangerous we added small particles and mini-debris. These also helped a lot to create zones of light as we could use them to scatter light from the core or other light sources onto them. To show that it was REALLY bad we created a final impact into the core structure where Vers was hanging just a second ago. Also, in the course of these events, Vers activates her protective helmet. We designed the building-up helmet together with the energy mask, that allows Vers to still breath. As a reference, we received the helmet Star Lord has in GUARDIANS OF THE GALAXY. Our build up however, had to be a lot faster and less technical. We came up with a holographic pre-glow, before the holograms are filled with matter to produce the helmet. The energy mask around the mouth is based on Hexagons, the Kree’s favored geometric pattern it was entirely created in Nuke to allow us to quickly modulate the pattern depending on the size of the mask in screen space. Additionally, we replaced all the mohawks in this sequence as the practical one was not reacting as desired to the wind created on set.
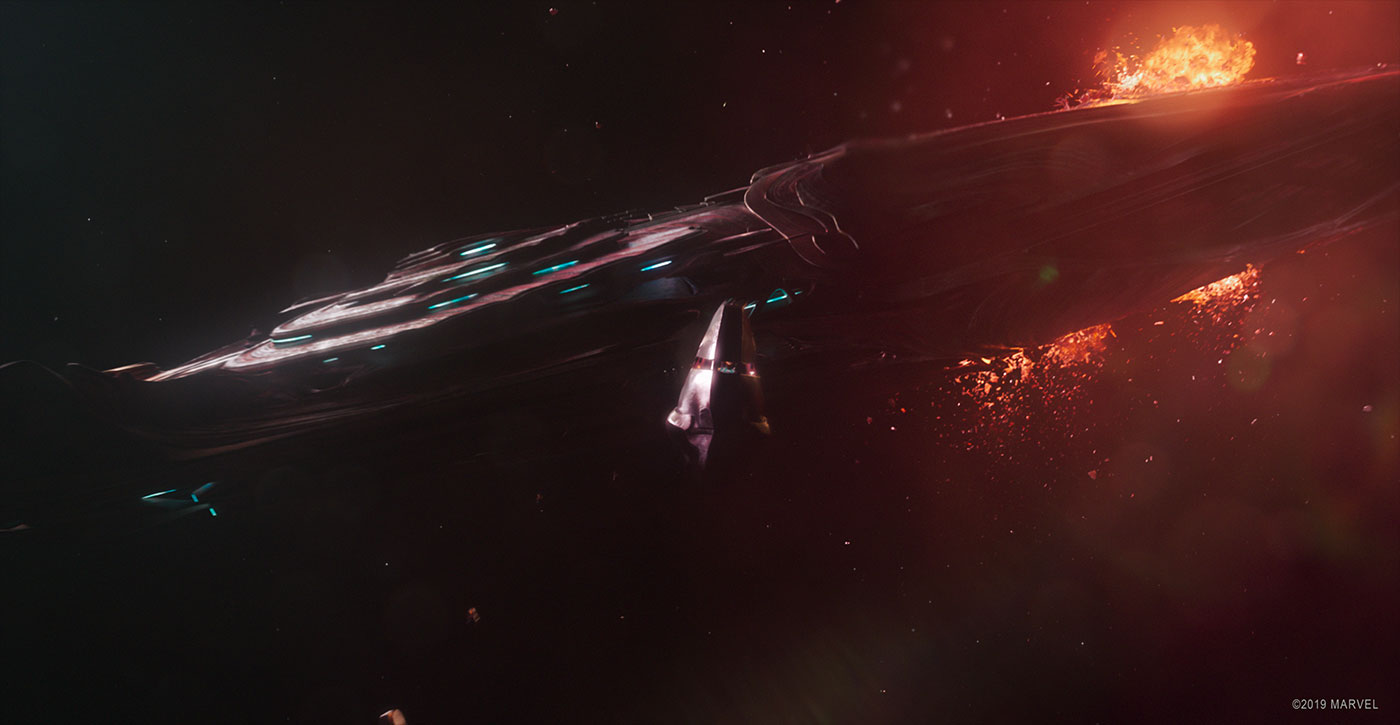
The shot in which she finally escapes with the damaged pod from the huge Skrull battle ship was also one of the big Full CG shots we had. It went through several iterations, from exploding the entire ship to having only a few explosions happening in the end, leaving the ship mostly intact. The entry effect seen in two shots was also much more complex than it appears. There are very little references for how a space ship looks on re-entry; mostly they are filmed from inside or from far distance – as in general there is no camera team re- entering alongside a space capsule! We looked at various movie references but had a hard time finding similar shots – especially since our Pod is entering the atmosphere in a controlled way, it is very small, has a smooth surface and not too many things break away from it. We were then looking mostly at tests of heat shields, which had similar properties. The problem here is, although these tests look extremely cool, you need to get it right, with all the small luminance changes, jittering movement patterns, sparks flying off etc., otherwise this effect can look very bland and boring. After the re-entry we needed to show continuously, how the pod breaks apart – from inside and outside. This goes on until the floor of the pod breaks away and finally the entire Pod disintegrates by the air resistance and damage taken from the atmosphere entry. The interior shots were usually a practical Pod asset with Brie Larson in front of blue screen, while the exterior shots of the pod were mostly full CG. When the floor is breaking away and she is hanging on the pod, this is a mixture between CG and live action material. Getting the exterior shot cameras correct was quite a long process as we needed to have a good balance between chaos and readability. I think our Layout Lead Philipp Welle did a great job here. The shot where she crashes into the roof of the Blockbuster mall was a beast on its own: the location was filmed with a crane, but didn’t go nearly as high as it needed to be. Additionally, the environment was wrong. So, the first step was to create a new camera move. Once this was approved, we built projection geometry of the foreground for comp to recreate the blockbuster video building for the new camera move by re-projecting on it. In the meantime our environment department was looking at references of Los Angeles and we were doing initial layouts to find out what was supposed to be seen. After that, the background was created with a combination of techniques. The far background were classic matte paintings from Photoshop mapped to cards. The mid and foreground was custom built low-res geometry to project the matte painting layers on, while reflections were rendered in Clarisse. The trees were created in Speedtree and also rendered with Clarisse.

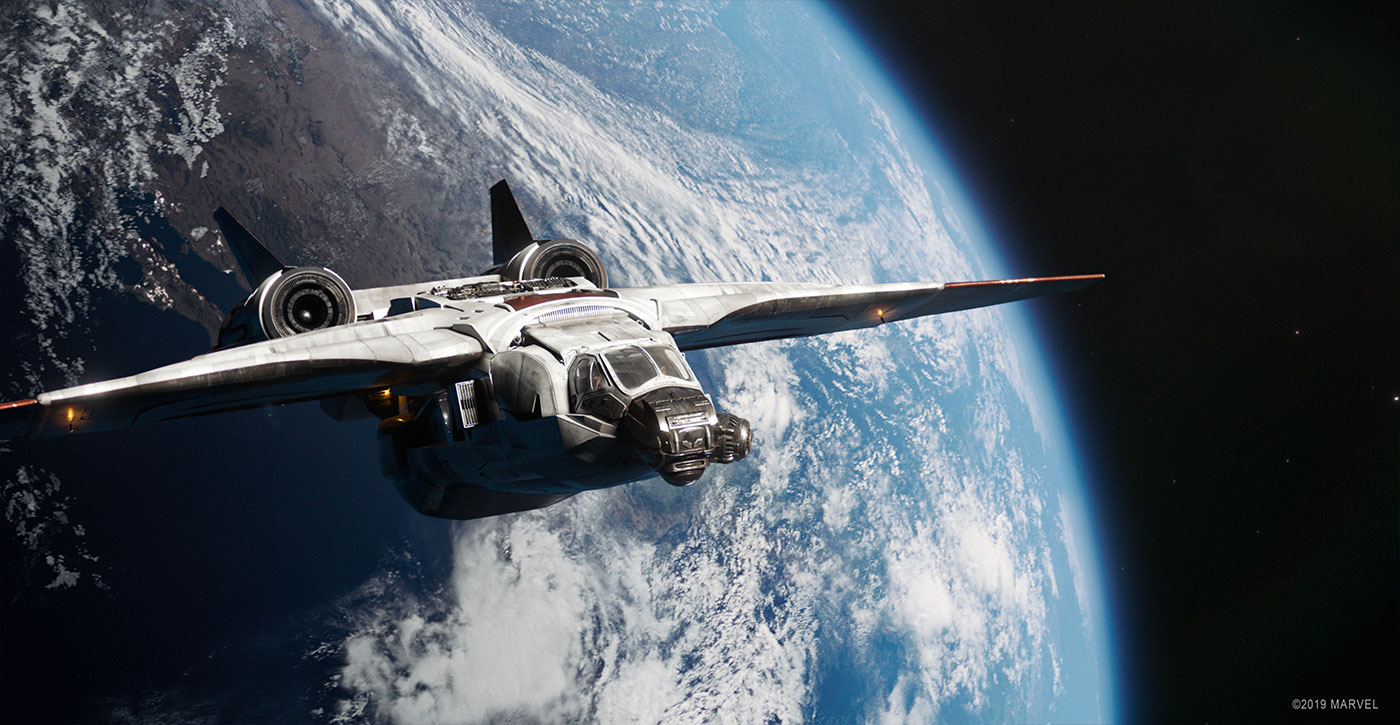
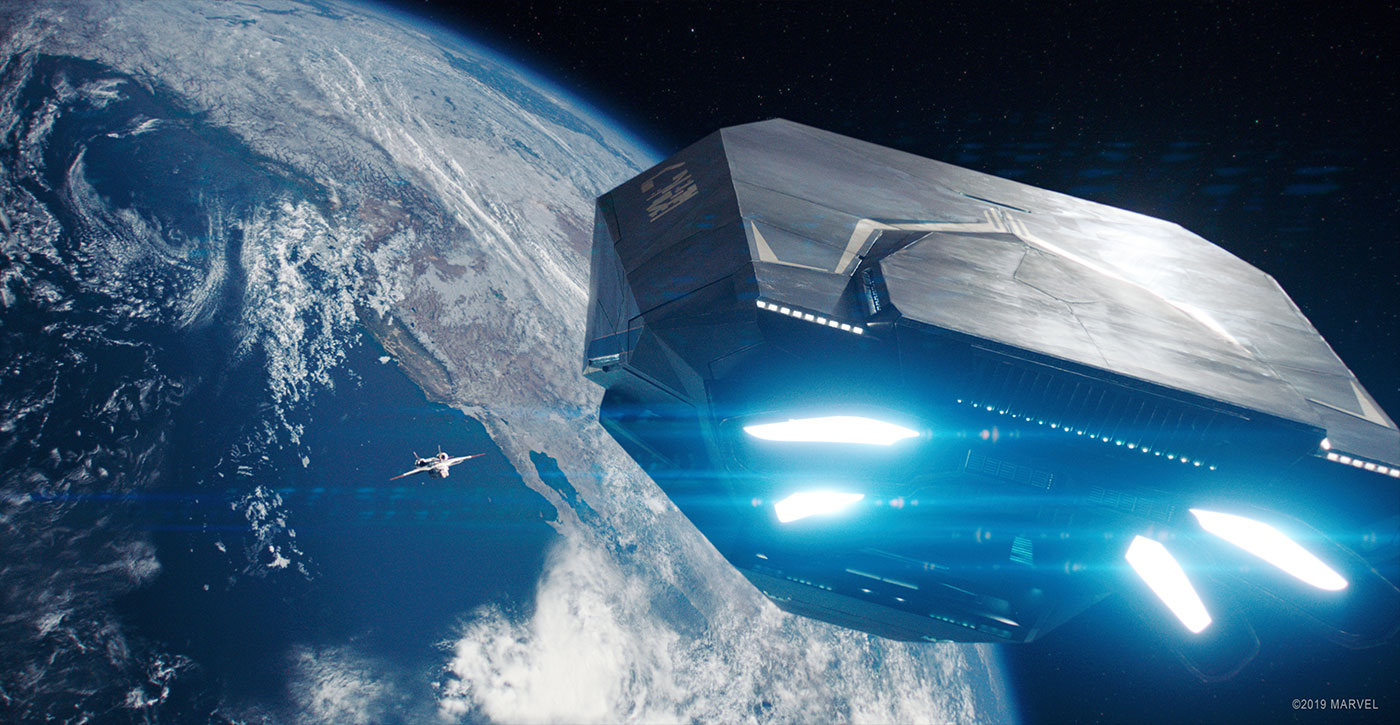
Can you explain in detail about the design and creation of the Quad Jet and Mar-Vell ship?
For both assets the original design was provided by Marvel Studios. However both assets had specific demands, which required us to go beyond this initial look. The Quad Jet had the design finished, before the shooting started. Due to certain requirements on set, the concept was not fully compatible to what was there, so a big part of our work was to marry the original design as much as possible with the set piece. This was further complicated by the fact that the set piece had a hydraulic ramp that could retract in a certain way, and the actors were interacting with the set piece. So basically, the briefing was: change as much as needed and as little as possible to not compromise the design language that the Quad Jet should have. We started off by modeling all « safe » pieces in production quality, meaning pieces, that were not needed to be altered to match what was on set. Afterwards we did a rough modeling pass on the pieces that were probably prone to changes while we were figuring out a plan to build them around the preset functionality. Once we had this base laid out, we went a through a trial and error phase – trying to figure out the best way to incorporate the set design into the Quad Jet design. We presented this in several animated layout movies, so we could also get approval on the way the animatable pieces were moving in conjunction with the moving practical pieces. Once we had the green light, we modeled all the pieces in full detail, along with the textures, based on what we had created a reference look dev for. However, as other companies had to do extreme close-ups of the Quad Jet, they had to add even more detail to the model and textures in some areas – which in turn motivated us to do a second round on the asset to match what was done at the other vendors. Even though we didn’t do super close-ups, this last refinement definitely helped to finesse our Quad Jet in medium shots. It was really great to get additional inspiration from what was done by all our colleagues at the other vendors.
Mar-Vell’s ship, in many aspects, was completely different than the Quad Jet. The design language is very edgy, consisting mostly of flat panels and not a single curved one. It looks like a three-dimensional cubistic painting. This is a very unique design with the big challenge that it is hard to read in terms of size. Once we had the first pass modeling and shading done based on the original concept art, we presented a turntable and the general consensus was, that this ship could be 20 cm long… or 2 km – however you see it. As it was supposed to be read as rather large, and 20 cm is definitely not a suitable size for a space ship – we explored what we could do to make it more readable for the audience. Adding too much extruded surface detail would have compromised the clean design language of the ship and so was not an option. Adding a lot of surface lights, however, was something that enriched the design, as it was highlighting areas, which would have been obscured by the harsh space lighting. We tried adding surface lights wherever possible, up until the point the ship actually looked a bit like a Christmas tree, but in general it was successful. Then, bit by bit, we reduced the lights, added variance to the illuminated parts and reduced the overall intensity. Additionally, we carefully staged the lighting for each of the shots to ensure that the reflective surface caught enough of the lights to make it visible – otherwise it would have only reflected black space. In terms of shading we tried to give the feeling that the ship was made out of some kind of metal spiced with the feeling of it being not human made. Adding fine paneling to the surface, breaking up the speculars as they travelled along the surface helped to achieve this. The Mar-Vell ship, in the beginning, was designed only to be seen in medium shots. However, towards the end of the show it needed to serve as a close-up environment over which Captain Marvel flies for the heroic end shots. We treated this as a separate asset and did a full detailing pass on top of our main asset. We heavily relied on render-time instancing to be efficient when creating the required amount of surface detailing.
How did you create the various shaders and textures?
The textures for both assets were mostly done in Mari with a combination of procedural textures and hand-crafted minute detail. For Mar-Vell’s ship we also employed Substance painter due to its great procedural texturing capabilities. As usual, we created all shaders in Katana / Arnold.
Can you tell us more about the environment creation?
We did a lot of environments for this movie. Our work ranged from full 3D assets, for example for the ceiling and background replacements in the Skrull Ship Escape sequence, in which cases some of the backgrounds were actually continuously simulated to show how the destruction of the ship proceeds, to Matte Painting only shots, i.e for high distant shots of the Earth – the Earth in space, as seen in several shots, is however again a full 3D asset. We usually will go for a fully assetized environment when it needs to be used for several shots. For one-offs our environment team is quite flexible in terms of techniques and tools they use. A good example for this is the entire background of the Blockbuster Video building that I mentioned before. Based on a lot of references we set-up cards and low-res geometry to put Photoshop matte painting sections into the far distant areas. For the mid ground our team built higher resolution assets in Modo, created palm trees in Speed Tree and rendered in Clarisse.
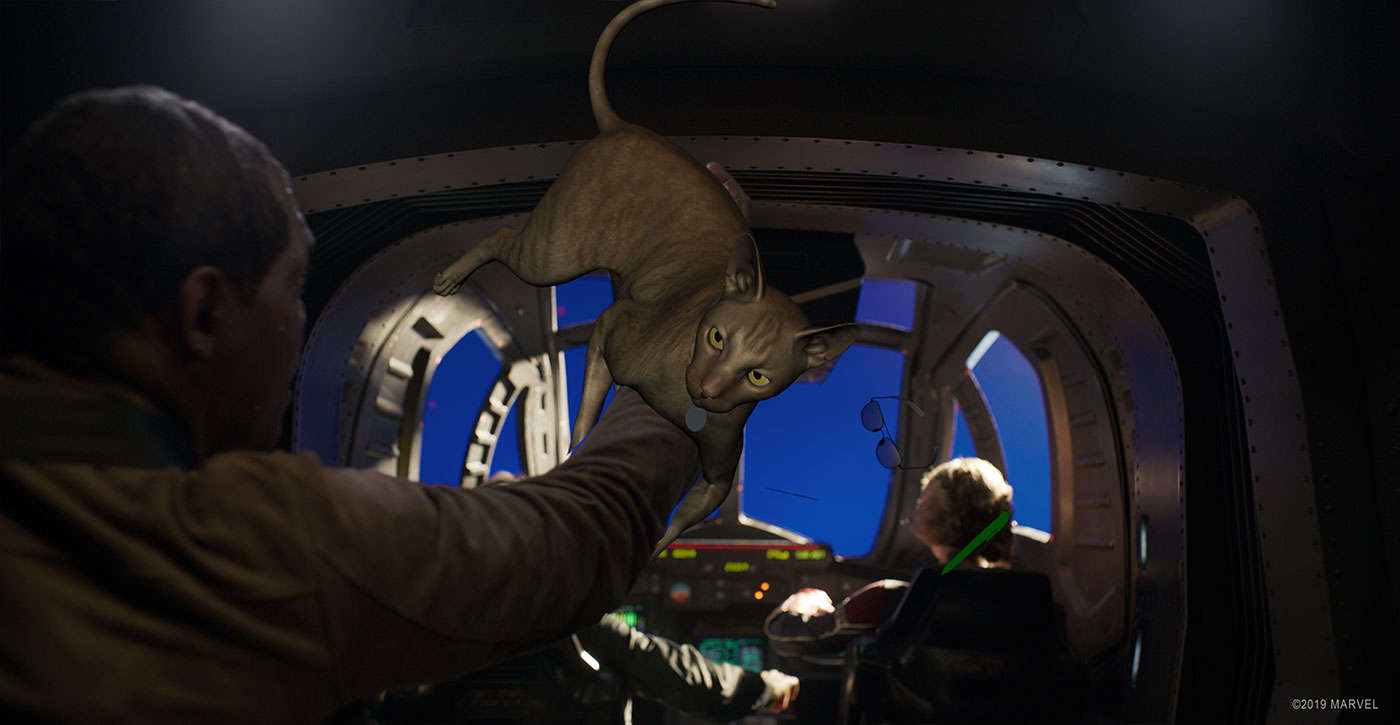
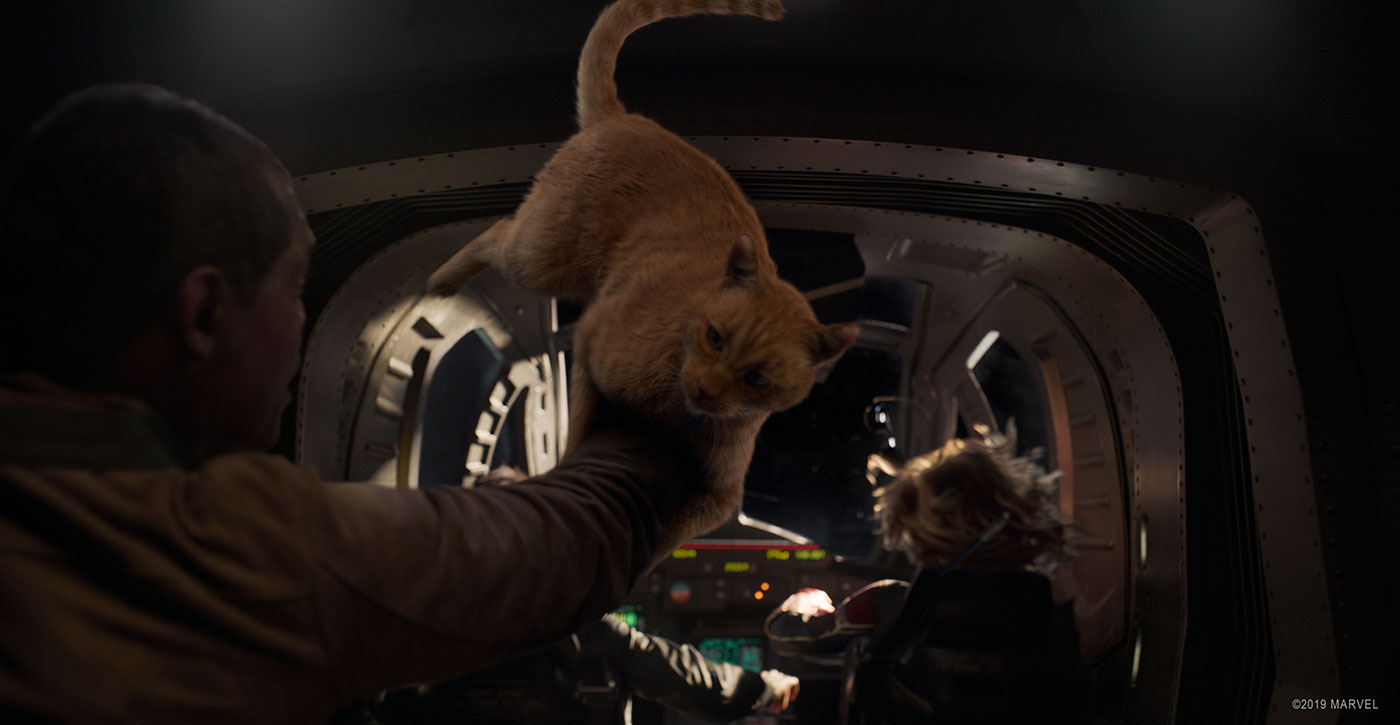
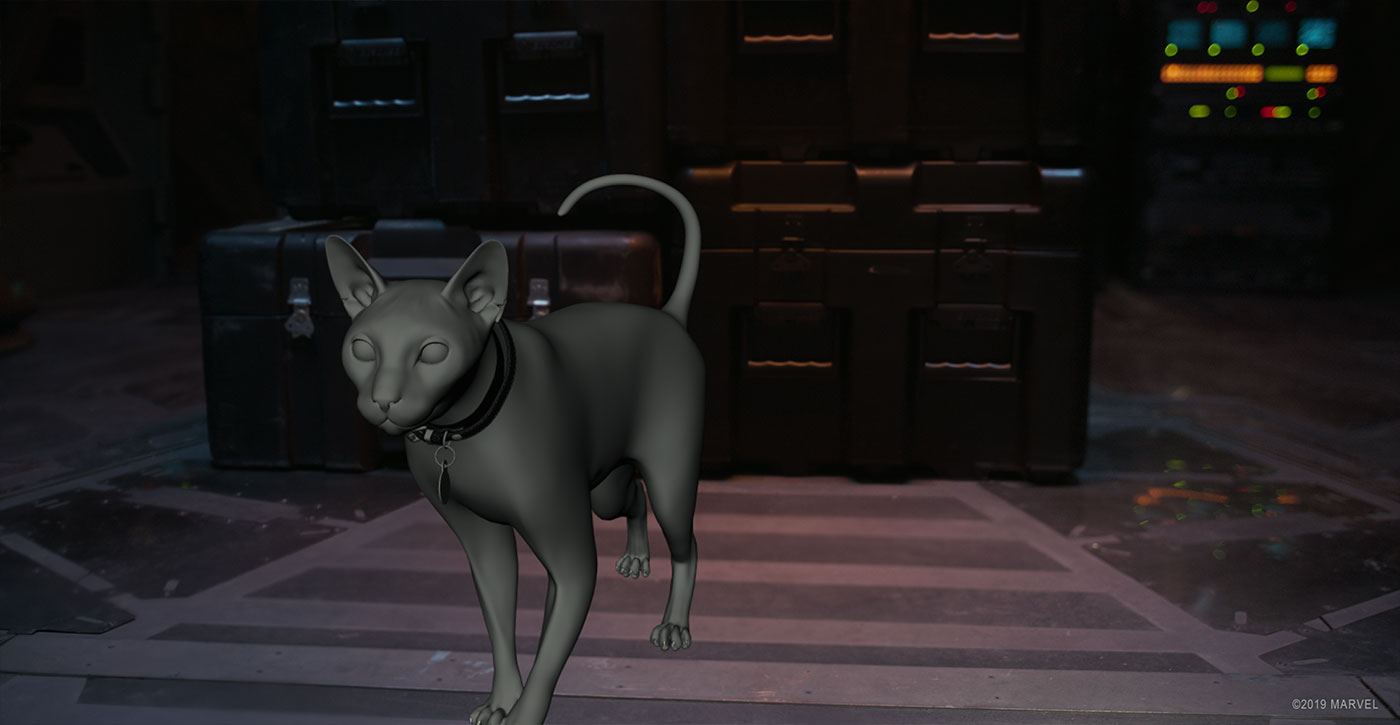
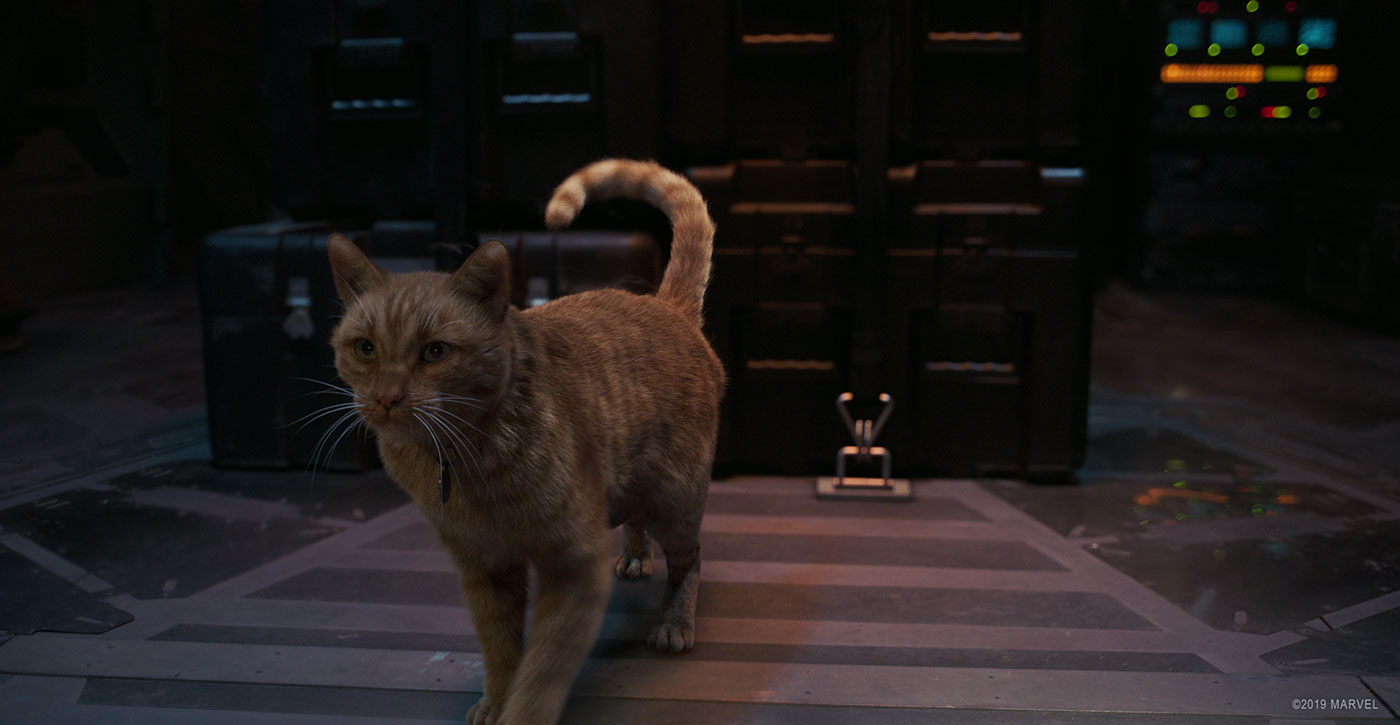
Can you explain in detail about the creation of Goose the cat?
Goose was THE hero asset of the show. Marvel, very early on, anticipated that relying on a real cat to act in every scene would be very dangerous, to say the least. So, in Winter 2017 we were awarded with creating a CG representation of the reference cat « Reggie ». Reggie was the hero cat from the entire cat cast – they had four – and was supposed to be matched one to one. To see how the asset held up in motion, we were supposed to create four animations: a walk cycle, a run cycle, a jump onto something and a landing. As references we got an asset package containing all kinds of reference animations in a controlled lighting environment, texture photography, and even a lidar scan. All these references however, had the caveat that cats are not really willing to hold a position if something interesting is happening around them – like people running around setting up cameras and lights. So basically, he was moving all the time (by the way: in the movie Goose is a she). Also, the Lidar had a few distortions, although it was really, really good and very helpful. To start off we did a initial model of Reggie, how we imagined him to look without fur and added a skeleton inside. For this first step, we looked at all kinds of additional references: what do furless cats look like, what do xrays of cats looks like, how is the bone and muscle structured, are there typical proportions, etc. For this model we created a rig and tried to match the provided reference animations – it was especially important for us to see if we could match the proportions, if our joints were located at the correct location, etc. Based on this feedback, we refined model and proportions, refined topology based on deformation needs, etc. We got additional help from the Ludwigs-Maximilians-University in Munich, that gave us the chance to look at a real cat without skin to better understand the anatomy and body mechanics of such a gracile animal. This helped us also for setting up our muscle system. We used muscles on previous shows, for example GUARDIANS OF THE GALAXY VOL. 2 and also SPIDERMAN: HOMECOMING, but we understood early on, that we would need to have more control over this for the cat, and also needed a more solid solution for skin and muscle sliding. We chose Ziva, as it had some very good examples and the company was very collaborative in providing support. During the time we built the cat, Ruth Wiegand, our Lead Rigging TD, and our pipeline department implemented Ziva into our system, we started building the muscle geometry and setting everything up. However, this was only the cat without fur, and we needed to match one with fur. So, once we were narrowing in on the proportions and topology, grooming started. The grooming was entirely done in Yeti. A big challenge here was to match exactly the incredibly complex fur patterns which we saw on Reggie. In terms of surfacing, developing shaders that could show all the detail in the fur and had the same behavior as Reggie’s fur, were the main focus points. Besides the agreed animations we also did a one to one match of two of the provided reference movies to put our cat to a test. The studio actually couldn’t tell the difference, and neither could many team members who saw it for the first time! The development of the cat was overseen by our CG Supervisor Radu Arsith, while later on Patrick Hecht took over the entire CG Supervision of the show and kept an iron grip especially on the cat and, of course, the rest of all the tasks. It was by far the most complex CG creature TRXITER has ever done, but both Radu and Patrick were on top of it throughout production.
How did you handle his rigging and animation?
As we already had done quite a few quadrupeds in the past, the basic rigging didn’t cause many issues per se. What was a longer process however, was to give the animators all the controls that they needed. To determine these needs as early as possible, we let our animation team « play » with the cat for a while. We looked at youtube references – yes, watching cat videos was declared « work »- and we asked the animators to match certain clips that we anticipated could come up in the movie: a crouching cat, a running and stopping cat, a playing cat, a cat rolling on the back, etc. At this point the movie was not shot, and we didn’t know the story or what the cat would be doing, so we wanted to be prepared. This was beneficial in a way, that the animators learned how a cat behaves, and rigging learned what the animators needed in order to match these animations. Also, later on it was mandatory for the team around Animation Supervisor Simone Kraus-Townsend and Animation Lead Grant Harris to regularly reference real cats as often as possible. The thing with cats is, that they are extremely focused and don’t do much looking around, squinting, squeezing the eyes, etc. They also have a very limited capability of rotating the eye in the socket and rather turn the head. The ear movements are usually very quick, and rarely symmetrical – if they are not angry. All of these were things we needed to keep in mind, and the danger of over animating the cat was omnipresent. We regularly needed to step back and see what we still could remove from an animation, as all unnecessary movements were very quickly drifting into a cartoony, or even dog like, behavior.
Can you tell us more about his fur and his eyes?
As I mentioned before, the fur was a big challenge. Reggie has quite long and fine fur, which creates all kinds of patterns. The patterns stay, to certain extent, constant – for example the fur on the chest will always look different than it looks on the back or the tail. On the other hand, the fur was also altered by Reggie’s movements and changed from reference to reference. Additionally, we needed to keep the groom efficient, to not overcomplicate the simulation. In terms of eyes, getting the shaders and textures right, was probably the most demanding aspect. The iris of Reggie has a plethora of fine color strands that is sometimes emphasized depending on the angle by the refraction of the cornea. Also, finding the right depth and curvature of the eyes in context of Reggie’s head was a lot of trial and error, as neither the lidar scan nor the reference photography was precise enough to give us clear information as Reggie was moving a tiny bit all the time, and the eyes are not really represented on the lidar anyway. The depth in the eye socket and the size were however extremely important to get a nice shadow edge on the eyes and have the right amount of light hitting it from the surroundings.
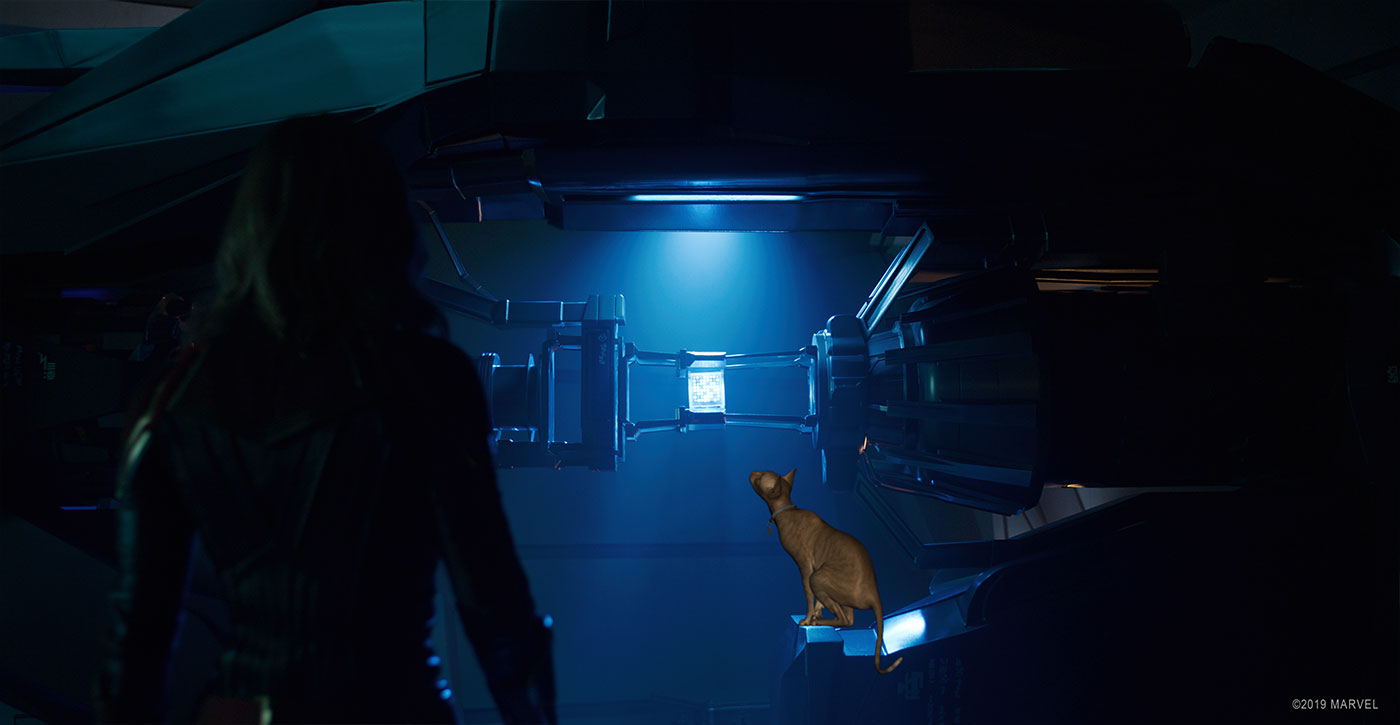
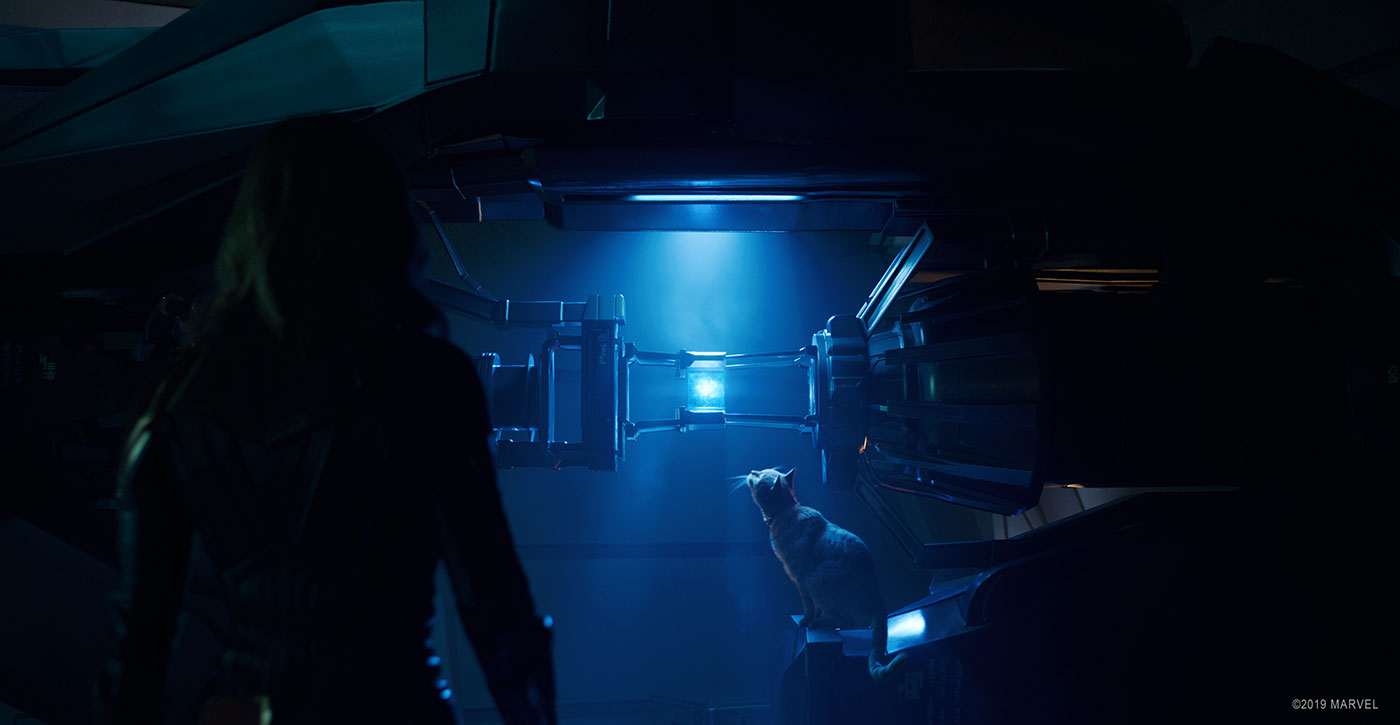
How did you create the Tesseract and its internal lighting?
The tesseract is a setup which was created for THOR: RAGNAROK. It consists of a cube – yes, really – and a volume setup inside in which lights are moving. All the layers are coming from lighting, and compositing has the flexibility to activate or deactivate lights, as well as to emphasize layers – depending on context, how much the tesseract moves (we usually needed to make the movement the more obvious the faster the tesseract was moving) and depending on how big it is in screen space.
What was the main challenge with Goose?
The main challenge was definitely that we needed to EXACTLY match a real cat. It was not good enough to have some realistic looking cat, but we needed to study every spot on the nose, the color distribution in the eye, how the fur was clumping on the chest, on the back, on the belly, so that every detail was matching the real cat. I have the feeling that something like 50 percent of our efforts were going into the likeness aspect of the cat. Also, for the lighting team around our Lighting / Lookdev Lead Julius Ihle, matching the set lighting as perfectly as possible was incredibly important. Goose looked very quickly over exposed, but on the other hand felt dirty when he was under exposed. I think they did an amazing job here, as well as our compositing team around our other Compositing Supervisor Mortimer Warlimont. There were very demanding shots, especially when Goose was interacting with someone, that required a lot of attention to detail and elaborate color corrections to give the feeling that the cat was actually there.
Which sequence or shot was the most challenging?
I think in general, all the shots in which we see Goose were challenging. We were sometimes finding ourselves in the situation, that the cat was beautifully animated, had a great lighting, was integrated perfectly in comp – and still was not looking like Goose, but just like a CG cat. It was sometimes something as little as a too slowly turning ear, a blink too much or a strange soft move of the head, that was killing the feeling of a real cat. This meant looking again at all references, checking what cats are doing in similar situations on the Internet and then trust Simone and her great animation team to implement these subtleties into the requested performance.
Is there something specific that gives you some really short nights?
Usually this would be effects work, that needs to be created from scratch, with only inspirational material and no real-life references. It is incredibly rewarding if you find a great visual and are able to create something that has never been seen before – but there is always the danger of being stuck and not finding the right key to solve the situation. And then the only thing you can really do is, step back, look for more inspiration, invite the artists in the team to come up with proposals and ideas and combine everything into something special. And sometimes this takes more than a regular working day.
What is your favorite shot or sequence?
That is a tough one. I personally really like the mini sequence in which the core of the Skrull battle ship is breaking and Vers is hanging there. It started out as a really tame and rather unimpressive row of shots, and after the suggestions from Chris and once we added all the airflow, flying rocks, impacts, breaking away hull, embers, etc. it turned into a really awesome piece of work, that really sells the dangerous situation Vers is in. I also really like the entire sequence in which the protagonists are searching for Mar- Vell’s ship. There are so many great moments in this sequence: the Quad Jet boosting into space, the zero gravity hair, and the hilarious shot in which Goose is coming into frame and grabbing Fury’s arm as well as some epic space shots.
What is your best memory on this show?
A big moment for me was, when we were already quite advanced with the development of Goose and we rendered for the first time one of our test animations. I was really blown away by what the team achieved here. And again, the entire collaboration within the team and with Chris and the Marvel crew was amazing.
How long have you worked on this show?
I personally worked over 13 months on the show.
What’s the VFX shots count?
In the movie you will see exactly 283 shot from us.
What was the size of your team?
Including the technical staff, around 120 people worked on the show.
What is your next project?
TBA I can’t talk about it yet, but we have some exciting projects lined up.
A big thanks for your time.
WANT TO KNOW MORE?
Trixter: Official website of Trixter.
© Vincent Frei – The Art of VFX – 2019


