
In 2013, Sara Bennett explained the work of The Mill on THE MISERABLES. She then worked on many films such as DRACULA UNTOLD, THE MARTIAN, FANTASTIC BEASTS AND WHERE TO FIND THEM, ASSASSIN’S CREED and ANNIHILATION. In 2016, she won the Oscar for Best Visual Effects for EX MACHINA.
How did you get involved on this show?
We were invited to pitch by STX Films, having met Ralph Winter who was Producing on a previous project.
How was this collaboration with director Baltasar Kormákur and VFX Supervisor Dadi Einarsson?
We worked mostly with Dadi, who would come in to the studio often and work closely with the team on the creative content. He would share the work with Balthasar at their own reviews. Towards the end of the project Balthasar would come into the studio and review the shots directly with us.
What were their expectations and approaches about the visual effects?
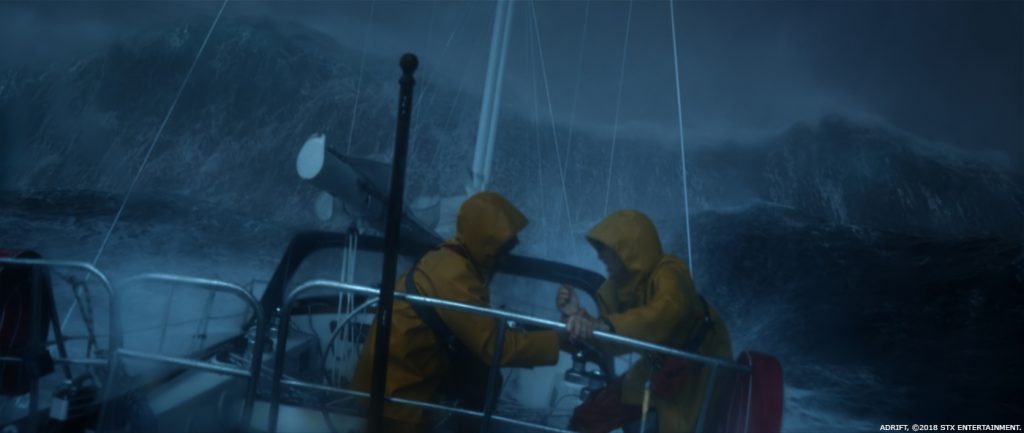
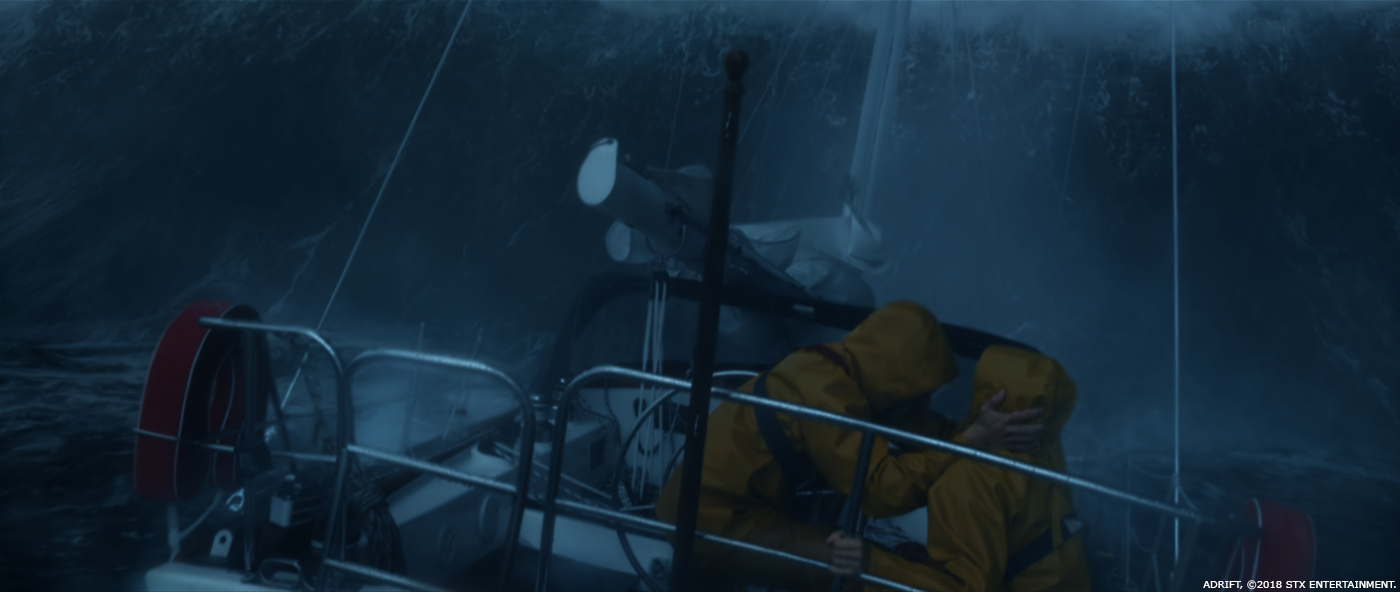
Dadi was very clear about the look he wanted for the storm sequence. He shared lots of real storm references with us and was keen for it to be as photo real and raw as possible and to do justice to the incredible story told in Tami’s Oldham’s book Red Sky In Mourning – that the film is based on. The aim was to feel like we were with them in the storm, moving through it.
Tami talks about the immense size, scale and power of the waves in the book and he was passionate about bringing the rawness and pure terror of the experience to life – rather than something very polished and clean.
What are the sequences made by Milk Visual Effects?
Milk made 170 shots for ADRIFT; 70 of which were big stormy ocean shots.

The key sequences were:
The big hero opening shot
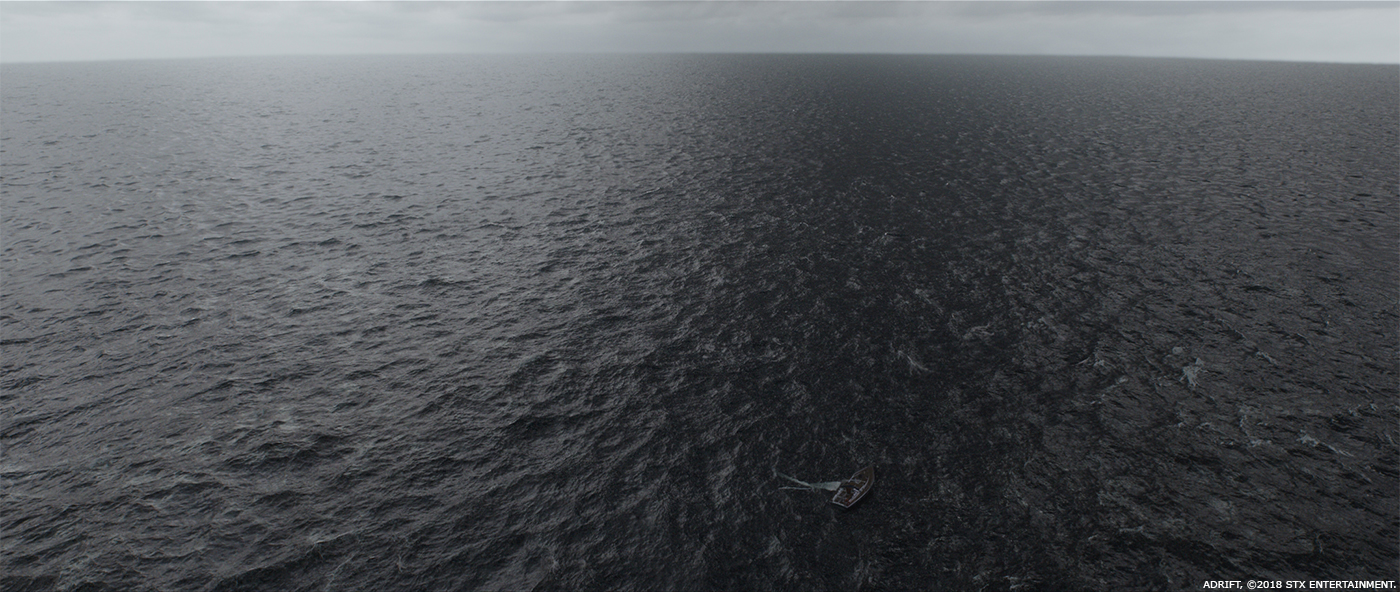
This sequence is over 7,000 frames long; we start by seeing Richard (Sam Claflin) underwater surrounded by lots of debris. This was a combination of a partial live-action Richard with CG leg addition, within a fully CG underwater environment. It’s a dreamlike sequence and the audience doesn’t yet know that it is Richard floating in the water. The camera then pulls up into the interior cabin, where you see aftermath of the storm and Tami regaining consciousness. For this part of the shot, we created a CG champagne bottle on which she cuts her leg. We added the gash and blood. The camera then pulls out of the cabin to an exterior VFX shot of a calm, post storm ocean, at which point Tami realises that Richard is not attached to his safety cable, the camera continues to pull out to a wide VFX shot of the vast open sea ocean, which brings home the realisation of the full horror and despair of Tami’s situation – she is completely alone against nature– surrounded by water for miles.
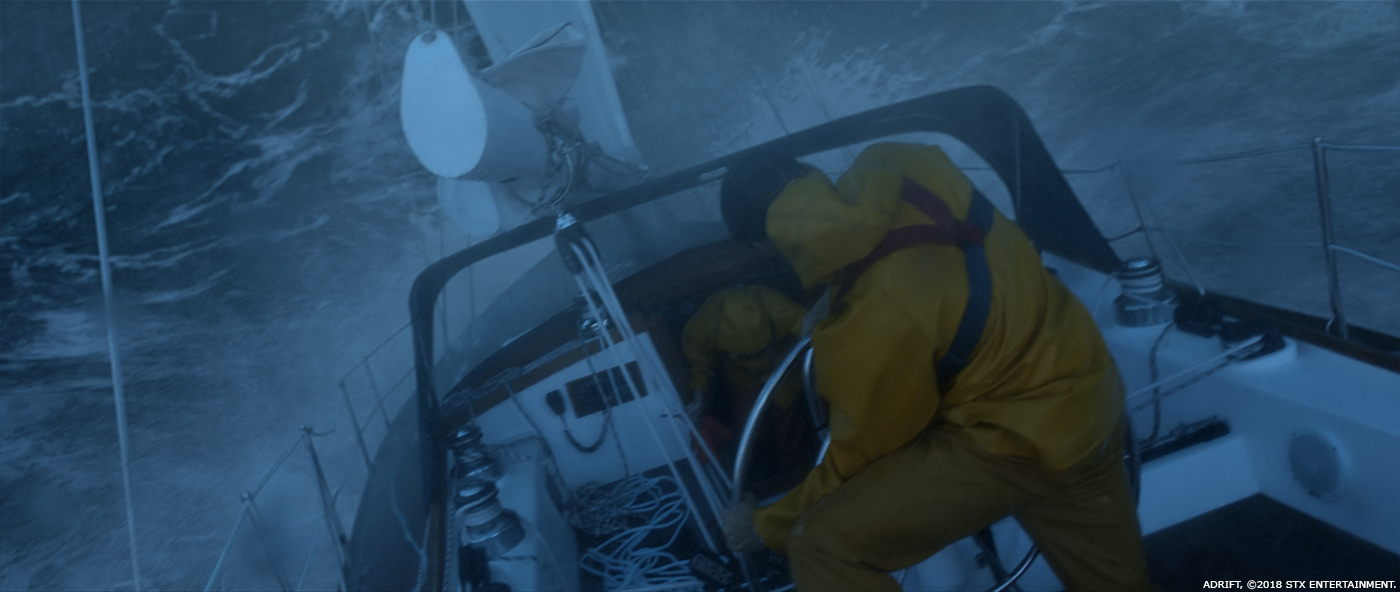
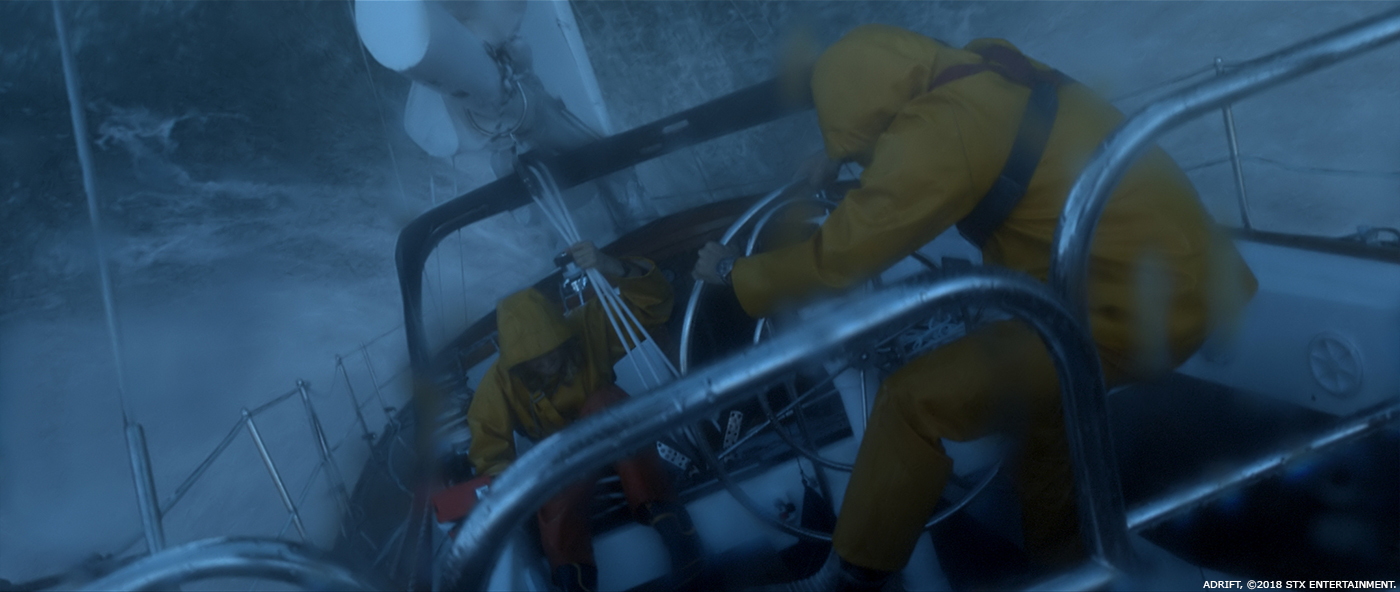
The storm sequences including the hero 100-foot wave
The most complex VFX sequences in the project, both technically and creatively, were the storm shots which included a terrifying, bespoke 100-foot wave that hits the Hazana and ‘pitch poles’ (capsizes) the boat, ending with Richard underwater disappearing into the depths of the ocean. Leading up to this complex “finale” shot, we created 40 CG storm shots, which were a mix of live-action and full CG as they pass through the developing cyclone.
The ‘pitch pole’ shot – as it was known to the VFX team – was over 3,000 frames long. The camera starts on the wide stormy ocean, as the boat careers toward a 100-foot wave, which we ride up before transitioning to the interior cabin as we pitch pole over and the boat capsizes before we pull back out into the underwater environment.
We approached the pitch pole sequence in stages, starting with the open sea. We used a procedurally generated ocean layout as a base – created by our animation team. This included 21 individual hero waves that were placed by hand and then simulated to sync with the key moments in the shot to sell the intense drama of this pivotal moment in the film.
One of our key challenges was animating a 100-foot wave by hand. The wave had to be placed specifically to tie in perfectly with the timing of the live-action plate and to emphasise the huge scale and mass of the body of water and add to the climactic apex of the pitch pole shot. We also had to seamlessly transition from one live-action plate to another without any cuts. Using a CG camera that had to rotate 180 degrees starting from a shot of the live-action plate looking up at the wave from behind the boat, to another plate that was onboard the boat looking back at the wheel of the ship and the actors. So, we had one plate at one end of the boat, and another at the opposite end. Using a full CG boat we match moved it to the live-action plate to execute a flawless transition from one take of the action to another so we read it as one continuous shot. We then transition into the interior cabin of the Hazana.
For this part of the shot, we were given a plate of a rotating green box that imitated the layout of the real Hazana’s cabin, which had Tami’s stunt double inside. This seamlessly follows on from the big wave that hits the boat. We made a fully CG interior of the Hazana based on a lidar and photo scans of the real cabin. We used this to replace the green screen and animated a digi-double of Tami that we used to stitch between real Tami and stunt Tami. To add to the impact of Tami being flung around we generated water sims and added CG props to the shot as well as strong interactive lighting so you feel the boat is being pulled under and over the sea, this really helped sell the chaos. We also created a digi double of Richard which is thrown off the side of the boat as Tami tumbles within the cabin.
The last part of this complex shot is a transition to our underwater environment; this was a full CG shot with the exception of a takeover into a live-action plate of Richard disappearing into the depths of the ocean after being knocked unconscious by the mast of the boat.
The shot starts with the camera reversing out of the hatch and into our underwater environment. We then see a CG animated Tami tumble back and forth across the hatch as the camera continues to pull back, revealing Richard who is still attached to a CG harness, with our CG Hazana above him in the water. The harness snaps and the momentum of the snap carries him straight into the Hazana’s broken mast, which knocks him unconscious.
We animated a CG Digi double of Richard, to show him being flung around under water. We then had to do a takeover from our CG Richard into a live-action plate of Richard sinking into the depths of the ocean. We had to make sure that the timing and the cameras matched and also the final position of our CG Richard lined up exactly with the first frame of the plate take-over. To achieve this we animated the broken mast, which swiped past the camera, to help the blend between our CG and live-action Richards. We also added animated props in the water to sell the carnage along with FX bubbles and blood from Richard’s head wound.
Additional shots
– We created 100 shots of sky replacement and non-stormy, green screen ocean comps, along with various 2d clean up and simple compositing work. A number of these shots needed the ocean to be either calm or choppy; therefore we used a different water sim set up to the one we created for our key sequence of stormy shots.
What was your approach with the creation of the ocean?
Our FX team, lead by James Reid, our Head of FX and CG Supervisor on this project, had to become experts in how the ocean moves under a whole range of different weather conditions, particularly in intense stormy ones. We watched hours of reference material of storms and boats in storms. We looked closely at how the swells build up, white water, giant waves and how they break. We carefully analysed and broke down all the details of every area and feature of a typical ocean in a storm.
We then broke out specific areas in the R&D phase with a focus on:
- White caps and peak spray
- Breaking of the waves
- The foam: how it generated and dissipated
- Colour variations/changes in the ocean as it gets churned up
- We chose Houdini’s Mantra over Maya’s Arnold for rendering of the ocean shots – which meant we needed to build a lighting pipeline using Mantra.
Can you explain in detail about its creation?
Early pipeline work concentrated on development of a tool for layout and animation using Houdini Engine. Using this setup we were able to create the broad ocean surfaces within Maya and export the data to Houdini for simming. Waves could be hand positioned and animated for the purposes of client choreography and for matching live action boat movement. The image below shows an example of an artistically placed wave whose position and features were entirely dictated by the artist.
Initial R&D work focussed on developing the underlying water simulation with seamless integration into the wider ocean. The simulation had to provide a stable and natural looking patch of particles around the boat that adhered closely to a rapidly undulating ocean surface. Houdini was used due to its open architecture, allowing us to develop existing systems further in order to cope with the extreme wave environments presented by the stormy ocean shots and skyscraper waves described in the movie script. Significant work had to be done in order to achieve this, both at particle simulation stage and when meshing an ocean surface that was suitable for rendering.
The boat spray and white water layer was identified as a key factor in adding detail and energy into the shots. It was driven by the core water simulation but its movement as it was lifted into the air had to indicate the intensity and chaos of the surrounding storm. As the white water settled on the ocean surface it had to continue beyond the bounds of the simulated water patch and leave a seamless wake behind the boat. We studied the process of how this type of foam dissipated over time to give realistic looking webbed patterns and a brighter subsurface look to the churned up aerated water below it. One of the challenges faced with this part of the work was in finding a way to blend between CG layers; from polygonal ocean surface, into the white water particle layer, with it finally vaporising and becoming a fine mist volume.
Another key area of R&D was to create a system for generating spray from wave peaks across the wider ocean surface. Whilst this followed a similarly turbulent movement to the boat spray once airborne, it was important to understand the life cycle of this effect as it built up in intensity and dissipated over time. The use of Mantra played a very important role in this process, enabling FX to work closely with lighting in building the final look. Simulations and shaders were developed simultaneously in order to create a realistic look with aerated areas of ocean, procedural foam and dynamic particles working together. The image below shows an early test of some of the procedural foam and marbling patterns that matched the look of our dynamics.
The final elements of CG were atmospheric layers of rolling mist and driving rain.
Animation
Our animation team lead by Chris Hutchison, worked closely with our matchmove team on our approach to the storm sequence. After much discussion and testing the team gave us 3 independent elements, which included a tracked plate camera, a match moved boat and any additional assets.
We created a ‘null’ that translated the boat and the tracked plate camera through our scene. In that null group we had a second camera that animated the banking and pitching of the boat but also drove the tracked plate camera. So, we animated the translation of the boat via the null group and the rotation of the boat and tracked plate camera via the secondary camera. Parented under that secondary camera, we had a tertiary camera so that we could add additional noise and rotations so that we could fine-tune the composition of each shot. Thus, each shot had this three-camera setup. For the ‘pitch pole’ for example we had 4 pieces of live-action that we had to stitch together to create one continuous shot that ended up being over 3,000 frames long. So that created 12 cameras (3x cameras per live action shot). However we needed to create bridge cameras (fully 3d animated cameras) that would take us from one shot to another seamlessly, animating different focal lengths and camera pre scales. Once we had these 15 cameras, we then had to create a 16th master camera that inherited all of the combined camera information together from the four individual plates. We could then pass to lighting and FX, however we still had to make additional tweaks to the camera, which eventually took us to a total of 16 cameras for our pitch pole sequence!
Compositing
The compositing team, lead by Henning Glabbart, were initially going to approach the shots using a unified render with unified ID’s to keep everything streamlined and for continuity from shot to shot for lighting and atmosphere. After testing this during the R&D phase we quickly realised this was very limiting and meant we had no control, because of the nature of water and its transparency we realised we needed separate layers to work with in comp.
We worked with one generic high res sky dome for the storm sequence. This was set up as part of a template script that was shared among the comp team, It was important they all matched shot to shot. We then had a library set up of generic rain/atmos and water sprites and splashes (generated by our wonderful FX team) that the compositors could grab to add in extra detail on top of the base renders.
Pipeline and rendering
Milk’s rendering requirements, as well as any additional storage needed, are now executed entirely in the cloud, so that we have full scalability for all our projects. We processed all of our rendering for Adrift and other recent projects Altered Carbon, Electric Dreams and Dinosaurs In The Wild in the cloud.
When we were planning for ADRIFT we knew it would be very large scale rendering project because of the volume of stormy ocean FX sequences, so we set up our systems and pipeline accordingly. The project would not have been possible to render without the cloud.
We rendered using our existing in-house cloud render pipeline – which uses both AWS and GCP. This was a huge project – 140 shots of which 70 were stormy ocean. During processing we peaked at around 130,000 cores so we needed to be able to scale up as required. We rendered in Mantra – as it gave us better results for the ocean – which was created in Houdini. This meant that we needed to create a lighting pipeline for Houdini.
Our extensive FX simulation work on ADRIFT meant that one challenge was transferring all the data to the cloud as the simulations were done locally. We built custom scripts for Houdini and Deadline to optimise this. Our rendering phase lasted about 6 weeks (between April and May 2018)
The ocean is seen through various conditions. How did you handle these various water simulations?
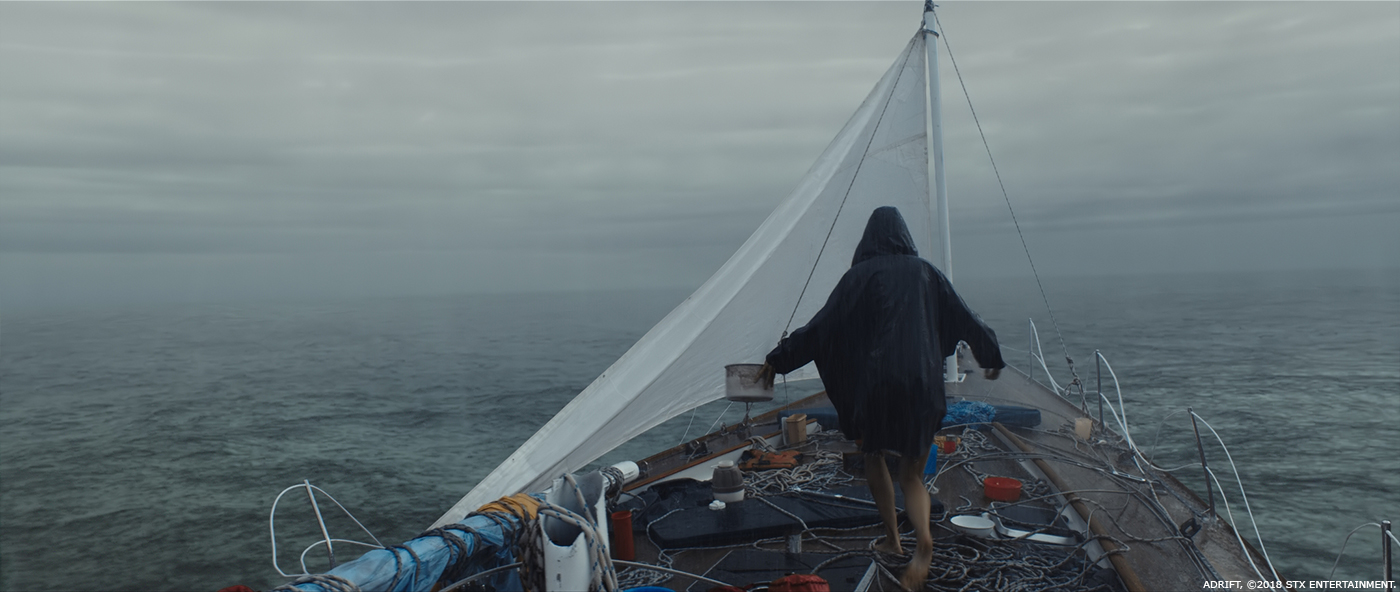
We had one storm environment; one standalone post storm environment composed of choppy water with rain interaction and a third, which was choppy ocean only.
And our opening shot consisting of calm sea and sky with small breaking swells. By far the biggest challenge was the big storm shots.
The choppy water and flat water required far fewer sims. One non stormy shot of the aftermath however was challenging technically in a completely different way, because you could see much further into the distance in the scene, and we had to maintain detail when close-up yet also ensure a different type of detail when you were further away (micro-wave detail). The core principals were set up to be able to cope with the different ocean conditions – even on the choppy shots we used the same tools and processes in the pipeline.
How did you create the various sky conditions and especially the huge storm?
We generated a 6K skydome per environment, which our compositing team could take and drop into any shot. These skies were also used to generate the lighting for our various different CG ocean shots.
We were given some reference images for various sky conditions by Dadi and we also created some concepts ourselves, which we then discussed with him and progressed them.
As the boat is filmed in a dry set, how did you manage the water interactions?
We made flip sims for these shots. We created a CG boat to mimic the live action boat. Generating the flip sims was challenging, as we didn’t know the outcome until the simulations had finished generating – which can take hours and generally will always need a fix before being rendered. We also generated atmospherics such as rain, fog and spray around the boat.
Can you tell us more about the boat creation?
We built a CG Hazana for all our full CG shots. We had reference of the real / practical Hazana along with a lidar scan and photogrammetry. This allowed us to accurately model and texture the boat.
How did you handle the challenge of the matchmove?
Amy Felce our tracking supervisor used the biggest, widest shot and set it up as a master reference scene. We got the first few reference shots and made a photogrammetry scene in 3de, which had all the shot references for 25 cameras as well as shots lined up to the live action boat, which had been shot on the gib in the studio. We used that base scene to track every single shot that came in afterwards. This way we knew where the tip of the boat was in the space straight away. This allowed us to half the tracking time of individual shots.
We made a ‘master’ scene in the preparation phase and then each shot was ingested into this master scene. For every shot we had to track the camera to the green screen and the lidar of the boat, to the boat’s movement. Then the lidar is swapped out for our rig of the boat. In addition, we had to matchmove booms, sails, rigging and the lifeboat too.
We took every reference image from set and calibrated their locations within our master scene too. So every reference camera you looked through, you could see the reference of the boat and the green screen. We also used roto animation on the characters on the boat and for water coming over the side of the boat (so that the CG water would hit the character in the right place).
As part of this, for the opening shot of Richard underwater we had to do a partial CG replacement for Richard, which also required roto animation. We also used this technique for the interior of cabin during pitch pole sequence: We had a lidar scan of this sequence which was spinning – so we match-moved the green screen pitch pole-ing set to the lidar of the interior of the boat. In addition we roto-animated Tami tumbling inside the cabin for this sequence– to ensure accuracy for the water and debris hitting her inside the boat.
How did you create the digital doubles?
The digi-doubles are a good example of the collaboration required on the project. The modellers made the base models from the on-set reference before the texture artists created the colour, displacement and AOV matte textures. We created lookdev turntables for client approval before placing the digi-doubles in shots. Animators used a combination of motion captured data and hand-keying to create the animation, then for CG take-over shots the texture artists created custom displacement maps so the creases in the clothes matched the live action perfectly. In addition, for the underwater shots, the hair movement was a simulation from the FX department and the rigging department created cloth simulations. All of those elements arrived in lighting where we carefully matched the lighting of the footage. Then compositing integrated all of the rendered and live action elements into the final shot.
Can you tell us more about the cloth simulations for the sails?
All the sail sims were created using Ncloth in Maya, which was exported as an alembic file for our Houdini lighting team.
We took numerous examples from the client’s reference footage and created an over-length simulation of the different weather conditions, which we could dial in and out of our sails. We had to create the sails furled, half furled and unfurled, so we needed different sims depending on the state of the sails in the shots.
For the Hazana – our rigging team created numerous variations for her different states of repair during the film (such as the mast: from broken, to damaged or clean) then we made rigs for the stays, masts and interior cabin.
There are two long underwater shots. How did you create these shots?
The challenge of the underwater shots was transporting the audience into a believable environment in which Richard is seen floating. We used a combination of mattes to generate haze and depth, as well as adding particulate, which we layered up for additional depth.

How did you manage the lighting challenge?
Physically lighting water is challenging – when light hits water it doesn’t react as you would expect because of the transparency of water. We lit everything physically correctly but we had to make significant adjustments.
The lighting and set up was all focused in one environment (the sea and storm), which simplified the process at this stage of our pipeline. We did all the lighting set up in Houdini’s Mantra – we needed to keep everything in one package, which was a big challenge for our lighting lead Darren Byford.
Our starting point was realism. Refraction, reflection, subsurface scattering and depth falloff were all built into our ocean shader and then sample ocean environments were tested in different lighting environments to ensure our surface shader and standard settings gave us good results across the board. Once you have a robust general solution then you can start tuning it to shot specific ‘looks’.
Our previous experience of taking Houdini oceans and rendering them in Arnold indicated that this would either compromise the quality or generate inordinate amounts of data given the number and duration of the shots we had, so the decision was made to keep the ocean data in Houdini’s own native format and use the integrated Mantra renderer.
This was the first time that most of the lighting team had ever touched Houdini, so we needed to learn the basics of the software and then quickly gain experience in shading, lighting and rendering in Mantra. It was quite a learning curve.
The final production ocean shader was quite sophisticated. Maintained as a digital asset, it had detailed displacement, two forms of subsurface scatter, accurate reflection, refraction and depth fade together with integrated surface foam driven by the outputs from the simulation. We also developed custom AOVs requested by the compositors, so besides all of the standard mattes, passes, FX attributes and IDs we also created the pRef, pWorld and nWorld AOVs. These were then rendered show-wide.
Along with the ocean surface we also rendered underwater bubbles then spray, mist and additional foam FX generated by both weather effects on the ocean and interaction with the boat.
Which sequence or shot was the most complicated to create and why?
Generally the storm sequence overall, but particularly the pitch pole shot across all departments. The complexity of blending various live action plates together to create one continuous shot and the shot length all contributed to this.
Is there something specific that gave you sleepless nights?
The R&D phase – because this would determine the final look of the storm scene.
What is your favourite shot or sequence?
The storm sequence, we are really proud of all the hard work the team put in to these shots and the innovation with the pipeline and tools we created to allow our clients and team to animate and then simulate waves, rather than a more typical “hit and hope” approach to ocean simulations. This allowed us to be extremely agile in producing the work to a tight schedule and allowed the director and VFX Supervisor to be able to direct the ocean!
What is your best memory on this show?
We had a great community and family feel in the ADRIFT team. We all pulled together on what was a challenging project. It is incredible just how much nautical language has filtered through into everyday life!
How long have you worked on this show?
Around 10 months.
What’s the VFX shot count?
170.
What was the size of your team?
65.
What is your next project?
We have a number of projects on the go including the BBC/ Amazon’s GOOD OMENS and FOUR KIDS AND IT – Dan Films/Kindle Entertainment’s upcoming feature film – based on Jacqueline Wilson’s modern-day variation on the 1902 E Nesbit classic novel Five Children And It – for which the Milk team will create the protagonist CG sand fairy character. Beyond these we can’t say more I’m afraid.
A big thanks for your time.
// WANT TO KNOW MORE?
Milk Visual Effects: Dedicated page about ADRIFT on Milk Visual Effects website.
© Vincent Frei – The Art of VFX – 2018