Jody Johnson went through all stages at Double Negative. She begins with roto and the compositing on STALINGRAD, STARDUST or SHAUN OF THE DEAD. Then compositing supervisor and finally VFX supervisor for movies like PENELOPE or BRIDGET JONES: THE EDGE OF REASON.
What is your background?
I started out in television. Making tea for editors.
After flirting with editing, my passion for design pushed me into broadcast graphics. I realised film work would was about making the best images possible, so after joining Double Negative I passed through roto into 2D, then sequence leading, then overall VFX Supervisor.
How was your collaboration with director Greg Mottola?
Fantastic. We got to know one another while making two tests for the film before it was green lit.
He has clear ideas, which he communicates well. Like wind up toys he set us of giving us the occasional shove so we never fell from the table. He loves chewing over ideas and shows little ego, this approach lets him get the best out of his tools and gave us the chance to really enjoy our work. I like to tune into a director’s thought pattern and then express their vision while shielding him from vfx spaghetti. It’s all about the image.
What was the biggest challenge on this film?
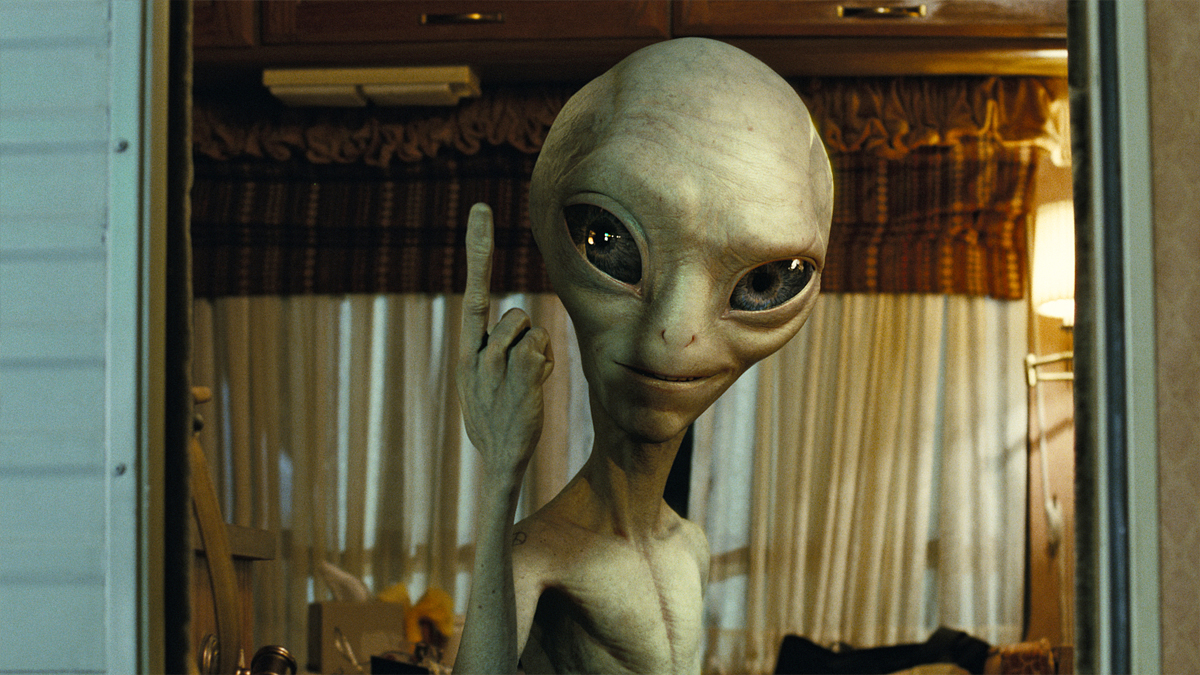
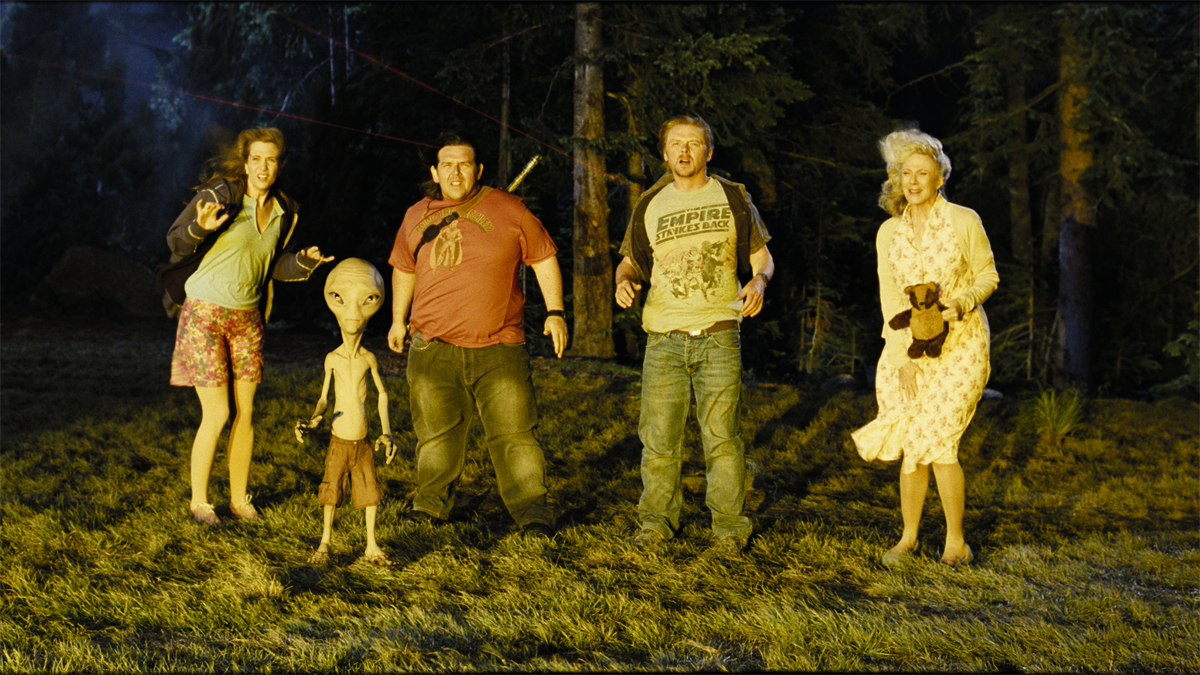
In terms of PAUL himself it was about creating a character at one with his environment. In terms of performance and look he needed to be totally naturalistic, loose and subtle, believable in the grounded reality of the film. We could not hide behind a fantastic reality or a heavy creasing and blemishes, hair, tentacles and warts. We also had to hold back on his aging and creature features, Greg told us to make him look like a made up actor in a film.
His eyes being so large meant many a late night designing and testing, to get the depth, wetness, fire, caustics and detail into his eyes. The unusual slanted elliptical nature of his eyes made rigging, skinning and wrinkling tricky to get right as well as giving him a base evil eye stance. The animators worked hard to control the eyes as they commanded so much screen space and had such an unusual anatomy.
In terms of the film making process, PAUL needed a place in the film as well as on set, thanks to all the actors, crew, writers and director he existed before a pixel was born.
Can you tell us about the shooting of the scenes with Paul? Was there a stand-in during the shooting?
The basic process would be:
Rehearsal with cast plus PAUL’s voice stand in. Blocking and framing up using our various physical PAUL’s. Lighting using PAUL lighting dummy as reference. Shoot live action plate with cast and a manifestation of PAUL, be it eye line puppet or stunt puppet etc.. Shoot clean plate with no cast or PAULs, this would be used for clean up.
Then film HDRI environment on Canon 1D 35mm digital stills camera with 8mm lens to help with lighting. We built up a tool kit to provide the strongest presence for PAUL on set. His personality needed to be present throughout filming.
For physical presence we had eye line dummies and LEDS, puppets and dummies from Spectral Motion, small boys and a short man, as well as green heads, and gloves, PAUL masks and cowboy suits. We needed to be able to adapt throughout the shooting process. To this end we built up a flexible set of PAUL stand-ins. We pre-planned for each scene working out what would be needed to deliver a plate that had accurate physical presence of PAUL. All the departments on the film made it happen, special fx, animatronics, Art department, costume, grips and electrical all jumped on board.
Seth Rogen being unavailable for onset duties meant an alternative was needed to deliver PAUL lines while shooting. CG characters are often voiced in a lonely sound booth, we wanted more. Greg wanted to capture the frisson of actors creating atmosphere delivering lines face to face for true timing and naturalistic performance and he loves improvisation. We brought the principle cast to LA for rehearsal of all PAUL’s scenes. Seth Rogen teamed up with Simon Pegg and Nick Frost to deliver a rip-roaring basis for PAUL. Props and stand in sets gave the guys a guide and they provided the performance. The rehearsal was edited together by Chris Dickens into a kind of radio play. This would be the basis for PAUL’s audio and provide a guide onset. Still needing someone to play PAUL on set we got lucky, Joe Lo Truglio who plays O’Reilly in the film agreed to provide a human presence. After studying the radio play he played SETH playing PAUL and brought something extra, allowing Greg to direct PAUL as a real actor.
How did you managed a so perfect interaction between Paul and the other characters?
Again our toolbox was the key. For dialogue scenes we relied on Joe Lo Truglio to deliver PAUL lines off screen to allow for ad-libs and timing. For the cowboy walking down the street holding hands Greg wanted an awkward, clunky gait so we drafted in a stunt child Tanner Prescott and dressed him in a cowboy outfit. This gave us the costume and well suited performance to which we added a CG head.
When leaving Tara’s farmhouse Clive picks up an unconscious PAUL. We needed something for Nick Frost to interact with that would not leave us with too much to paint out. We took one of our stunt PAUL’s, which had hero detailing, and the Spectral Motion boys chopped off his arms and head. They added extra weight to Nick – something to struggle with. Double Negative then body tracked both puppet PAUL and Nick, and added CG arms and legs and extra body movement as the puppets spine lacked articulation. This kind of work demands attention to detail, adding occlusion from NICK to PAUL and from PAUL to NICK getting all the cast shadows correct etc. as well as complex layering and cleanup. The hug between Clive, Graham and Paul at the end was fun. Again we turned to Tanner our stunt boy, dressed him up a green suit to help with his removal and gave him a PAUL headpiece to give better proportions. He then acted out the hug. We replaced him where possible and painted out any areas where his anatomy failed to match up. Thanks to all involved the result has a great, natural feel.
Can you give us your standard procedure for a shot with Paul? Starting from the original rush to the final compositing?
Chris Dickens and Greg edited a first pass of the film. Each time PAUL was to appear they choose a line from the rehearsal and Andy Hague the VFX editor composited in SETH’s head into the shot. This gave us a rough idea of the film without any CG. This involved Andy Hague and I working out what plates we would need to create the shot, which we then had scanned. He would also turn over a whole package of reference material too, all reference cams from the rehearsal audio reference as a wav-file, and the facial motion capture, all from the specific line chosen by Chris and Greg.
In addition to this, using time code from the facial capture, we grabbed the motion capture from Seth’s performance at the rehearsal. This reference was to act as a guide for PAUL’s performance, giving the animators, led by Anders Beer, ideas and mood.
The live action plates were then tracked using 3D Equalizer and PF Track. Once tracked, the camera and reference material as well as BG plate would be turned over to animation. Rough blockouts of PAUL’s animation would then be provided back to editorial from where they would start to fine-tune the cut. Once blocking was complete lighting was taken to what we called « level one. » This entailed sitting PAUL into the plate but included no beauty lighting to make him handsome. We had several tools to help us reach this lighting level quickly. HDRI maps shot on set and colour charts gave us a technical standpoint and our lighting reference dummy gave us a more specific reference. HDRIs from which the man lights were removed provided ambient lighting and these main lights were recreated as digital spot lights to give control of lighting. We could then provide slap comps of PAUL to gather initial thoughts. The animation would then start to include facial and finer acting. A system of tools was developed which allowed animators to pull in simplified shot light rigs, and render their animation rather than looking at playblasts. This allowed them to gauge how shadowing and occlusion would help or hinder the facial expressions and lipsync in their shots. Once animation was published, lighters would use the published anim scenes to generate geometry caches, keeping lighting scenes quick and light.
All the time compositing leads, led by 2D Supervisor Gruff Owen, would explore further polishing of PAUL’s look in a particular scene. Adjusting wetness and reflection levels, while experimenting with contrast or colour. This was a great way to quickly fine tune PAUL’s look, which could be passed back for final lighting over seen by Lighting Supervisor Joel Green. We had a fast and fluid pipeline that along the way allowed us to react to changes in the edit. It is an on going process when trying to fine-tune a cut that does not include the main character. Cloth and fx work came once the animation was signed off. Then it was back to the compositors to do then integration work. Really sitting PAUL into his environment and giving him the final polish took PAUL above the norm.
Did you create Paul from scratch or did you use a sculpture from Spectral Motion?
We first took a brief on how PAUL should look from Greg and the writers Simon and Nick. PAUL was to be a traditional grey Area 51 alien. Skinny body, large head and dark huge elliptical eyes. We developed an initial look trying to make a creature that fit the brief and could be scary (but must not be too creepy) with a wide acting range. Using concept work we ended up with PAUL mark one, referencing nature for the qualities of his eyes and skin. We then shot a short test. This took the form of one of the scenes in the RV from the film.
Bill Hader was enrolled as the voice of PAUL and Double Negative’s Head of Animation, Eamon Butler led up the animation. We lit then and composited the scene and the idea was well liked but it was felt PAUL had too much darkness in his soul. We produced further tests with Greg, tackling scenes from other films and replacing the prospective actor with a cg PAUL. This allowed us to explore PAUL’s softer side as well as getting a feel for how different actors voices would play against Paul’s awkward look. The process allowed Greg to hone in on Seth Rogan as a great hearty, friendly, but irreverent voice for PAUL.
While the tests were great Greg wanted to take PAUL’s design to the next level. He needed more history, more essence of Area 51, he needed to have inspired lunch boxes and funny posters! A more recognisable Alien feel was needed so Greg hooked up with Spectral Motion to explore in a more tradition creature environment. Working first in concepts and then in maquettes they used there feel for creature design to come up with an organic, expressive design that ticked all the right boxes. Back at DNeg we chipped in to help with areas we felt would be important when transferring PAUL into a full 3D creature. Some slight changes in proportions would allow for more pleasing articulation and range of expression as well as providing a better match for Seth’s voice.
Once Greg and his team were happy with Spectral’s design. The race was on for them to build the required PAUL’s for the shoot. They produced 2 beauty puppets that could be fully articulated using rods or remote control for head and jaw movements. Also a more hardy, less well finished dummy, for lighting reference and a stunt PAUL with removable limbs and head for interaction. The beauty puppet was lidar scanned and this design provided the bases for our PAUL model. As the puppets were only to be used in distant shots or out of focus overs, DNeg had the freedom to further develop PAUL’s look.
DNeg’s Markus Schimit took control of the development of PAUL’s modeling and animated wrinkles, while Andy Middleton developed more detailed textures, and maps. We added a wider jaw line and thicker lips also help tie PAUL into Seth’s gravelly voice as well fine tuning overall head shape and adding asymmetry. The look development process was tricky. Led by Joel Green we fine tuned his facial characteristics to allow a full range of expression, which proved demanding with such a tight skin and odd proportions.
Animated wrinkles were tricky to fit in, particularly around the eyes, but were vital to help sell expression in this omnipresent area with such little skin to work with. Finding the allusive level of ageing and caricature lines that would give him presence without straying to far from the brief was fun. Giving him a convincing level of detail without him becoming grotesque became the ultimate goal.
The art of building a 3D creature lies in identifying the required design traits and then executing them across a wide range of disciplines.
Bringing together the rigging, texturing, shading, wetness maps, displacement, animated wrinkles, skinning and muscle systems and making it all work together when animated in a particular lighting environment requires team work, cooperation and drive.
 |
 |
What feeling did you have with the recreation of the legendary final shot of the hangar in RAIDERS OF THE LOST ARK?
Fun! I loved it. What a setting for PAUL. What an honour, to recreate a great moment in film history and all with the blessing of the man himself. In this scene PAUL is talking to Spielberg on the phone, helping him with ideas for E.T.. Having worked with him on TINTIN, Simon and Nick managed to get Mr Spielberg to voice himself.
How do you recreate this famous shot?
We worked hard to persuade Greg to let us do the whole scene in 3D. I felt it would give us more control over cameras lighting and atmosphere to compliment PAUL’s animation and would end up costing around the same as shooting what we could and then extending the sets and adding PAUL. We pre-vised the whole scene and took some time to get the crane up over the crates correct.
Obviously we studied the inspiration from RAIDERS OF THE LOST ARK and tried to recreate the feel of this shot without matching it exactly. This meant the concept work came for free and we had to tailor the layout and lighting to work for PAUL at a desk and to fit with the rest of the scene. Unlike the original move we could allow for full 3D rather than relying on a 2D matte painting. Once the camera move was locked we laid out the whole shot in 3D, working on getting the positioning of the crate’s lighting and spaces right to give the pleasing composition and to sell the sense of an infinite space while drawing the eye to PAUL. While this was going on the desk and desk furniture were being look-developed, under the auspicious guidance of 3D supervisor Julian Foddy, to work both in the wide and close up shots.
We hit on a nice layout and began to work up the lighting in 3D. A rough of this lighting was given to 2D artist Peter Jopling. Pete then really got to grips with the mood of the shot, roughly adding light and dark, atmosphere, and hitting the right colour palette to work within the film, but also keep some sense of the reverential.
Once we had a look that was good, this was given back to Roberto Clochiatti’s 3D team to match lighting provide volumetrics, and particles for atmosphere as well as the all-important PAUL. These 3D parts were then handed back for final comping.
Did you do something on the various car chases and stunts? Like some wire removal or face replacements?
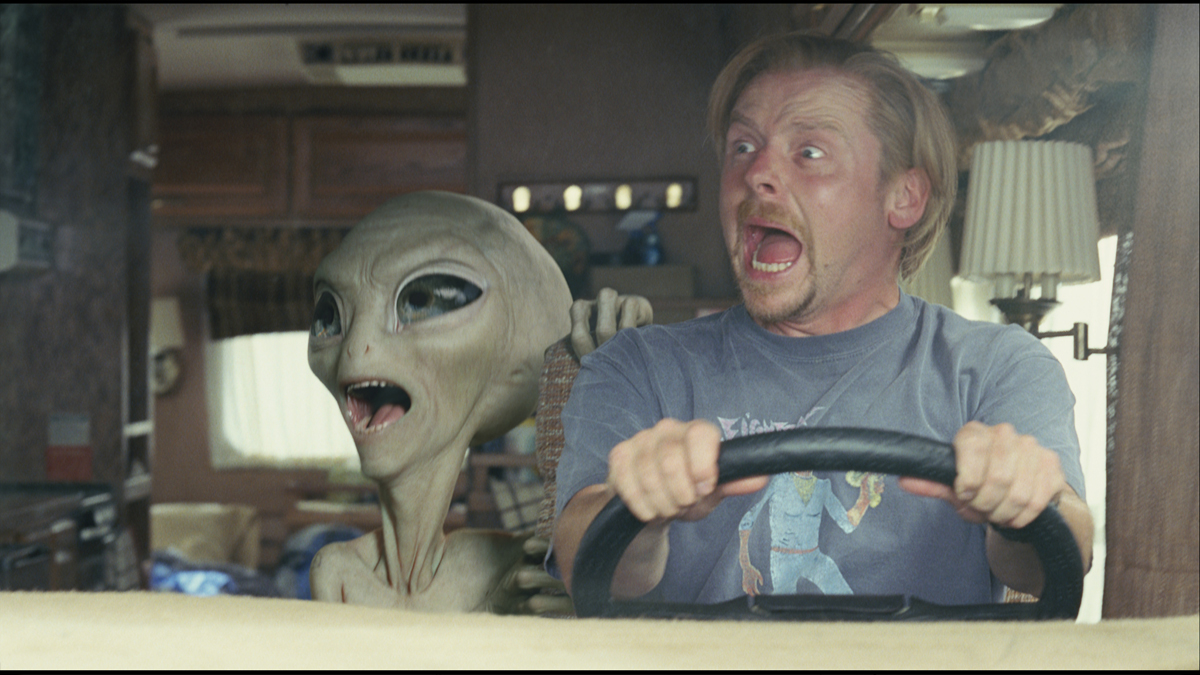
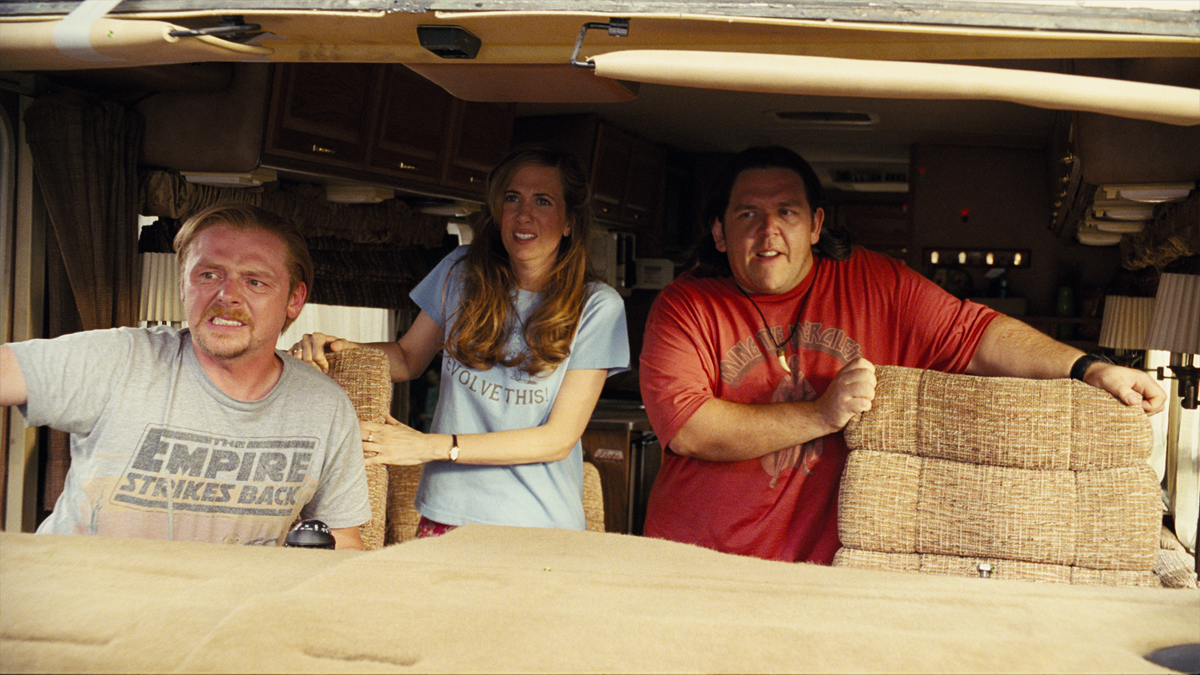
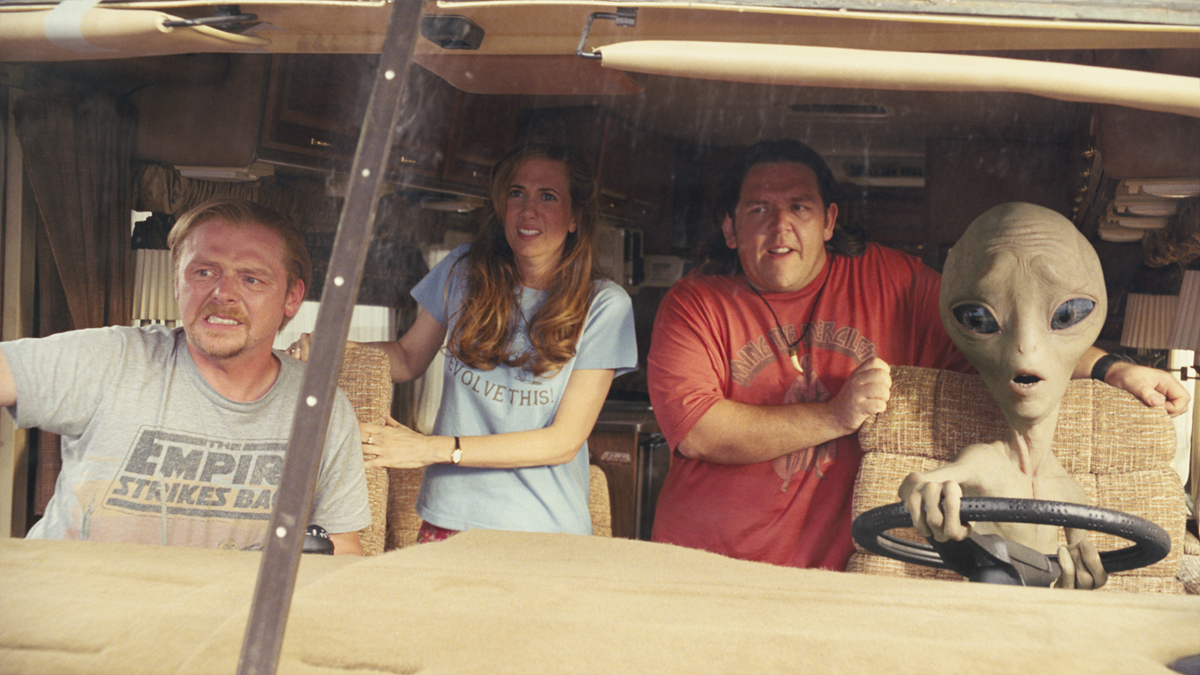
Much of PAUL’s dialogue with Graham and Clive takes place in the RV driving in the deserts of New Mexico. Due to logistics it would not be possible to shoot these scenes for real on the road. Therefore it was up to us to create flexible system for shooting driving scenes in a studio environment to be combined with driving plates to give a 100% believable result. Greg was particularly keen that our green screen work was seamless, as he had felt that bad driving shots had pulled him out of films in the past. To this end we hooked up with Larry Sher, PAUL’s DOP, and shot a series of tests driving an RV in the desert. These gave us fantastic reference, giving relative exposure levels between foreground and background in all conditions. It also allowed us to look at lighting conditions and lighting movement inside the RV as well as how road conditions and camera mount affected movement of the camera, foreground to background.
We also tested to give us the best exposure, colour of green and colour of lights combination to work with our pipeline. We also tested the number of coats of paint needed and best finish.
Due to the varying locations and lighting conditions required for each scene and undefined camera positions, we decided to shoot the green screen foreground elements first. That way we could measure camera angle lenses and positions to make sure we shot enough BG coverage for each scene. Using the age-old vfx adage « estimate and then double it » we allowed 2mins coverage for each scene.
While lighting of the foreground element is the most important factor for good results, there are lots of measures we can put in place to ensure good source material such as, a small amount of wind on an actor’s face to provide subliminal outdoor messages to the audience. We played it with the driver’s window open a lot of the time but even when windows are closed a small amount still helps. Larry provided elaborate moving light sources on the sound stage, these simulate objects and scenery passing the vehicle. We covered with white or black (for night) when area of green screen is not needed and we used large plastic tiles and had movable drapes. This way we cut down on spill and give natural light bounce from an environment. The RV set was mounted on a hydraulic gimble, suspension also allowed for manual movement of the RV. These simulated the internal movement of a vehicle as it moves over the rough surface of the road or makes sudden stops. This was very important to make subjects react and also give movement to soft objects such as curtains. While shooting foreground plates we measured the angle of the camera relative to the direction of travel, tilt, height and position within the RV, as well as lenses. For any camera move, start and end position were measured.to give us total field of view for any shot. These figures were catalogued and translated with help from VFX producer Hal Couzens to give us background coverage required.
We ended up with various fields of view for each set up, describing what background plates we would need to provide coverage for green screens shot. Some were facing backward as we looked out of the back of the RV some side and some forward. Over 24 scenes and 300 shots with varying camera moves, this meant a lot of background coverage , also the nature of the scenes demanded precise material. Slow-ish dialogue scenes in a large RV with lots of glass meant we had wide field of views over ong-ish takes with smooth camera moves leaving few places to hide. After studying the figures and taking into account the large amount of specific locations, we worked out 6 cameras, mounted in pairs on Libra heads was the best way forward. This would allow us to get large amounts of coverage in single passes up to 170 degrees and also to turn each pair for flexibility. A camera truck was brought in the grips rigged it with scaffold to suspend the 3 Libra heads at the correct height and provide bases for the 3 Libra operators to work from. We went out over a 3-day period and drove to locations for each driving scene, the tricky bit was finding suitable road shapes when we needed to match specific action of the RV. Turns or a series of turns don’t happen that often in the dessert. Having said that haring around New Mexico in a supercharged camera truck with a police escort was fun.
Once all footage captured we crudely stitched it together as you would making a panoramic photo. From these quick combinations we chose the right bit of footage for each shot and then stitched only those bits together seamlessly using the scanned images. These stitched images then put on a virtual cylinder which we used to surround the RV in the computer. Once the shots was tracked no matter where the camera looks you see the right thing out of the windows. Once bg is in place compositors then have to sit everything in so it’s all utterly convincing.
In shot such as this it would be jobs such as:
– colour grading the exterior
– adding a tiny glow to fg edges
– bouncing some exterior colour tones onto the set interior
– adding dirt and reflections to windows
 |
 |
What are the references that you received for the creation of the ships?
Greg provided us with sketches of the type of mothership he wanted. He sent us rough orthographic views, which we then worked up into full concepts. We had to work out the moves for the ship before the meet of the design could be done. That way it could be tailored to work to camera for both shots. Once the layout worked for both shots, Philippe Gaulier our concept artist painted a few stills from each move to give the texture artists and modelers something to aim for. We also look at lots of sci-fi artwork for stylistic inspiration.
How did you create the impressive mothership?
Under CG supervisor Julian Foddy! The mothership was designed ‘in house’ by our concept artist, Philippe Gaulier and in close collaboration with Greg, the director. It was modelled in sections, allowing more than one modeller to work on it simultaneously.
The intricate detailing was creating using a custom mel script, which created semi random extrusions of geometry. The tool performed up to 4 iterations on any given object, creating the city like structures on the underside of the ship. Another DNeg in house tool, dnWindowBox, was used to create the illuminated ‘windows’ on the city detailing. This is essentially a custom shader which renders a simple plane (to represent the window) as the inside of a room with correct parallax based on camera angle.
The ‘rivers of light’ which feed the huge engine with energy were created, again using a custom mel script. Curves were layered out for the main ‘river’ paths, the script then created 16 small tubes, offset around the main path – these make up the individual ‘filaments’, and assigned attributes to each filament to control light flow direction, speed and timing offsets.
How long have you worked on this film?
In total from original testing through pre-production and planning on to shooting and then through post-production, it took about 2 and half years.
What did you keep from this experience?
This was my best work experience. The people were the best!
Working with the creative genius of Simon Pegg and Nick Frost made me appreciate a kind of talent I knew nothing about. Greg Motolla was always a pleasure and a good friend. I loved his quiet authority, his story telling and visual sensibilities, patience and ability to extract the best from his chosen tools. Hal Couzens was an inspirational organiser and provided a driving force to get things done .
Anders Beer led me kicking and screaming through my first big animation project. Being involved with the crew in the States was and amazing experience, what a bunch of talented friends. Real go-getters who always said « can do » Karen Clarke, DNeg’s line producer was a great organiser and pillar of calm.
Most of all I loved working with the post-production crew here at Double Negative. Trackers, roto artists, compositors lighters, animators, texture artists modellers all showed commitment, talent and artistic ability to get the job done with a common goal.
What is your next project?
I could tell you but I would be fired
What are the 4 movies that gave you the passion of cinema?
BLADE RUNNER, TIME BANDITS, THE FIFTH ELEMENT and AUGIA RATH OF GOD.
A big thanks for your time.
// WANT TO KNOW MORE ?
– Double Negative: Dedicated PAUL page on Double Negative website.
– fxguide: Article about PAUL on fxguide.
© Vincent Frei – The Art of VFX – 2011<


