After speaking with us about the effects for IMMORTALS, Simon Hughes returns to The Art of VFX. In the following interview, he talks of the many invisible effects for SAFE HOUSE.
How did Image Engine get involved with this show?
Image Engine is known primarily for creature effects – DISTRICT 9, and THE THING for example – or digital environments, for instance on IMMORTALS. However, we’ve also been building up a good roster of invisible effects work over the past few years (for example LAW ABIDING CITIZEN and various projects for Dark Castle) – and we have an excellent working relationship with Universal Studios, which all contributed to us handling the show. We were the sole vendor for the production, and output over 370 visual effects shots. Steve Garrad was the Visual Effects Executive Producer, Geoff Anderson was the producer and I was the overall Visual Effects Supervisor for the production.
How was the collaboration with Daniel Espinosa?
Working with Daniel Espinosa was a great experience; he gave us a huge amount of creative freedom and trusted us to come up with the goods. His directing style required VFX to be able to adapt and improvise to satisfy and improve upon what was being shot whilst staying unobtrusive, which was a real challenge for both myself, and Jeremy Hattingh, the on-set supervisor in Cape Town. The style of the film was intended to be documentary style, and very much handheld.
 |
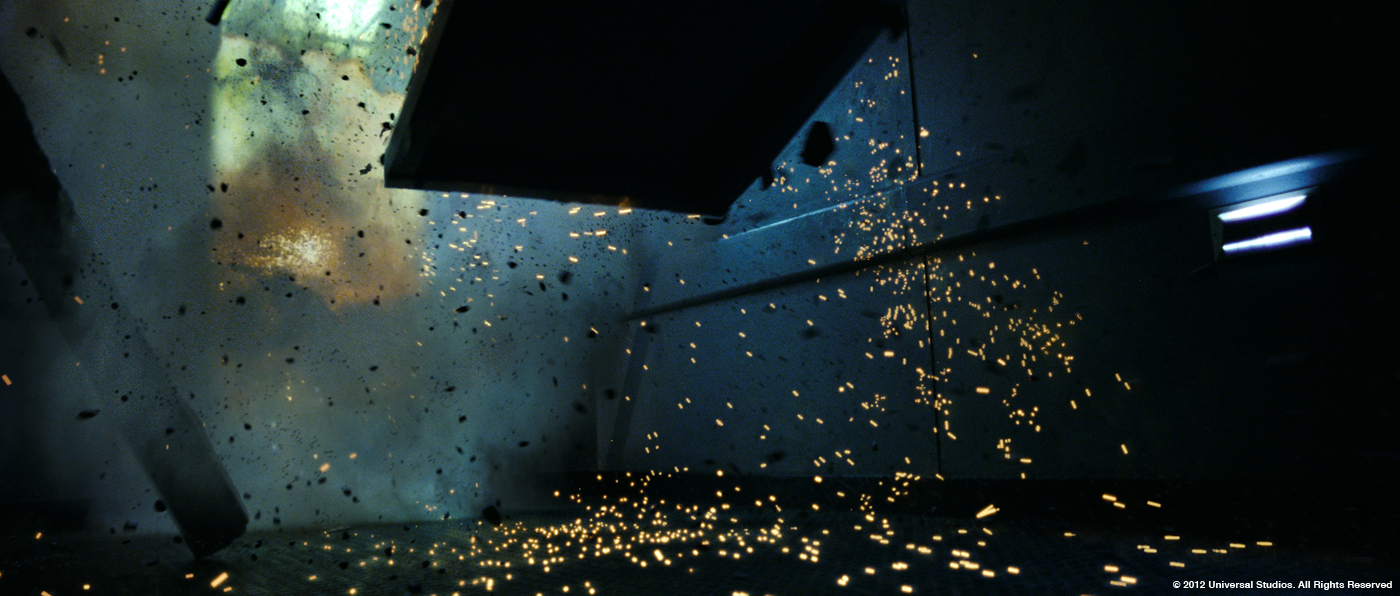 |
Image Engine was involved very early on the show. Can you tell us how it’s improved your work?
From the outset, we were asked to be present for the entire shoot. This was to cover eventualities and improvisation on set, and to oversee green screen driving sequences and co-ordinate a crowd shoot.
The way the show worked for us was that once an initial edit was confirmed we were given the edit and I was asked to review the film to see how we could augment the sense of danger in what was shot and to look for ways to make things more exciting, whilst also looking for technical fixes that needed to be done to handle oversights that come about from documentary style shooting.
As the edit went through changes it was important for us to remain fluid and mindful of the requirements of production. This was a challenge for both Geoff Anderson (VFX Producer) and myself, working in combination with VFX editors Kevin Hickman and Derrick Mitchell, and Image Engine coordinators Eva Abramycheva and Crystal Choo to stay on top of.
This proved to be an incredibly rewarding experience, not only for the work completed, but also to have been so involved in the narrative filmmaking process. The biggest improvement this show made to our work would probably be dealing with crowds. The crowd sequence was the largest sequence dealt with by Image Engine, and it was a great lesson in how far to go in 2d before moving into 3d, and where the line is.
Can you tell us more about the work on this show?
Our work was a mix of CG car crashes, green screens, face replacements, gore additions, matte painting set extensions, car crash augmentation, crowd additions, explosions and muzzle flashes and squibs and sparks all over the place.
This was all completed in a tight schedule matching the high energy pace of the film itself. In other words a lot of VFX fun!
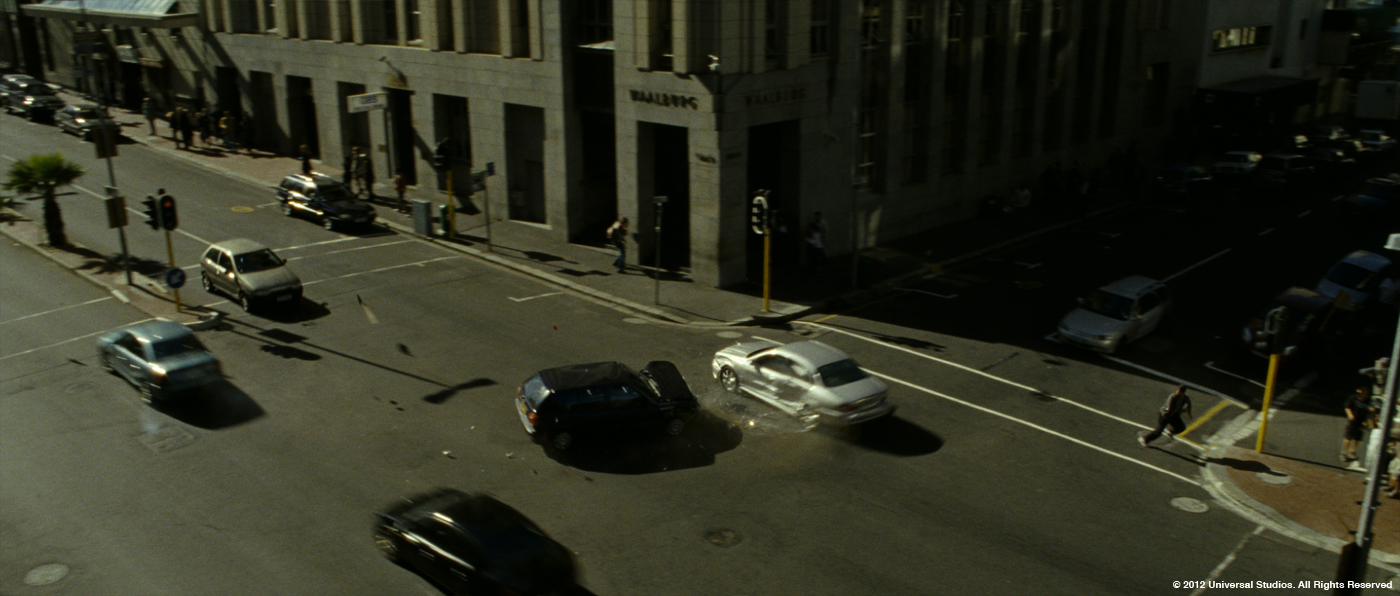
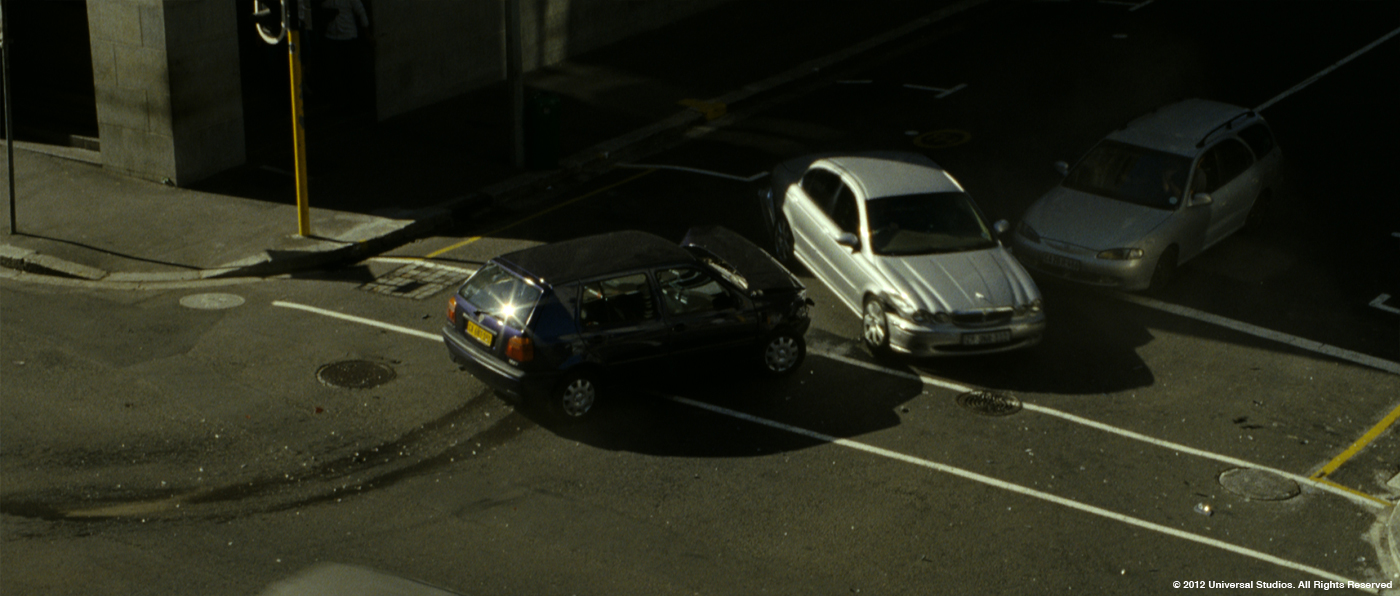
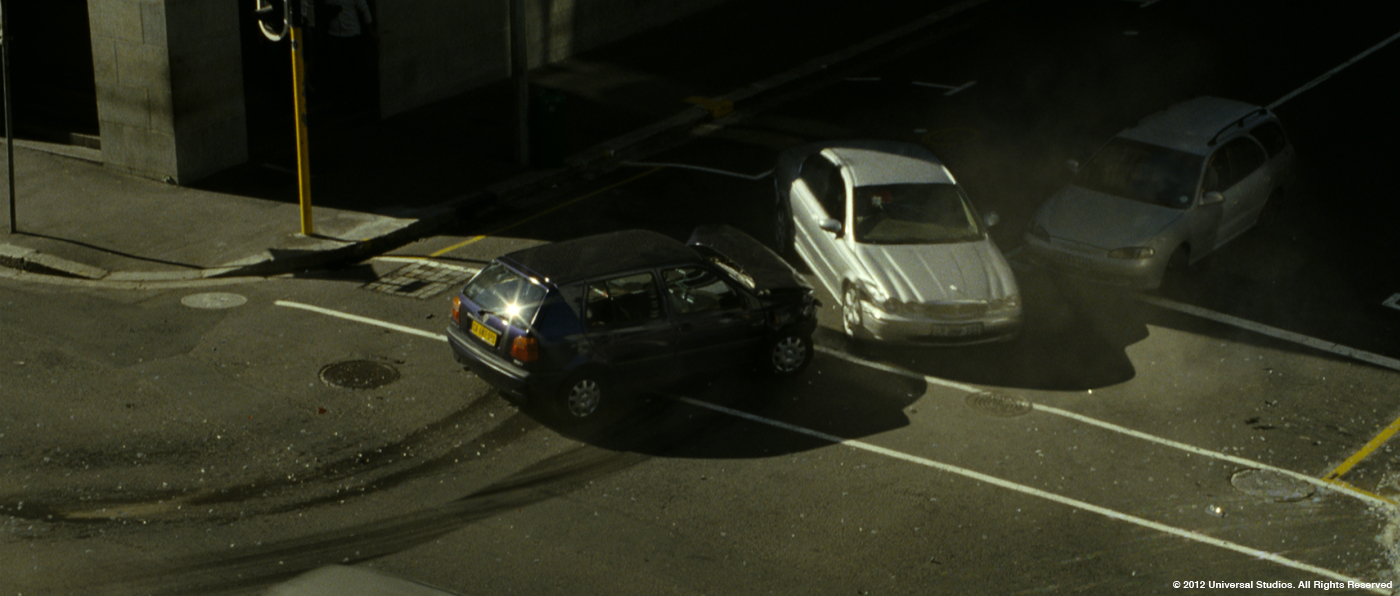
How did you enhance the car chase sequence?
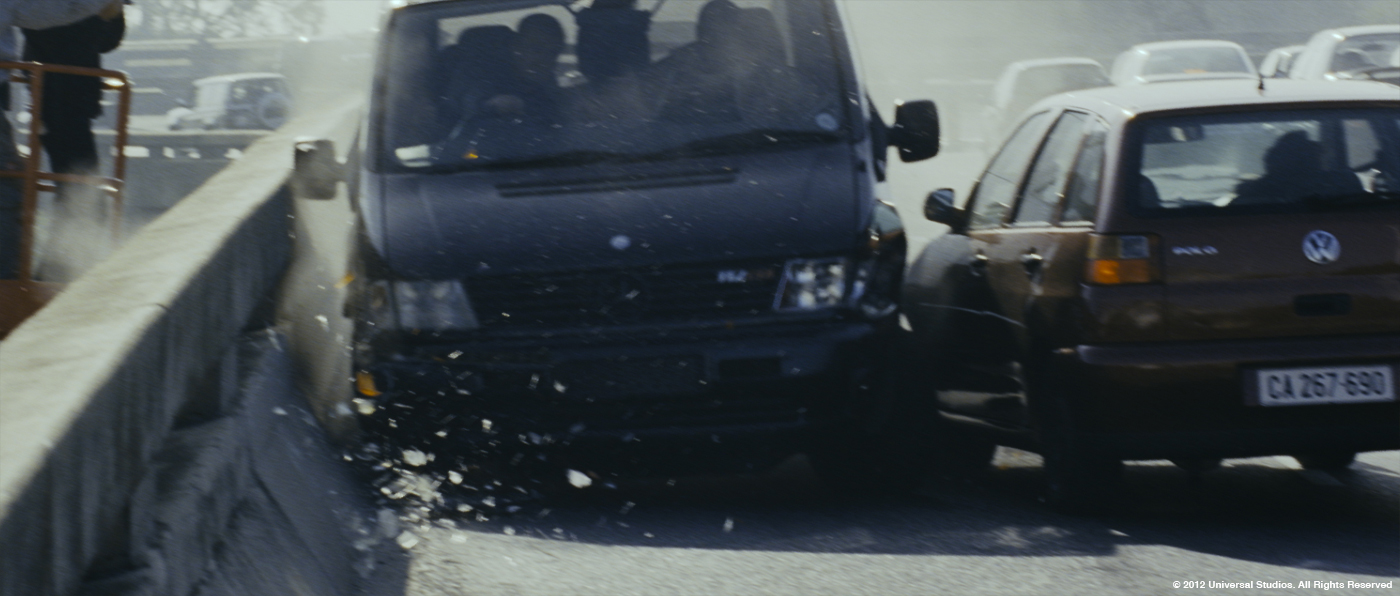
Throughout the car chases we looked for opportunities to turn the volume up on crashes and impacts to help convey the overall sense of danger and excitement. This included adding more debris on impacts, adding smoke from wheel skids and skid marks, to ripping off bumpers and replacing with CG bumpers flying off towards camera, and finally to a complete removal of an existing vehicle and replacing with an entirely CG version, colliding into a CG wall with all the debris that would come with such a collision.
 |
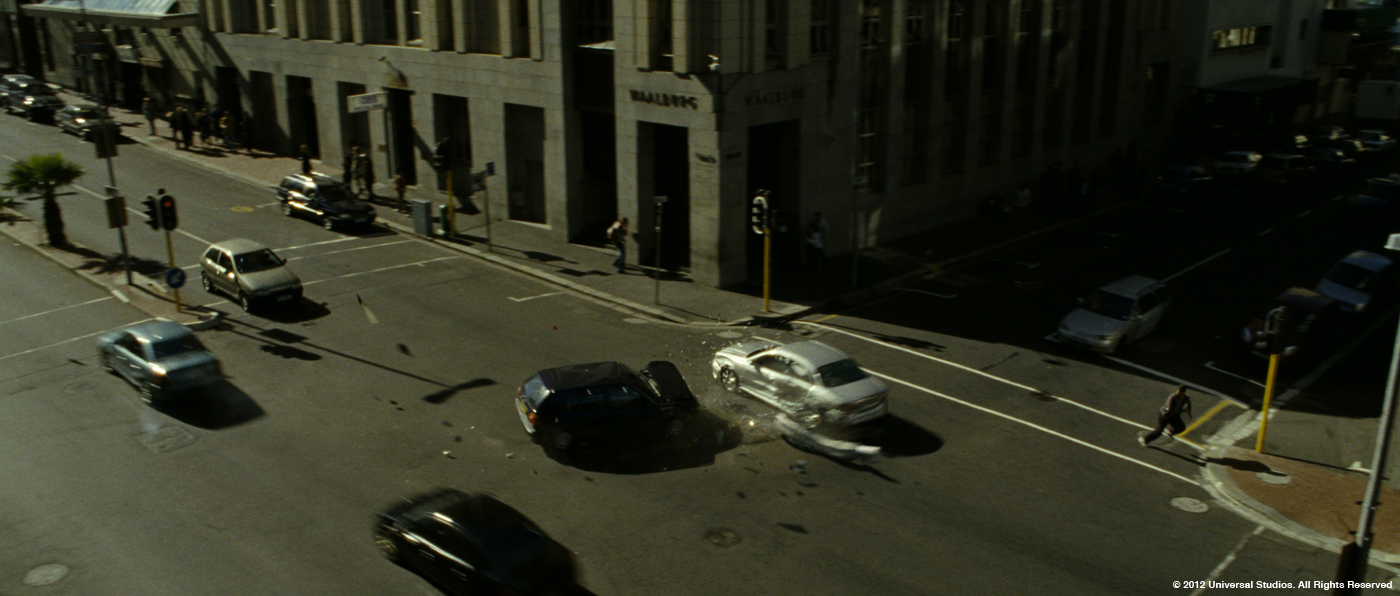 |
As well as CG bumpers, we also did the same with a selection of shots where a VW Jetta is rear ended by a Jeep causing the trunk door to fly up, hit the window and ultimately come off.
Generally speaking, the biggest challenges with these shots started with matchmoving. We had a real problem with these as there was no lens information and the cameras were handheld and zooming. So coming up with decent cameras that Animation and FX could use was a real challenge that Derek Stevenson and Luke Byrd handled with great calmness and patience.
For animation there was some flexibility, but for FX these needed to be solid. For compositing, as there was a lot of removal of the original features that were replaced with the CG versions, this was also a challenge for the same reason that Matchmove was a challenge.
Lighting was, again, a case of matching the source, which Yuta Shimizu and Kyle Botha did meticulously.
All in, these shots go relatively unnoticed in the context of the scene as they needed to appear natural, but the amount of work involved in these kinds of shots is a real challenge for all involved.
 |
 |
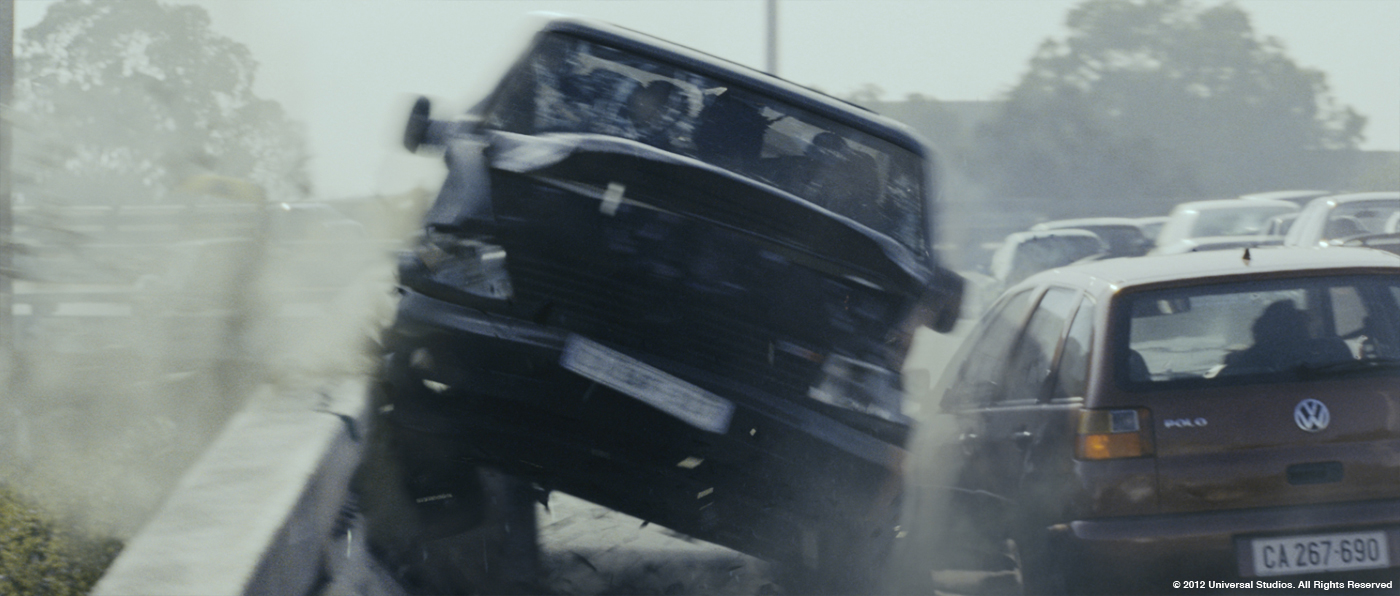
Can you tell us more about the CG car for the collision?
This shot started with Janeen Elliot the Senior Compositor for the show removing the existing van, cleaning up the plate and replacing moving cars in the background underneath where the real van existed.
In parallel with this Rhys Claringbull (asset supervisor) and Ryan Calloway set about making a CG version of this van. This had a handful of challenges – the main one being that as the shot was not planned for from day one (not considered a VFX shot) there was a need to source decent photography of the vehicle and a model had to be built from scratch, not from a scan for example.
We used plates from shots either side in the cut and outtakes to source decent reference textures, but then went about sourcing new textures from our own photography. Then it was a case of Ryan matching the overall look.
The luxury with a shot like this is it is a takeover shot so we have decent real world images to match to, so once the asset was complete, Yuta Shimizu, one of our two main lighters on the show set about look-deving the Van to match the real one to a degree, reflections and lighting direction primarily, then a lot of work in matching shadows.
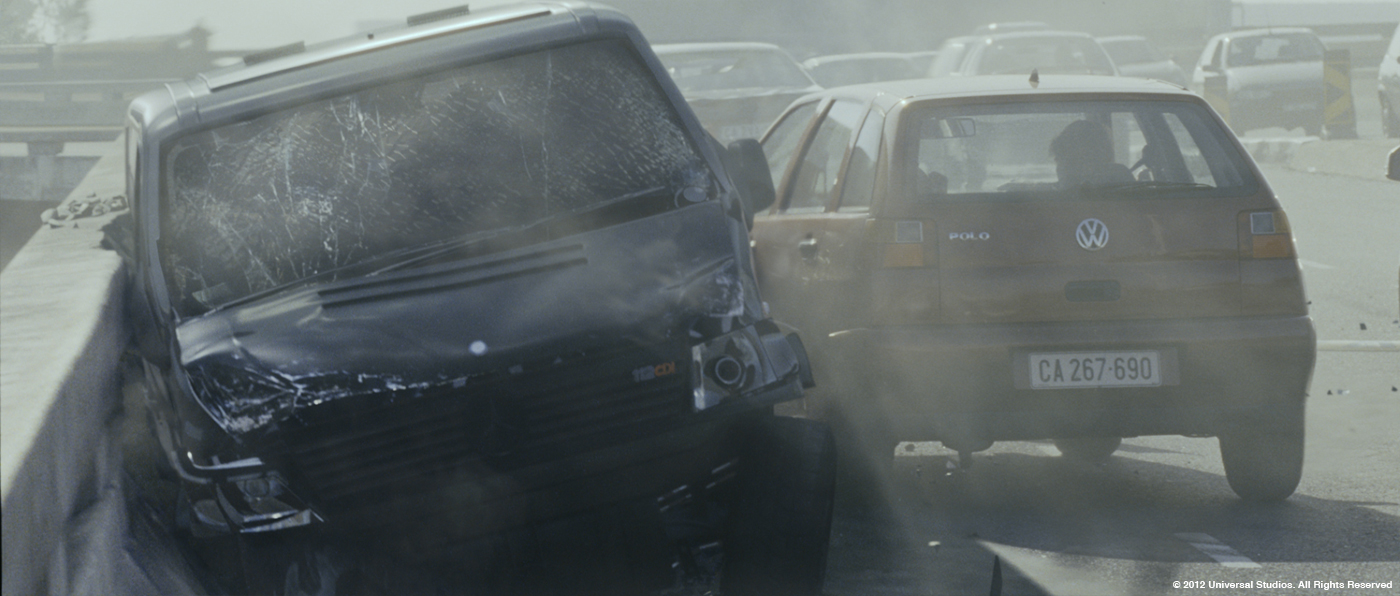
This was all handed back to Janeen who, in combination with the clean plate she had prepped, set about further matching the van to the original, adding shattered windscreen glass from real photography, adding the drivers taken from the original plate, and layering debris and dust to convey the impact.
The red Polo that collides with the van was augmented to appear to be colliding from a sharper angle with more of a bounce back into place.
With all the elements in place and looking good we started presenting animation versions to Daniel, starting with grey shaded renders but quickly realizing that a shot like this is all about seeing it in context, so as we progressed the lighting and compositing. We showed animation iterations in edit context to get approval on the overall move of the van.
Ken Steel, the senior animator on the show was in charge of this and offered several suggestions for different speeds, angles and distances traveled and different versions of impact with the wall. Ultimately we opted for pulling the van farther back in frames at the start, coming in faster, with amplified bump and roll prior to hitting the Polo. On hitting the Polo, we have it swing round and brought the wall farther into frame so that the collision happens sooner and more violently.
Generally we keep the overall trajectories the same for a few reasons, the main one being budget, to make this work we needed to reuse as much of the plate as we could, namely the Polo and the people, by keeping this overall move we were able to just replace the van and wall as CG pieces and cleaned the rest up in comp.
 |
 |
As we moved forward with the animation we took the shot into FX, where the team set about coming up with debris from the van, and debris from the wall. Aleksander Szkudlarek and Nik Slotiuk supplied these to Janeen, again offering various different amounts until we came to a level that felt good.
Overall we were all really happy with the shot. This is one of those kinds of shots that shouldn’t be underestimated – 80% of it was replaced, all close to camera, and all needing to appear as real as the original scene.
 |
 |
How were the backgrounds created for the shots inside the car?
There were two main driving sequences in the film, the BMW car chase from Safe House 1, through the streets of Cape Town at break neck speed through to the final crash inside the parking garage.
The sequence itself was largely shot in camera, with about 15 shots on green screen and the plates shot on two separate plate shoots.
The camera configurations covered the correct angles on film looking front, back depending on what was needed and side to side, ¾ angle if needed, and reflection and mirror plates were shot on Canon EOS 7D’s. So multiple passes were taken at the actual location to cover the footage needed.
Once it was all in place, it became a compositing task to match in to the real photography, which made the sequence smooth – yet difficult in other ways, the problem being, how to deal with the shoots happening at different times of day. The shots often change in appearance throughout the sequence, so matching actually became relatively difficult, but we always had a solid foundation in real world photography.
The second of the sequences was far easier to deal with for two reasons: there wasn’t any in-camera footage, it was at night and it was looking through dirty and broken glass.
This sequence follows Tobin Frost (Washington) and Matt Weston (Reynolds) driving from the Langa Township through the streets at night, where they are ultimately t-boned by the mercenary’s car.
The sequence was relatively straightforward once we had isolated good reflection plates and defined a look for looking through glass.
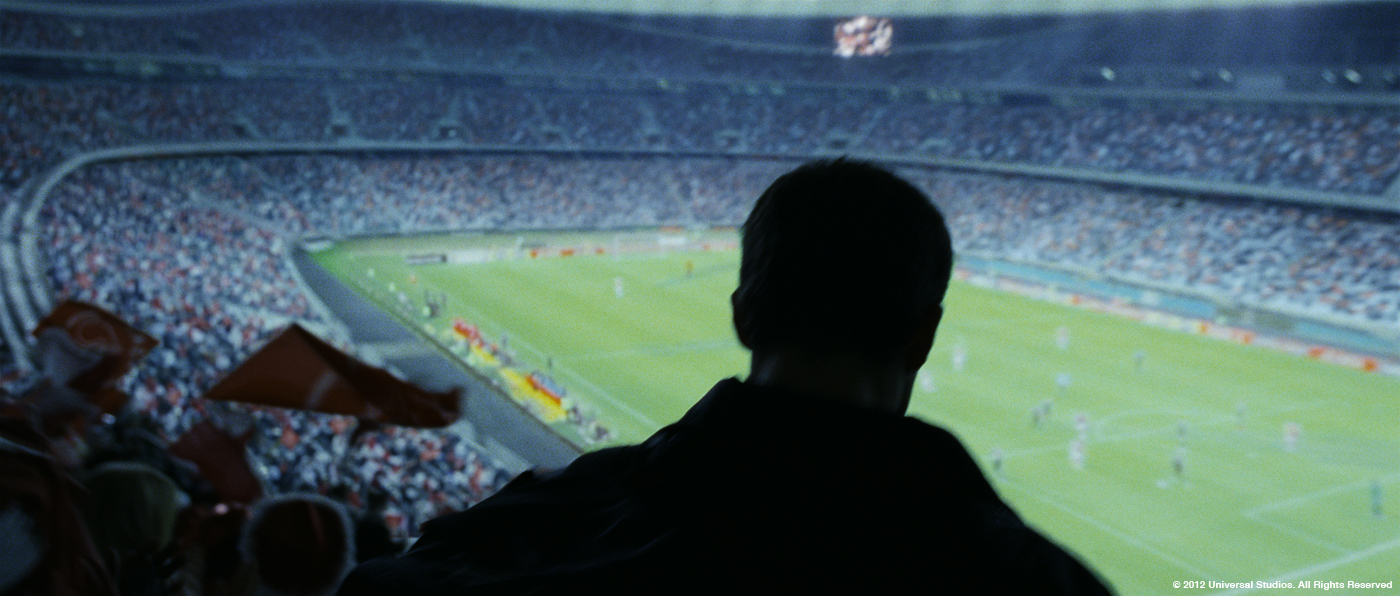
How was the shooting for the Green Point Stadium sequence?
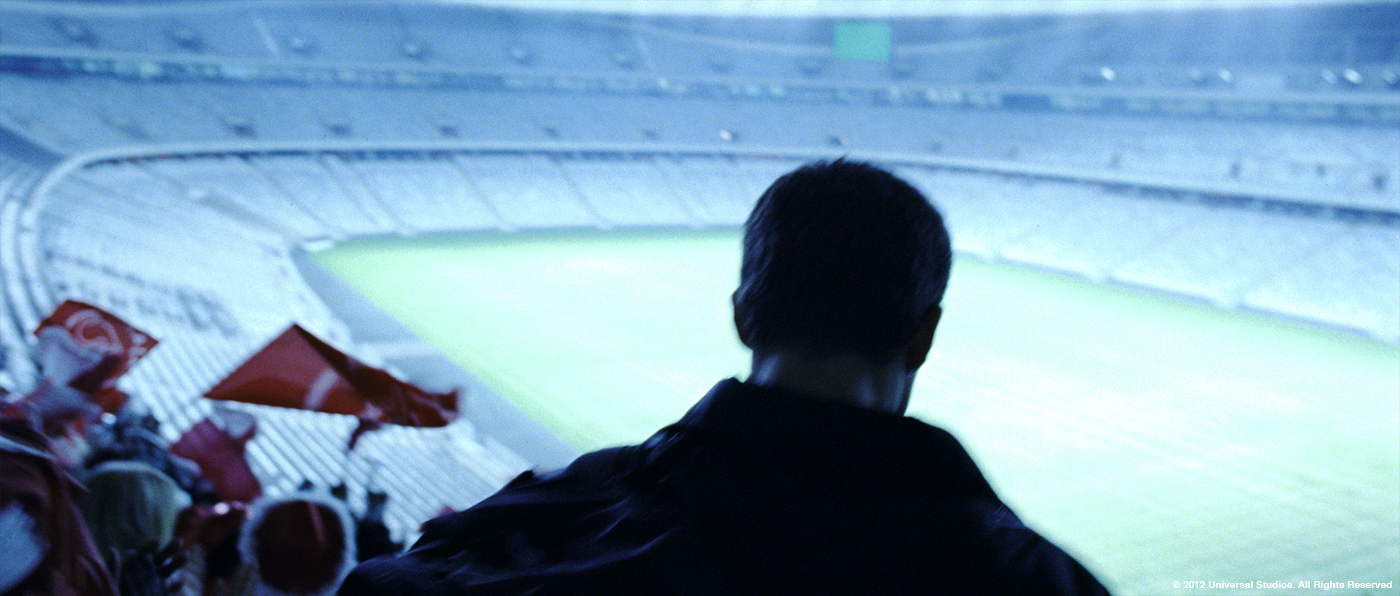
For the main crowd shots where we see inside the stadium, the production was aiming to keep it handheld over the shoulder and they wanted to see as much of the interior as a pan.
We went to the location and walked up and down the stairwells filming each version with 7D’s, always with the goal of keeping the pans nodal. We tried from the front looking back at Weston, fixed in position and a single nodal move etc, but finally landing on an over the shoulder shot following Weston to a mid point down the stadium staircase where it does a handheld nodal pan.
On the day of shooting, 500 extras were placed directly either side of Reynolds as he walked down the staircase.
Once the shot was taken, Jeremy Hattingh and I supervised a separate VFX shoot with 500 extras, which essentially filled one block, out of about 200.
There were two film cameras used, one in the mid point position to cover the nodal move, and one directly across the stadium in the main corridor looking straight across.
The second film camera was to cover a handful of shots where we are inside the stadium looking across to the other side as Weston and Frost are taken away by Security guards.
In addition to the 2 film cameras we set up 3 more 7D cameras at each opposing side of the stadium.
This meant that instead of having to shoot a tile for each block of the stadium we only needed to shoot along one half and reuse the opposing camera to fill the other side of the stadium.
The biggest challenge was coordinating the extras on a cold night running from 6pm to midnight, while the fog was rolling in and, for one hour of the shoot, completely covering the opposite side of the stadium.
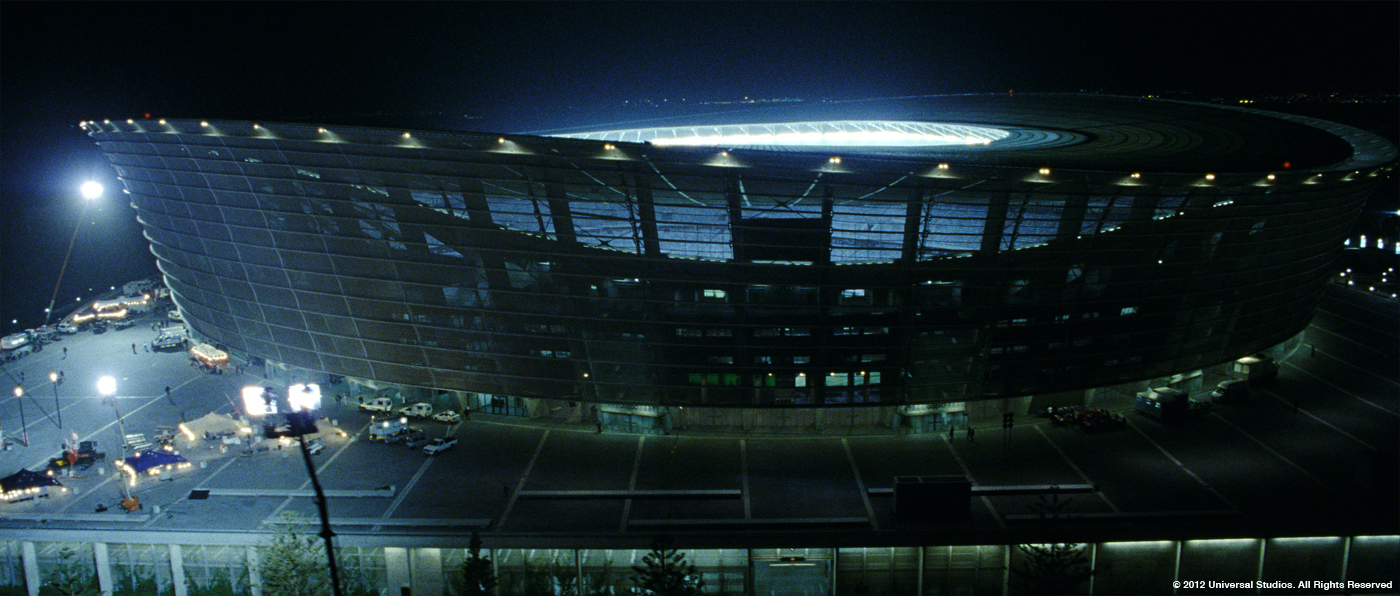
In addition to this shoot on the night, we had to coordinate and a create one more completely new helicopter establishing shot, which also used the same extras walking in groups outside the stadium. They needed to be seen to be filling the streets and upper concourse outside.
This was incredibly difficult for a handful of reasons. There was only an hour to do it in, as the locals around the stadium had complained of previous helicopter shoots, the fog was rolling in off the sea and due to freezing conditions in the air, the zoom on the camera had broken and had to be controlled by a camera man hanging half out of the helicopter. Meanwhile, I coordinated the pilot, operator and the AD and crowds down on the ground via radio, whilst coming up with two variations of the shot plus crowd tiles for each variation.
Once this was complete, the crowd was moved inside and the interior tile shoot was begun. The shoot was a challenge but incredibly successful, as it enabled all the stadium crowd shots to be handled entirely in 2D with camera projections onto geometry which was derived from a lidar scan of the stadium.
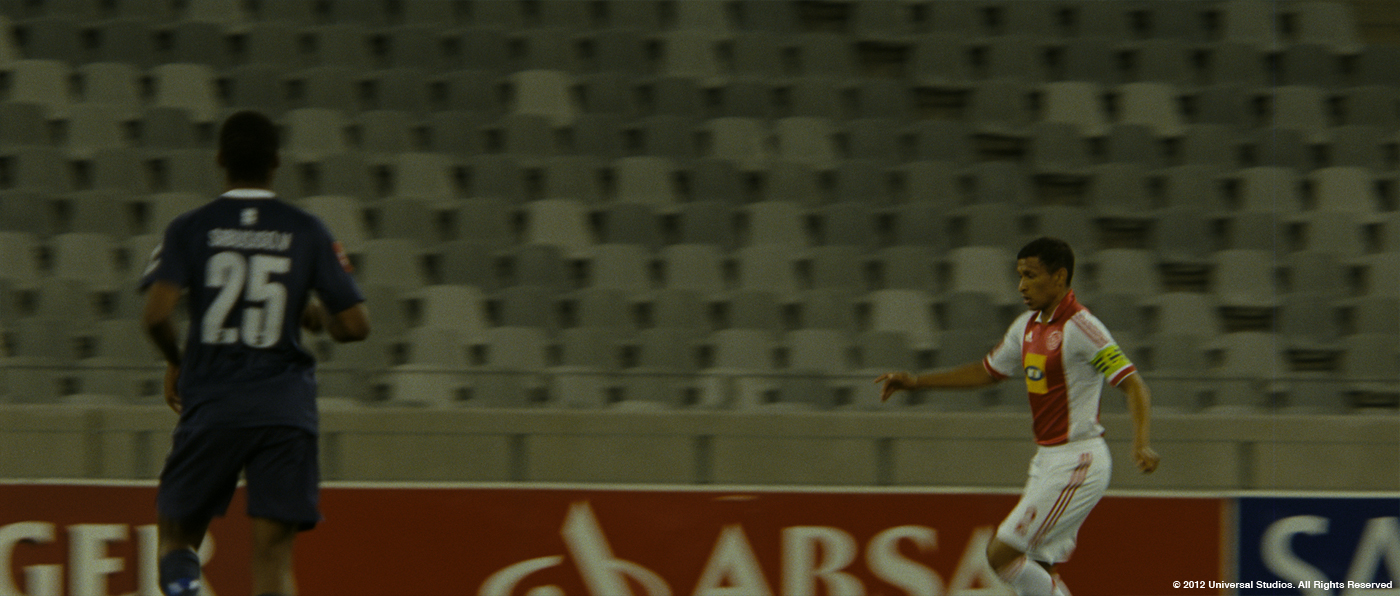
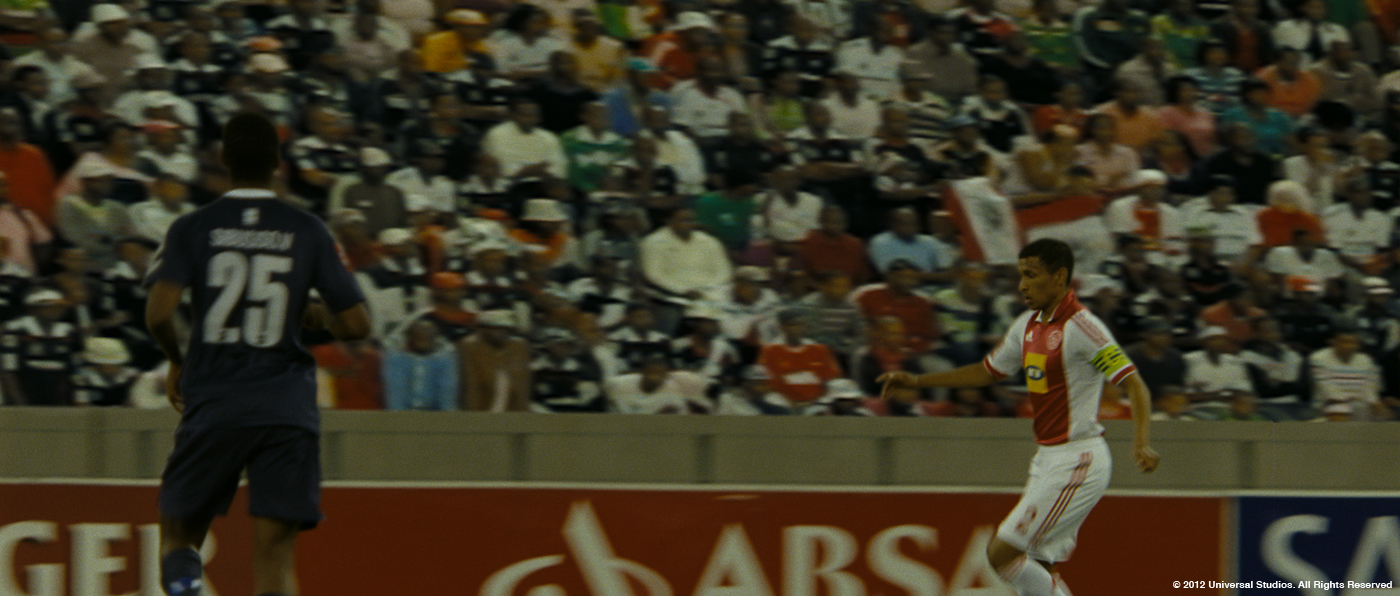
To cover the game play, Jeremy shot several games at both Greenpoint and Newlands stadium in Cape Town. The reason for the multiple shoots was because we were supposed to see Ajax vs. Pirates playing, but there weren’t any games scheduled for both teams together at Greenpoint. However, there were at Newlands, which is a completely different stadium. Eventually the footage from Newlands of the two correct teams was used, and again was shot from a similar angle from the mid point down the staircase prior to the nodal move.
 |
 |
What was your approach to populate the Green Point Stadium?
Once in post, we initially setup tiles and projected onto the geo, by selecting still frames in position first. This was handed to Evelyne Lebond the comp supervisor for the show, who took the shots to final.
She set up the game play and tested the cameras and it all worked, so it then became a case of selecting footage of the crowds moving as much as possible, in some cases retiming the footage so the flag waving could be seen easily.
Finally it was then a solid job of keying and rotoscoping all the foreground objects and integration of the footage within the stadium, matching lighting, atmospherics and generally keeping things consistent. No mean feat when dealing with such a large projection. All compositing was completed in Nuke.
For the exterior helicopter shot where we follow the Landrover into the car park, there was a selection of tiles shot of the crowd in position from a rough mid point in the helicopter move. The biggest issue was that these were all handheld from a helicopter, so they needed to be repositioned, stabilized and all in place so that they could handle the push in, and hold up as far as resolution was concerned.
In addition to this we had to fill the car park full of cars, add more cars coming up and down the street, remove rigging, cranes and lights.
Again, once initially designed and laid out this was up to Evelyne to complete.
 |
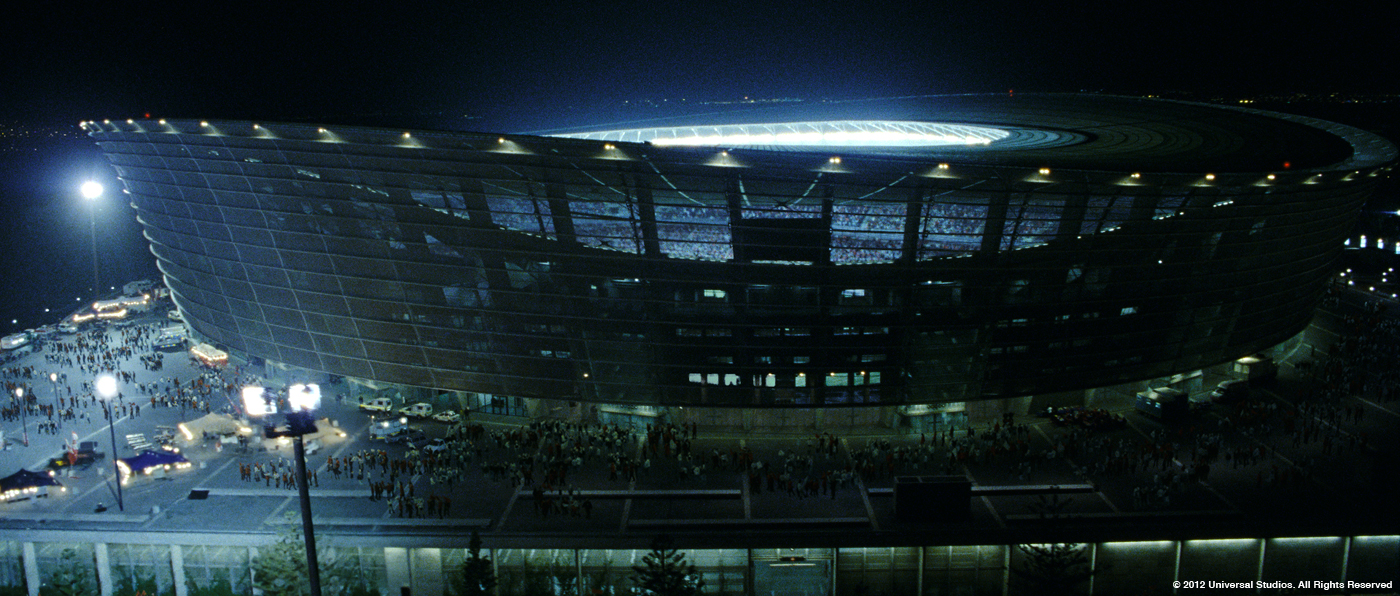 |
For the first exterior Stadium shot, where we see a helicopter move screen left to right, establishing the stadium in full, we again had to add a crowd both outside and inside.
For the interior we were able to reuse the projection setup from the interior shot already completed, and for the exterior we did a second crowd element shoot in Vancouver.
We shot multiple passes of 20 crew members in outfits waving flags, on a green screen in daylight. The crowd was shot from one camera position on a 7D again.
Once keyed and prepped, these groups were projected onto tiles throughout the front of the set. We were able to accurately position the crowd, as the stadium geometry was available and the camera was supplied via matchmove, the setups were all done in Nuke. There were roughly 20 groups of crowd retimed and repeated another 111 times, projected in different positions until the outer concourse was filled. This gave us several thousand extras in place.
To work out the tiling setup and the crowd shoot, we actually initially setup with a crowd shoot from another previous show. What this enabled us to do was work out numbers, position and whether or not the actual approach would hold up to 2D only.
This setup did save time but was an incredibly complex nuke setup, which took a lot of time and patience to pull together.
In addition to these shoots and setups, to cover our bases we shot 7D and film footage at two actual games at both stadiums from as many vantage points as could be arranged. This also worked out for us as late in the day several new shots of actual game play came about without crowds. We got lucky and had the angles in camera from this footage, with a combination of tiling the footage and matchmoving and rotoscoping we easily managed to bring these shots together.
 |
 |
Can you tell us more about the chase on the roofs in Langa?
About mid way through the film, Frost arrives at the Langa Township in Cape Town where he meets his old friend Carlos Villars.
Throughout the scene which starts with an establisher of the Township from above, and culminates in several cranes shots above the Township where we see the chase happen, we had to set about extending the Township and closing gaps in the road to help get across the overall claustrophobic feeling of the location.
The cars were crammed into tiny ramshackle roads, and the mercenaries and the heroes are seen jumping between similarly ramshackle buildings.
We took a huge amount of photographs of the location both in the daytime and on the night of shooting, getting up on roofs and cranes to see as much from above, and running round the streets getting as many variations and angles as possible.
Again, the work wasn’t initially considered, but once we all saw the edit there was a feeling that the areas were not full enough, and that there was a risk of them feeling staged and not real, even though they were.
So Mitchell Stuart, the matte painter on the show, working in combination with Jesus Lavin, the lead compositor for the sequence, set about wading through the mountains of stills photography to find similar lighting scenarios and angles that could be used, and then daylight versions that could be relit if needed.
Jesus, working with the matchmove team, set up geometry in Nuke so that Mitch’s matte painting could be set up and tested in the comps to see how things were working. Again this was a relatively smooth extension that took patience and accuracy to set up.
Are there other invisible effects that you want to reveal to us?
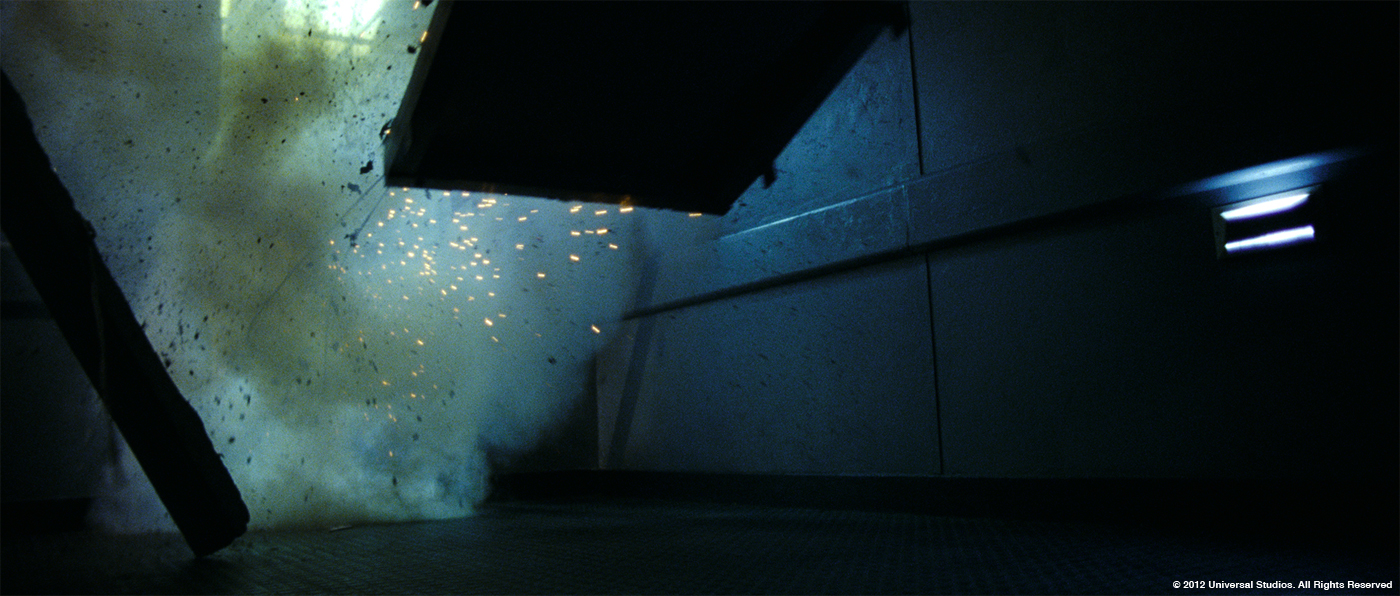
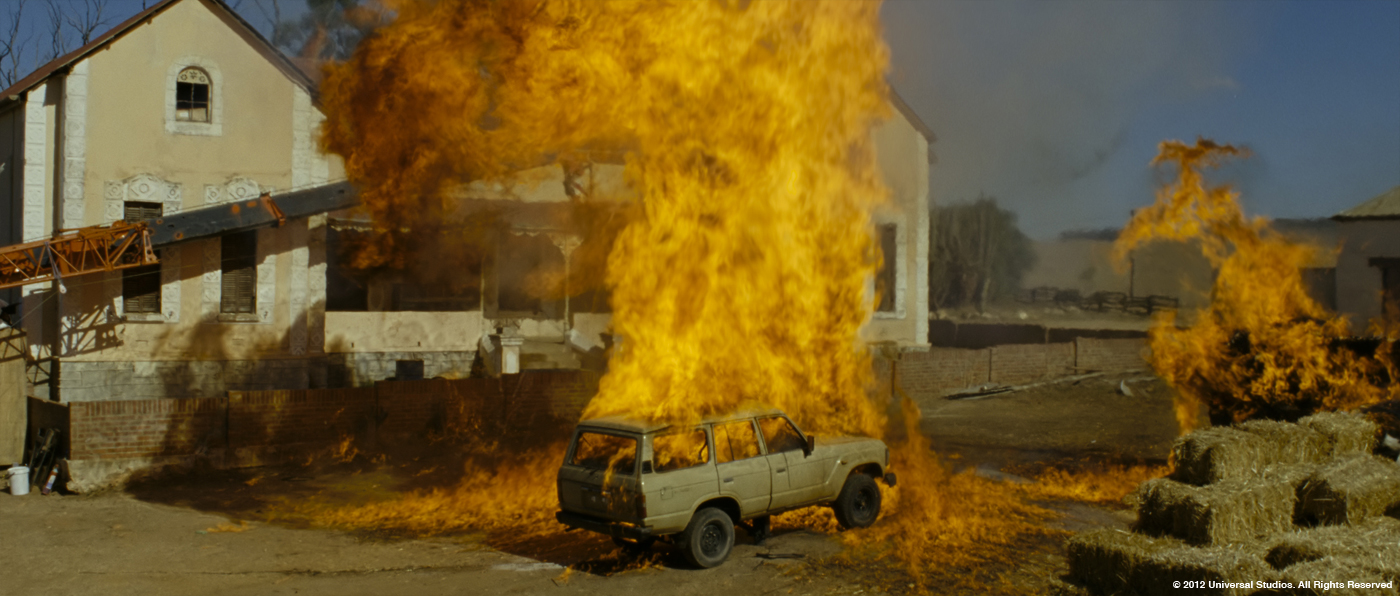
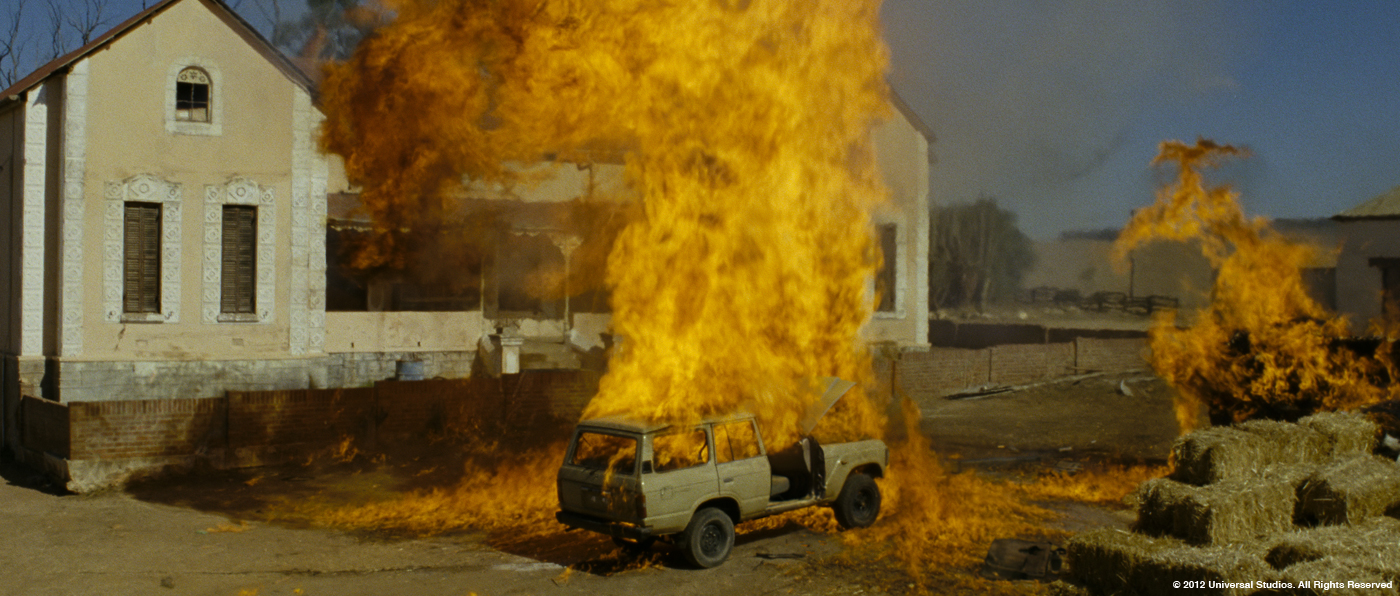
Explosions also played a pretty big role. There is one key explosion sequence in the film, which takes place at Safe House 2 in the countryside, where Barlow (Brendan Gleeson) comes out of the house and stands in front of a burning car, which ultimately explodes, sending him flying.
To augment the scale of these explosions we opted to digitally blow the hood up and throw out engine parts, one of which narrowly misses Barlow’s head. This set up was seen from 3 shots, and the fourth seeing the other side where we also digitally blew out the passenger door.
The engine parts were an FX simulation by FX artist Nik Slotiuk, the pieces were all designed and textured by Jamie Gigot.
Jamie essentially supplied a collection of pieces that could be positioned in different ways and with several options and variations, some large some small.
The simulations took a few iterations, playing with amounts and scale, and little extras like glass towards camera and bumpers flying off, over time as the shots progressed I asked for more and more pieces from Nik, which we think he enjoyed doing, what FX artist in his/her right mind wouldn’t want to blow stuff up!
A handful of pieces were isolated for animation to take and manually animate, for example flying towards Barlow or the hood bouncing up and down, and finally the door flying off. These animations were created by senior animator, Chris Derochie.
All of these pieces were composited in combination with practical elements by Eric Ponton and Virginie Goulet in Nuke, which also entailed rig removals, adding an interior to the passenger side and inside the engine block.
All the four shots played out well together, making a larger seamless explosion seen from multiple angles.
Also – with films of this nature there is a body of fairly standard VFX work that shouldn’t go unnoticed.
For safety reasons throughout the filming process stunt doubles are used, and practical SFX cannot be used or doesn’t quite work out, and finally all these deaths need some gore! So throughout the film Image Engine’s compositing team tackled face replacements, added muzzle flashes to guns, and squib hits and sparks to walls from gunfire, and finally peppered the deaths within the gun battles with gore/blood seen flying from exit wounds. This was always aiming to be relatively subtle and well integrated, which was the biggest challenge. This was a considerable body of work that came off without a hitch.
 |
 |
What was the biggest challenge on this project and how did you achieve it?
Really there were two big challenges, which were the fully CG van crash into the wall and the crowds sequences.
The biggest challenges being how to manage the shoots, how to maintain the quality of the CG, and come up with a conceivable yet violent enough move, and finally how to integrate all these elements seamlessly.
Was there a shot or a sequence that prevented you from sleep?
I hate to say it, this was a really smooth show, so I got all my beauty sleep! But needless to say there were challenges, and again these really came down to the crowd work and the main crash, but it was also a considerable challenge to come up with the whole body of VFX work and maintain this within budget and keep everyone happy.
What do you keep from this experience?
I think the biggest lesson on a show like this was how to improvise and manage expectations at the same time.
Also how important it is to have a close working relationship with production.
A show like this changes by the minute and if you don’t have a solid foundation in place you will miss the changes and pay the price later!
How long have you worked on this film?
Just over a year. We started preplanning at the end of 2010 and finished up just after Christmas 2011.
How many shots have you done?
378.
Any final thoughts?
SAFE HOUSE was a lot of fun from day one – it was just one of those projects that had such solid foundations behind it, with DOP Oliver Wood and Editor Rick Pearson on board. I can’t say enough how awesome the crew was at IE, and how everyone just got on board, worked fast and enjoyed the ride.
A big thanks for your time.
// WANT TO KNOW MORE?
– Image Engine: Dedicated Page about SAFE HOUSE on Image Engine website.
© Vincent Frei – The Art of VFX – 2012


