On last month, Simon Carr explained to us in detail his work on EXODUS: GODS AND KINGS. He speaks to us today about the impressive work of Method Studios on the new sci-fi movie by The Wachowskis, JUPITER ASCENDING.
How did you got involved on this show?
I joined JUPITER ASCENDING in January 2014 – at that point, it had been in progress at Method London since August 2013 with VFX Supervisor Stephane Naze. I was asked to take on Supervision for some of the sequences in order to spread the load of work. Method had been involved on the project for some time as our Art Dept had been part of the film’s concept art team for two years before the work began in post.
How was your collaboration with The Wachowskis?
In post production, we did not have too many interactions with the Wachowskis as they had a lot of vendors to visit and a huge number of worlds to oversee, but on the occasions on which they came in to our facility, they were very supportive and friendly. I had the feeling that what Lana and Andy most enjoy is getting to see really cool and beautiful images and allow artists the space to explore possibilities around the brief.
How did you work with Production VFX Supervisor Dan Glass?
Dan Glass is Method’s Chief Creative Officer as well as the Production VFX Supervisor for the film so our team got great access to him around his very busy schedule. He was our main point of creative contact through post-production and we were in regular contact via both conference calls and cineSync whilst the production was based in Chicago and later in person when the post-production phase was coming to a climax in London. At times, these sessions were daily, but in general it was a few times a week that we were in contact.
What was their approach about the visual effects?
The VFX were handled by quite a large number of vendors with different facilities handling different sequences and aspects of shots, so there needed to be a high degree of collaboration between studios and co-ordination and communication on behalf of the production. We were able to make our own decisions with regard to the technical approaches, but we had a large collection of concept art to help with the look of the work.
How did you organize the work with VFX supervisors Stéphane Nazé and Matt Dessero?
Stephane Naze originally began as Supervisor in London for all of our work, but as that was a lot for one person to handle, I was asked to help with some of the sequences for the last six months or so of the project. Matt Dessero supervised the work carried out in LA, which was largely separate to our work in London.
What references and indications did you received from the production to create Alcazar and Orous?
As our own art department had been involved in the development and gestation of the two environments, we had direct access to all the material that had been produced. This consisted of both large-scale concept art and mood boards.
How did you approach the creation of these two locations?
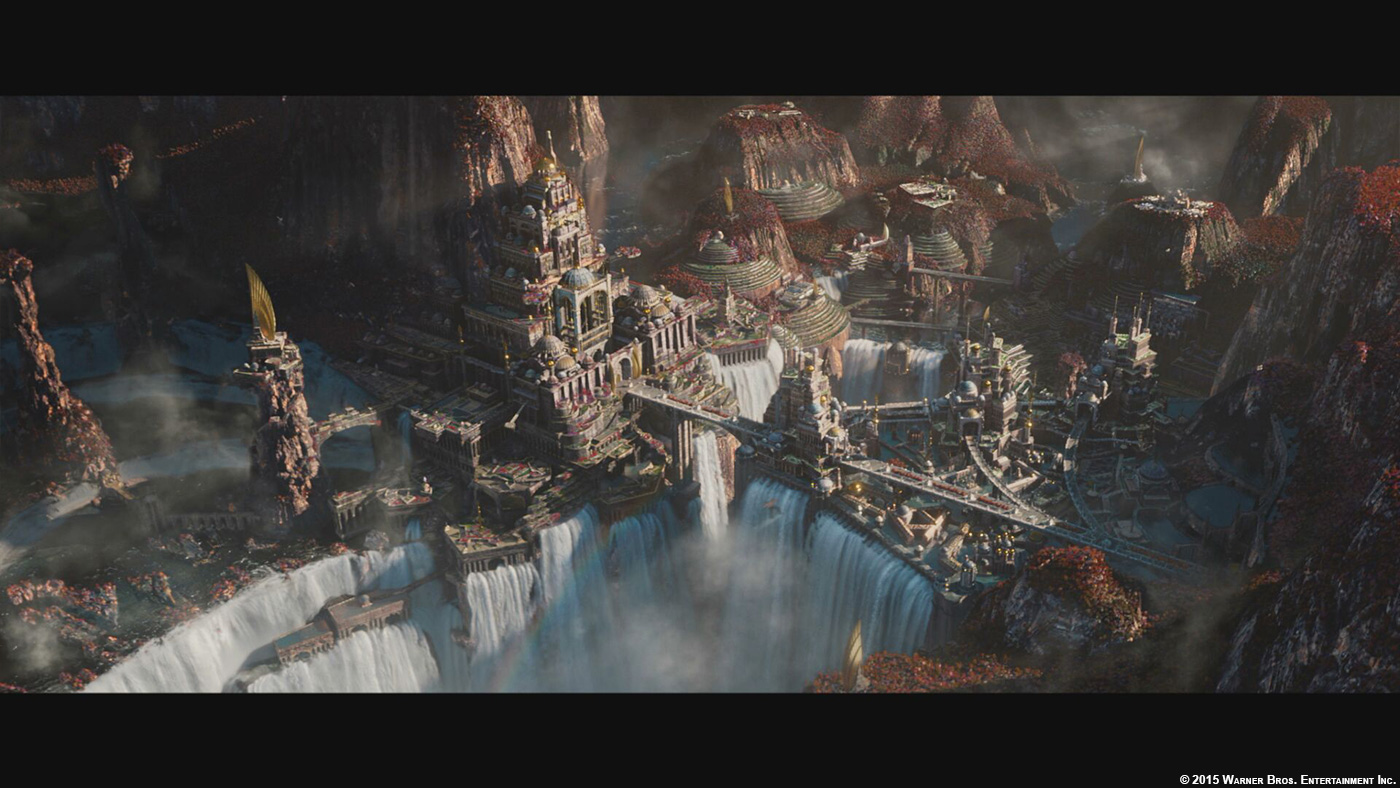
Kalique’s Alcazar is a huge palace built in an environment dominated by towering rocks and waterfalls which have been carved into a basin over time but which also bear the effects of millennia of pleasure garden-building by Kalique herself. We needed to create this landscape and populate it with the exotic red-leaved plants of the planet Cerise on which it is found. Initially, the plan was to achieve the shots using a DMP approach, although as the sequence developed it became clear that it would be necessary to build a CG environment on which to project large-scale, detailed matte paintings and textures.


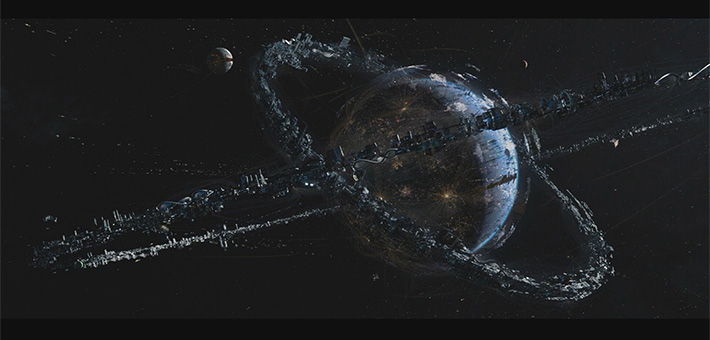
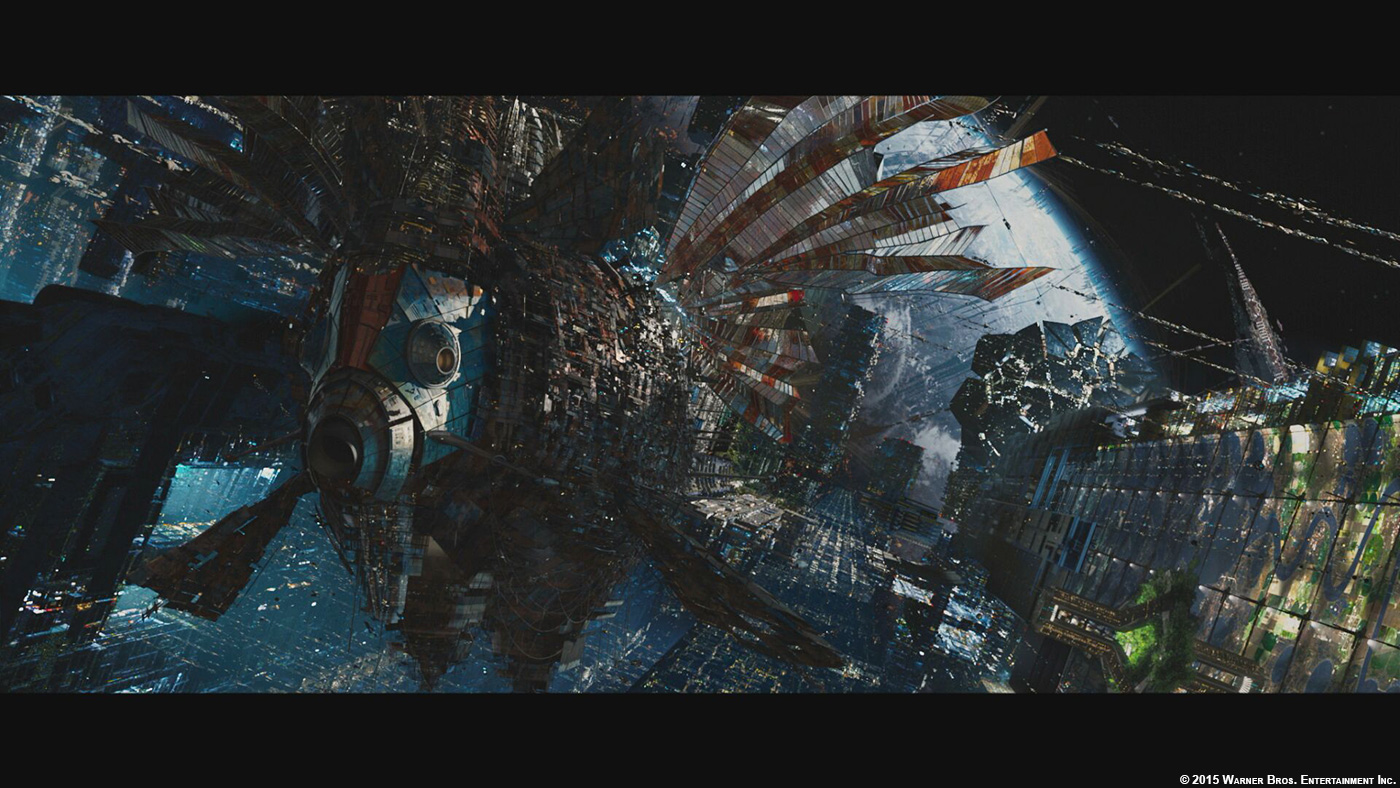
Orous is an even more massive environment, comprising the home planet of the human race and surrounded by accreted rings of habitats and industrial zones that have developed over millennia. Achieving the scale required whilst not getting lost in the sheer complexity and detail of the images was the main challenge and for this, we again employed a combination of projected DMP and full CG modeling.


These locations are really big. How did you handle this aspect?
The main space/ time saver that we employed for both sequences was the use of projection. Once the lighting was set, we were able to bake the look into the projected images and this saved a lot of complex rendering. As we do not have the luxury of a massive render farm, we have become adept at optimising our approaches to achieve the best quality image possible with the least amount of disk space and render requirement. We also made extensive use of compositing to combine elements to, again, reduce the CG requirements. This meant that anything which had to be CG (vehicles, reflective surfaces, water for example) could then be achieved this way whilst not becoming a burden.


Can you explain in details about the creation of these two environments?
For the Kalique environment, we worked with a Maya base for the full environment put together by our Lead CG artist on the sequence. This included base geometry for all of the cliffs and pillars of the environment along with a fairly detailed model of Kalique’s Alcazar. Using Word Builder the landscape was then weathered and Vue used to generate some naturalistic rock textures and vegetation.
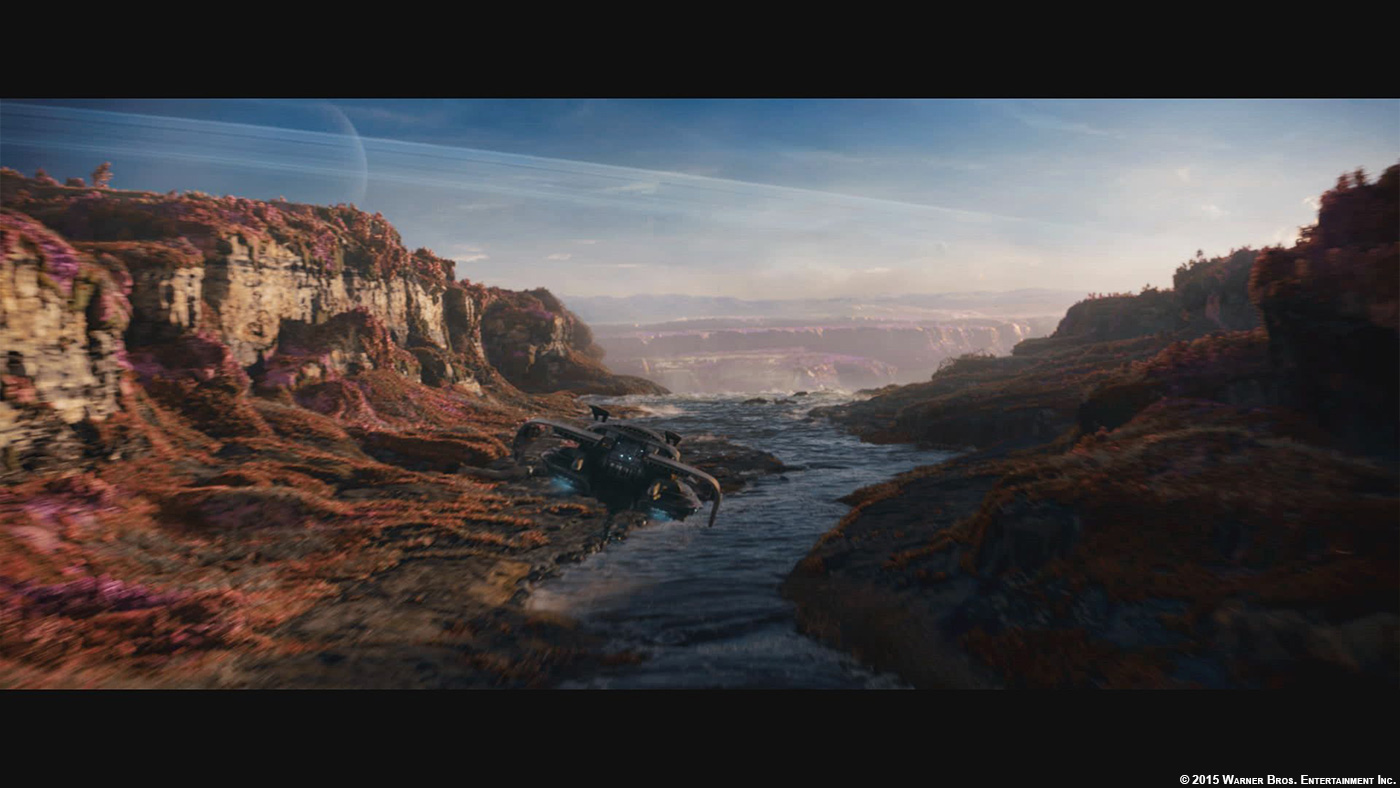
A combination of Vue and photo-texturing was then used to add detail and decorative features to the buildings in the landscape which were resupplied to the Maya scene to be projected onto the original geometry. Where trees and other vegetation broke the line of the original geometry, cards were added to catch them. Our CG sequence lead then produced a materials render for gold and glass elements in the landscape and water surfaces. For the many waterfalls, we projected live-action footage acquired on a shoot in Iceland extended and enhanced with Houdini water and cloud elements.


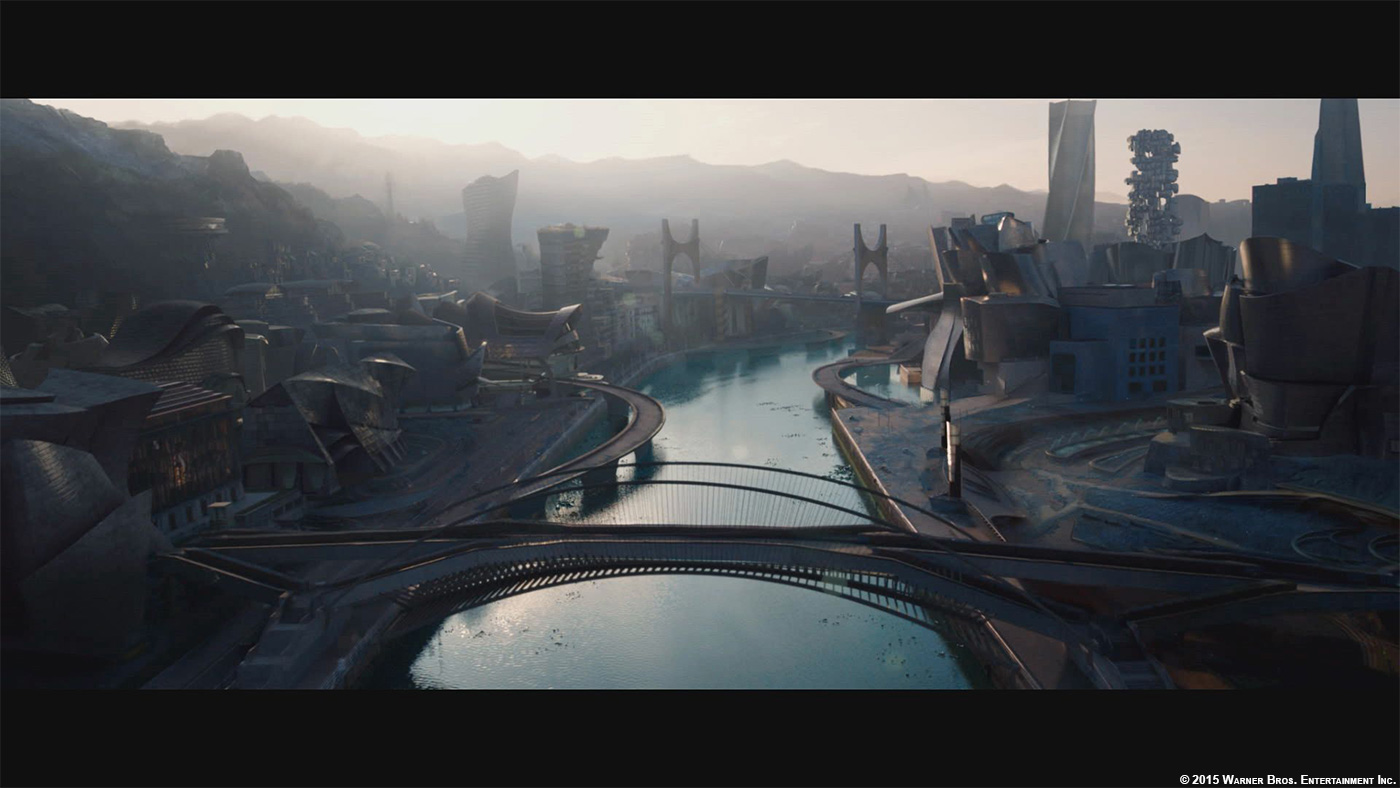
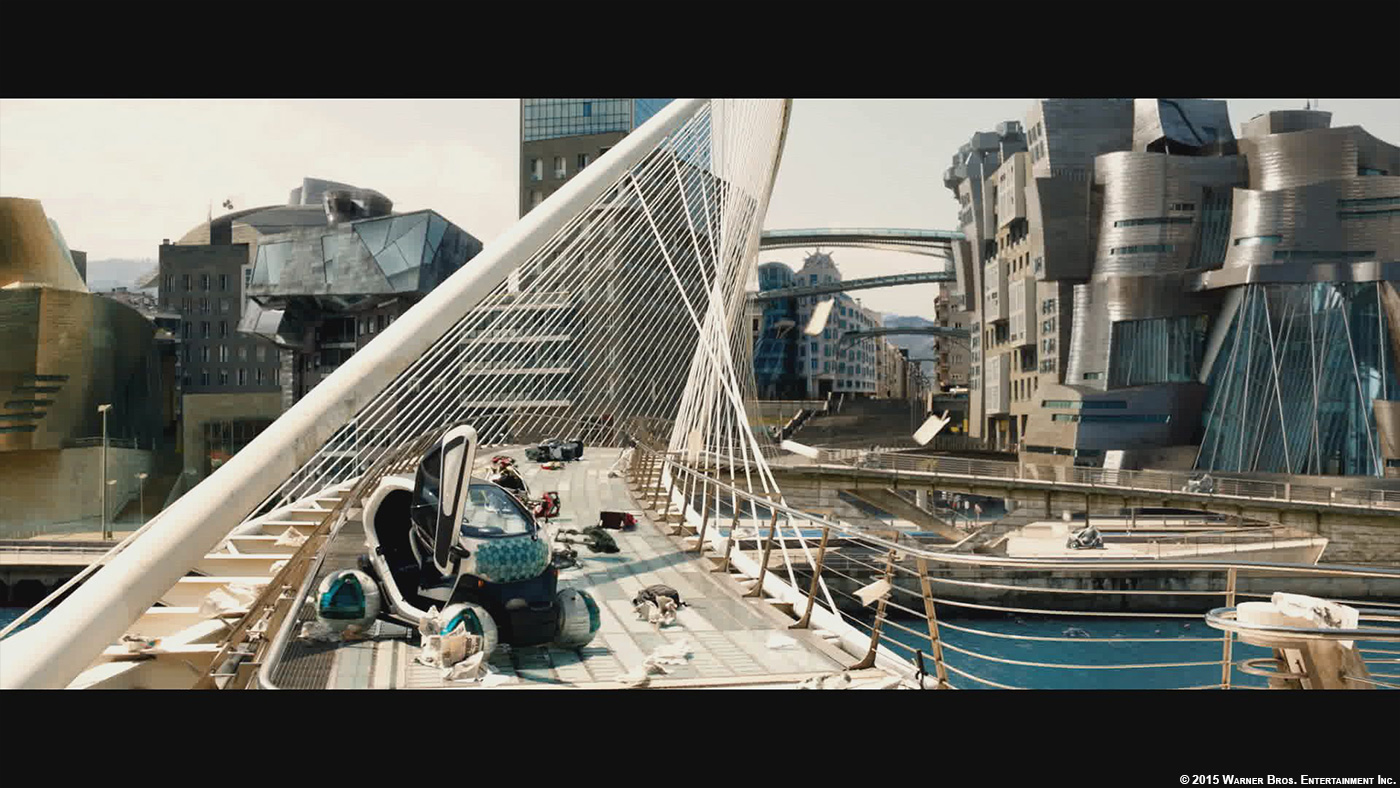
For the Orous shots, we began with detailed concept images for the route from which we then created basic geometry onto which we could project complex DMP elements such as a large-scale agricultural landscape. We then built some full CG elements, such as some star gates, the rings of Orous, a gigantic junk-ship in the form of a vast fish and masses of traffic which were incorporated into the 3d scenes to help give a sense of logic and purpose to the teeming worlds. For the final approach to the Commonwealth building, extensive DMP was used, projected onto some simple geometry, for the main buildings and landscape (including an homage to 2001); the FG object across which we approach this landscape was modeled and textured in Maya with point and volume lights to sell the scale.
How have you worked with the others VFX studios and the asset sharing?
Although JUPITER ASCENDING was shared amongst a number of studios, the times had needed to share assets was relatively few. In most cases, vendors were supplying part-comps to one another with split-Finals handled at the compositing stage. The main assets that we needed to share were Caine’s shield (which was a set-up created by Double Negative and for which our comp lead was able to visit them and discuss how the passes were put together and our lighting lead to render corresponding passes in our Arnold pipeline); some FX set-ups were shared, but in most cases were base set-ups that were then adapted to the differing requirements of our scenes.
Although we did receive the Aegis cruiser model and textures from Framestore (as we were both rendering in Arnold, this worked well), we didn’t need to render it in any final shots: we shared cameras on a couple of occasions with Framestore, and received the corresponding renders.
Can you tell us more about your work on the Kalique Fermionic Bedroom?
When Jupiter first awakens on an alien world, it is in a bedroom in Kalique’s Alcazar and she is floating – which is a surprise for her. For this, Mila Kunis was shot using a rig which raised her above the bed and also allowed her to swing around and onto her feet. Since the bed uses one of the story’s main technologies (fermionics) to provide this flotation, we needed to add floating hair, extend her dress so that it also floated and add the beam element, which is a blue column of ‘anti-gravity’ in which small particles glitter and move around objects within the beam.
What were the challenges with her hair and dress?
The main challenge involved in replacing her hair and dress was to balance the ‘anti-gravity’ feel with a sense of beauty and gracefulness so that her hair floated but did not simply become a like she’d been shocked. A combination of Yeti sims and hand animation allowed this for the hair and for the dress the approach followed a base cloth sim in Maya combined with Houdini animation for the complex ribbon elements which cover the dress.
Can you tell us more about the Crew of the Aegis?
The Aegis are a sort of cosmic police force in the story and our team handled over 100 shots in which they feature. In the story there are many characters who have genetic or robotic enhancements, or are robots with human faces. In the crew we added robot elements to Gemma Chatterjee (mainly her head, neck and wrists), a small trunk to the pilot Nesh, and many smaller enhancements to other crew members. We also enhanced, replaced or adjusted screens and control consoles that the crew use whilst in flight.


How did you enhanced Gemma and Advocate Bob?
Gemma (from the crew, above) and Bob are robot characters with human faces. Their performances were shot as part of the main unit action, making them a reactive part of the scene, which gave them a natural, interaction with the other actors. On set they wore an indication of where their robot parts would be and then in post, we body-tracked the performances, painted through to the plate behind and then added the robotic elements. These had been extensively concepted, which made modeling, texturing and look-dev more straightforward as we knew what we were aiming for early on.


In the case of Advocate Bob (who became one of the most loved characters in the show during post), we were able to keep one CG artist on the whole sequence who was able to develop a complimentary animation performance to the actor’s own.


Gemma has less obvious mechanisms within her head, but there are many gears and pistons working which add subtle details that help the overall sense of coherence. In Gemma’s case, we also added slimmed metallic wrists, and because the rubber outfit that was used onset occasionally wrinkled, we also needed to develop a comp-based approach to smooth out her ‘skin’.


Was there a shot or a sequence that prevented you from sleep?
Nothing specific, although being such an immersive world that we were building, I often had lots of ideas and options in my head which can be hard to let go of when trying to sleep.
What do you keep from this experience?
It felt like an important moment for Method London, showing that we can handle significant, complex work and large numbers of CG-heavy shots. It was a good showcase for our adaptability and spread of talents.


How long have you worked on this show?
I worked on the show from January 2014 to the last finalled shot in early June 2014; but Stephane Naze began in August 2013, we had CG teams on set from about May 2013 and concept artists who had been working with the Wachowskis and Dan Glass for two years prior to that.
How many shots have you done?
In total, Method London delivered about 320 shots.
What was the size of your team??
We peaked at a total of 89 with about 70 of those being artists in a mix of concept, DMP, CG and Comp.
What is your next project?
After JUPITER ASCENDING I supervised shots in London for THE PURGE: ANARCHY and then moved on to Ridley Scott’s EXODUS: GODS AND KINGS. We have other big projects in production and will be announcing them on our website when we have permission to do so!
A big thanks for your time.
// JUPITER ASCENDING – VFX Breakdown by Method Studios
// WANT TO KNOW MORE?
– Method Studios: Dedicated page about JUPITER ASCENDING on Method Studios website.
© Vincent Frei – The Art of VFX – 2015


Great job on the designs and visual effects people! You’ve done a fantastic job of creating a truly massive and impressive-looking universe for this film.